background

Wednesday, October 28, 2009

Today the Fabric Spoke to me and I listened!


One of my Etsy friend told me that fabric speaks to her. Today, I heard it and I listened. I had a request for a red, black and white Expression Cover. So, I sent out some photos and my client picked the fabric. She asked me to choose more red or more black. I love red! So, the biggest piece is red. I had considered using a lime green on the sides for fun, but once I pieced the body portion and saw how elegant it was, I knew I had to finish the sides in the same colors as the piece they neighbored. I mean the fabric spoke to me. And then it said, "Ribbon Rose embelly! No, fabric yo yo for me!"
I added some ribbon leaves in the lime green and love it! Have to say that I love making covers for paper crafters! Even if they pick the fabric or the colors, their design sense if wonderful.

Saturday, October 24, 2009

2010 Planner Cut file to Share


I have a planner addiction! My planner of choice right now is the M Eye Book. It all started three years ago while attending an end of year crop at Archivers. The planner and three pages were included in the price of the crop! Now every year, I return to Archivers and get a new planner (with a coupon). I make a new cover and move my photos from last years planner to the next year. Can you believe it is gonna be 2010?!
I know that it is only October, but if you have school age children you may want to start your planner early like me! So, here is my cut file for my cover. Made with Home Decor, Home Accents, and Doodletype.
I am also going to share my favorite pages. The first is a photo of my Mother. She passed away at the age of 61 and every photo I have of her is precious! So, you know she had to be in the planner! The stamps are CTMH and Autumn Leaves.
Then a picture from a visit to Lake Michigan, a trip we make every year and a treasure from my childhood I am determined to share with my children.
Next a photo of some of my family. I loved the ribbon and the silhouette of them both in the baseball caps.
Another tip, if you use this planner and hope to one day move this photos to an album, cut the page 8 inches x 12 inches, and fold it in half. Scrap both sides and insert it in the planner. Then when you move it to your 12 x 12 album, you will only need to glue it to your 12 x 12 page and add a title for journal block!
I will try and post my back cover cut file later...

Friday, October 23, 2009

My ScrapMaBob is here!


Thanks Christmas with the Cricut and the Original Scrapbox! I just got the ScrapMaBob delivered today and I love it. I had another similar drink holder trash bag by CM and knew it was a good thing. But I have to say I like the ScrapMaBob better. The cup holder is bigger, the trashbag is bigger (and I won't need to get refills), and I like that the trashbag mount is on the front of the cup holder, not the side. When you are at a crop, it is sometimes too cozy with the side mount.
The third picture is of my CM cup holder trashbag.
I must confess though that for both products I felt the trash bag was just not pretty enough. If you follow my blog, you know I am looking for excuses to get out the sewing machine. So, for both, I made my own trash bag with Michael Miller fabric. I think both companies would do better with a prettier bag. I have seen the work you ladies make and you love beautiful things. I actually considered making bags for the CM cup holder, but the wire for holding the bag takes too long to bend and it is difficult to make. Now I am wondering if anyone might be interested in a bag made to fit the ScrapMaBob...

The black bag pictured is the one that came with my ScrapMaBob. And I would like to say that this cup holder/trashbag is a tool I suggest you have doubles of, one for home and one for the crop! I always have a bag packed with a paper trimmer, scissors, and adhesive. Then I can get ready for a crop and know I have the basics. I am now adding a cup holder/trashbag to my packed tote!

Sunday, October 18, 2009

A SCUT Pom Pom Trim file to share


Well, after spending about an hour and a half on my DS pom pom file, I was determined to try my SCAL 2 again! I just knew there had to be a better, faster way. This time it took me 20 minutes, and I think I could've been faster, if I used it more often. It's has a size for the card maker and one for the scrapbooker. I made the trim bigger than the card so that the edges could be trimmed. Find the scut file here (SCAL version 2). I am also happier with the look of this trim. I used the V from Arial font to hang the pom pom part. I struggled in DS to find a piece to use, but did not think of a V!

Pom Pom Trim cut file and Two Cards to share


This weekend I got a chance to get out and crop with the S.C.R.A.P. Guild of Northern IL and my sisters. I had a lot of fun and was happy with my work! Here are two cards I made, one for Christmas With The Cricut (I won a Scrap Ma Bob from one of their sponsors) and the other is for the sponsor.
On the Christmas Thank you I used Basic Grey paper, miscellaneous card stock (from my sister, so I am not sure of the brand), a micro pom pom trim (from the Sugar Pink shop on Etsy listed in yesterday's post), and SU border punch and stamp, my sewing machine, and my Storybook cartridge.
For the Pom Pom trim cut file thank you card, I used Close to My Heart paper and stamps, colored card stock, DCWV Glitter mats, Me and My Big Ideas bling, Clear Art Stamps Sew Special (for zig zag and button, and my Cricut Storybook! For the cut file, I used George and Storybook.
You can find the cut file here. After spending quite a bit of time on the cutfile, I realized that there should only be one scallop between each pom pom. So, another opportunity to embellish, I used some bling between the scallopes. I will probably make another pom pom file when time allows. Also, there are two cuts in this file, one for the card maker and one for the scrapbooker (a border cut). Both are adjustable! I am seriously considering purchasing some flocking powder or petal soft to make this pom pom trim have more texture. But the mad money account continues to dwindle as the year progresses. If you have either of these products, please use it on the pom pom and share your picture in the Cricut message boards here. Please help me decide if it is worth the money!
I would love to have your comments on my cut file and please don't sell my file, or use it for a competition!

Saturday, October 17, 2009

Pretty in Pink Paisley a better way to photography my work!!


While visiting Etsy to list my item, I came across a supply vendor who carried wonderful trims! Her shop is called Sugar Pink Boutique. She had the most beautiful photographs of her product and inspired me to improve my own product photos! I had to have the micro pom pom trim, and was so excited to see how Christmas with the Cricut used it around the tag in one of their posts! I love how Sugar Pink used the background and vintage bowl for her photo! Even the bown edge matches her trim!
The problem, how to find back drops on a minimal budget. So, as I usually do when I need help, I called upon my big family (six sisters and four brothers) and asked if they had any unused sheets in pretty colors, or neutral colors. As usual, my sister Marge came through for me! The top photo is a picture with a pink back ground that I am pleased with. It just looks scrumptious to me!
It is a Jukebox cover made for one of my best customers!

Thursday, October 15, 2009

My Favorite Swap: for a Finicky Frog!


Just had to share a photo of my favorite swapped item: a Finicky Frog pin cushion! I won a Finicky Frog pincushion and liked it so well, I asked about custom orders. She checked out my Etsy store and suggested a swap! Boy, did I luck out! She requested one of my scrapbags and in exchange I got a pin cushion. I sent her three different fabrics, and asked her to look through her supplies and see what worked with what I sent. She picked the ribbon, beads, thread and felt. It's enough to make me want to start a new collection of pin cushions! You can find her Etsy store here. I am so impressed with the quality of her work and I cannot say enough about the cost. This is value at it's finest. What a wonderful gift idea for the sewer and quilters in your life!
The mad money account is running low this time of year...I will have to consider more swaps! I would love to do a digi swap for a new banner for my Etsy store...

Wednesday, October 14, 2009

A Matched Set! Cover your Expression and Jukebox.


Just finished up a Jukebox cover to list in my shop. It matches an Expression cover I created and I thought it might be fun for you to see what a matched set looks like. Would this add instant fashion to your crafting space?!

Sunday, October 11, 2009

Snowflake Tutorial & Cut File


If you visit my blog regularly, you know I have been making a lot of snowflakes on DS. Perhaps it is my childhood memories of folding paper and cutting that make me desire to continue to see what I can make with my cartridges and the DS software. So, I thought some of you might like to know how to create your own. Here is my tutorial:

1) Start with a shape that is triangular or diamond.
2) I recommend that you make the shape as big as possible for intricate cuts, so set your object size to somewhere between 5 and 5 ½". Then select the shape. For this snowflake, I used the heart in the Storybook cartridge at 3 inches.


3) Place the first object at the center of the matt, so that the smallest point falls on or near the center of the matt.
4) Select the weld
5) Select copy
6) Select paste
7) Go to the Shape Properties Box and type 60 degrees into the Rotate box. This is assuming a 6 sided snowflake.


8) Pick the heart up at the move handle and move it so that the sides overlap just at the edge; and if your using the heart, the centers will need to be about 1" apart. If you use the Christmas tree shapes you will have to stretch the tree so that the side overlap from the point to bottom.


9) Select copy and paste again
10) Go to the Shape Properties Box and type in the degrees 120 (this is your original 60+60)

11) Pick the heart up at the move handle and move it so that the sides overlap just at the edge; and if your using the heart, the centers will need to be about 1" apart.


12) Select copy and paste again
13) Go to the Shape Properties Box and type in the degrees 180


14) Pick the heart up at the move handle and move it so that the sides overlap just at the edge; and if your using the heart, the centers will need to be about 1" apart. Your heart in this case, should mirror the heart you placed on top. You may have to do some fine adjusting with the hearts in between.


15) Select copy and paste again
16) Go to the Shape Properties Box and type in the degrees 240


17) Pick the heart up at the move handle and move it so that the sides overlap just at the edge; and if your using the heart, the centers will need to be about 1" apart and mirrors the hearts on the other side of center line of your matt.

18) Select copy and paste again
19) Go to the Shape Properties Box and type in the degrees 300


20) Save your file and do a preview to see your results.


So, take a look through your cartridges and give this a try. You will get a much better result than if you use our fold and cut technique from childhood. If you do give this a try I would love to see your results. Visit this Cricut message board post and leave me a picture or a screen capture! For those of you who are pressed for time, I am sharing my 
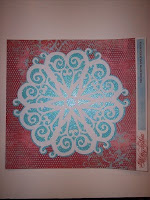
cut file. You will see that I added some circles in the center, so you will need Storybook and George for this cut file. Also, I made a shadow for this cut file. The first picture in this post is my cut file finished snowflake. For the shadow of the flake, I used some glittered paper, cut with my deep cut housing blade. I have found the deep cut blade best for my glitter and metallic cardstocks!

Thursday, October 8, 2009

Swirly Snowflake Cut file to Share


Here is my latest snowflake, made with a swirly Christmas tree from the Christmas Cartridge. Please leave a comment and share my blog with your friends! Here is the cut file.
I will have to borrow the Christmas cartridge for this cut! So, many cartridges, so little mad money!

Fabric proposal for Jukebox


This is just a photo I took for a customer's custom order. She sent me the blue print and I added some items from my stash for a Jukebox cover. When I make custom orders my customers send me color or fabric requests. In this case, she sent the fabric. I then send my customer a proposal for their item in a photograph and they can approve it or ask for more choices (photos to approve). Wonder how she will like this one...oh I am in such a pom pom phase right now. Love how the pink pom pom pulls out the flower in the print!

Sunday, October 4, 2009

Wait it gets better! Another Celtic Snowflake!


It occured to me that if I stretched that Christmas tree from Lyrical Letters I could get rid of the gaps and do a better snowflake. So here it is...and yes I listed it on Etsy as a die cut. I have a secret fantasy to make the front page, and thought this was pretty enough to be noticed. But who knows the secrets of being chosen?!
I love the tiny star in the center and the larger star around it. Did you notice that there are rows of hearts as well? I would love to have a job designing the cut files for a cartridge! To bad I don't live in Utah! I will share the cut file here.

Friday, October 2, 2009

Celtic Snowflake Page


Have you ever gone to a workshop and seen something that you had to have, that has been in the catalog for awhile, but you just never saw it? I mean you went through the catalog, but the item just didn't cause you to notice it. Then, you see it in person, made into a card or a page and you realize that it is beautiful and you want it. I like to see pictures of completed items. So, here is my completed page. I love how the Celtic snowflake is repeated by the snowflakes in the actual Christmas card.
I was very happy with how this file cut! I took a clue from an Etsy designer/store owner Nicole Limbardo and used a lighter weight cardstock. She has some of the finest cuts I have seen from a machine that is not a laser cutter. I set my blade a little lower (4) and my speed at 3.
I wasn't happy with my glue choice though! I used some sheet dots and they were too strong. So, when I pulled up the snowflake from the glue it ripped a little. You may want to try the repostionable dots, I was anxious to finish some I had around the house for 8 years.
If you would like the cut file, please see yesterday's post to download below.

Thursday, October 1, 2009

Celtic Snowflake Cut File to Share


Been a long time since I shared a cut file...I have been on a sewing binge. But, I just got my new Lyrical Letters and I found a Celtic Christmas Tree shape. I played with it a bit. Copying it and rotating it 60 degrees each time for six shapes and came up with a snowflake. I will have a new page for my Christmas card album! If you down load the file, please leave a comment! Also, files are for sharing, so please do not sell. If you know someone who would like the file please ask them to visit the blog! Thanks!
Here is the cut file.

LinkWithin

Related Posts with Thumbnails