background

Tuesday, May 31, 2011

Babies First Scrapbook with Cricut Imagine!


Just finished making a baby scrapbook for my son's teacher's baby and had to share it! I was so excited to try printing on fabric with my Cricut Imagine! I used the Imagine More Card cartridges along with Songbird (babies name on front cover). Below are more details.


I started by ironing heat and bond to the back of some cotton canvas fabric. I then adhered the paper back of the heat and bond to my Cricut mat with the fabric face up. I used white blocks to fill the dead space and then the font from Song bird to write the babies name: Esme. I filled it with the pink from Imagine More Art to match the images in the next step.


Once that was printed, I pieced some scrap calicos together for the back of the cover and fused some batting to that. I sewed the front cover, and pieced calicos with right sides together in a square, leaving an opening to turn it right side out. I clipped excess fabric in the corners and turned it right side out. To highlight my Imagine More image, I zig zagged around it. Because the heat and bond, the machine skipped some zig zags, but I love the look. I also stitched "look" and and wrote "in."


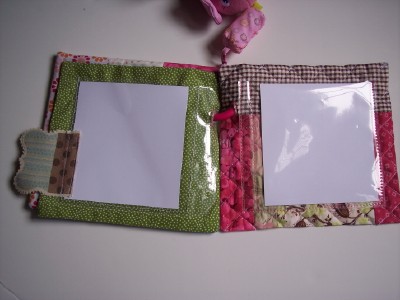
For the inside pages, I used a Close to My Heat 6" page protector, and cut the back side off of the page protector, to make it safer for the baby. I would like to add here, that babies should never be left alone with albums with page protectors!!! These were then sewn to the quilted pages. I added some tabs also printed on canvas using my Imagine.


The heart image on the back cover was also from Imagine More Cards, and I trimmed the edge with my pinking shears and zig zagged it one. To bind the album, I knew buttons, grommets, etc were choking hazards, so I purchased a toy for dangling on the car seat and threaded it through button holes in the covers and pages. The pink bird on it so so sweet and their is a gentle bell in the toy too!

Monday, May 30, 2011

A Graduation Card To Share


Just a quick graduation card to share today. I made this with my Cricut Imagine, using one of the pre-loaded images (yellow marquee), and my Wild Card Cartridge (For the Graduate quote). I love that I can make up a graduation card for anyone with their school colors on the Imagine, even if I don't have the right color cardstock on hand! To get the quote inside my marquee on the Imagine, I printed my marquee first. Then I used white boxes to place my quote in the marquee and reloaded the paper with the marquee on it. I then printed the quote. It is a bit of a estimation game, but it works!

The black paper is embossed with Tim Holtz's Notebook folder. I added some measuring tape ribbon (not sure whose as it has been in the stash for sooo long), a flower, a chip board hart and a few buttons.

Sunday, May 29, 2011

More Moxie Fab Inspiration from Tuesday's Trigger


This weekend I took a look at the Crafts Meow blog hop/release and saw the most fabulous flower at a blog called Note to Self, by Lindsay! Such a beautiful card and such a simple technique, I had to give it a try! Now, I don't have a lot of Copic markers, just enough to color skin and one lonely orange marker. So, I pulled out my Chrome Orange marker and checked my cardstock to see if I had an orange piece. I used a Stampin' Up set called Fifth Avenue Floral that I got at a garage sale for $4.00, with my Close to My Heart White Daisy Die Ink. The sentiment is Close to My Heat as well, For Every Occasion. It wasn't' showing up well, so I went over it with my Uniball pen.


And since my card had orange in it, I decided to add some red to this fabulous look and post it to the Moxie Fab Tuesday Trigger! I am just a wee bit obsessed.


And speaking of fab, you have to see my yellow tree peony! It has the scent of lemons! Wish I could create the beauty mother nature does! This tree peony is supposed to get as big as a lilac bush!

Saturday, May 28, 2011

Guest Designer at Art Glitter


This is my last post as guest designer for Art Glitter. I had so much fun playing with Art Glitter and really loved the different types of glitter they carry. I am also a fan of their Ultra fine tip and glue.


This time I scrapped a shaddow box to retire my sons lovey. You can find the details at the Art Glitter blog here.

Friday, May 27, 2011

More Imagine Covers with Michael Miller


I love the colors and pattern in the Michael Miller Fabric! When I first started making Cricut dust covers, I tried to include a little Cricut green in every cover so I was drawn to this fabric. I also added a bit of the micro pom pom trim to the ruffle. Fun! Find it at my Scrapguild.etsy.com shop.

Wednesday, May 25, 2011

This Week's Tuesday Trigger at Moxie Fab World


I'm jumping back into the Moxie Fab Tuesday Trigger. This week the theme is the Pyrex Effect and their inspiration photo is above! I made my Card with my new Cricut Imagine. Now, you might be asking yourself, why use the Imagine for a solid image? But, one of the beauties of the Imagine is that I can print card stock in any color I need and even match an RGB code of one of my CTMH or SU stamp pads! I also love that I can use small fonts in the print mode only like I did with Soar! I then cut the Bird and the shapes all with my Songbird cartridge. I added three small seed beads for the center of the flowers. I chose this marquee shape because the curved corners reminded me of the handles in the Pyrex bowls. I will use this as a Graduation card.

Tuesday, May 24, 2011

Two for Tuesday Imagine Ideas


I just received my Imagine on my birthday and have NOT had enough time to play with it yet! So many things to get done before the boys start summer break. But I have played a bit and wanted to share two items I made with my Cricut Imagine.

Now, I must confess that when I first saw the Imagine, I was sure I did not want one. I love layers and texture and thought items made with my Imagine would lack that. But, it's NOT true! Think about using the images in your imagine with your existing dies. I pulled out my My Favorite Things High Tea Doily die and printed out some round images from my Imagine More cartridge. Can you see the pattern in the red scalloped circle? Don't you love it? And the other image is a piece of notebook paper. Wouldn't this make a great journaling block?!

To get the image to print in the middle of the paper, so that I could center it in my die, I used the same technique Linda Kaiser used in her video here. I can't wait to try this idea with my Cricut cartridge doilies. Now if I can just find the time to get the latest version of the Gypsy Sync and Imagine software!

LinkWithin

Related Posts with Thumbnails