I get email notices daily from Oh My Crafts and loved the page layout in todays add. It inspired me to make a cut file for the inside scalloped circle. Today I am sharing a tutorial on how to get inside scallops on a circle in your Cricut DS software and with a little adaption you can also make one for your Gypsy. You will need the Graphically Speaking cartridge and the George Basic Shapes Cartridge to be able to cut this file.
1) Start by selecting Graphically Speaking as your active cartridge, and insert the square with the circle of dots.

2) Now copy the shape and Paste (go immediately to step 3 while shape pasted in is selected).
3) Click in the Shape Properties dialog box and type in the Rotation 33.8. I knew it should be close to 30 degrees and played around with is a bit until I got the circles to just over lap. Your mat should now look like the picture below.

4) Select the outside edge of the original shapes square and right click
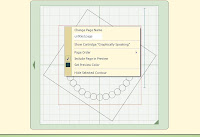
5) In the drop down box pictured below, select the Hide Select Contour

6) Save the file and quit the file, so that you can Hide Select Contour on your copied shape.
7) Reopen the file and repeat steps 4 and 5 on the outside edge of the rotated square
8) Select Weld for both of the shapes above
9) Change the active cartridge to George Basic Shapes and select the Shift Lock and Outline font icon
10) Insert the circle outline shape, and select Weld
11) Size and position the outline circle so that the inside edge falls in the center of your ring of scallop circles, and the outside edge falls outside the scallop circles as pictured below.

12) Check to see the file will cut as desired with the Preview

Now, have I got you thinking about making scallops inside your other shapes?! I know some of you will want to try this technique, and others will want the cut file. I wish I had more time for all my ideas and appreciate when others share their files, so, here is the Gypsy cut file. Your comments are appreciated! Thanks!

No comments:
Post a Comment