background

Thursday, December 31, 2009

Fancy Daisy Edged Circle SVG to share


Here is an SVG to share of a fancy edge circle I made. This one again was made in SCAL 2 with PC Ornaments font. Please consider reading yesterday's post and making a donation to the Juvenile Diabetes Research Foundation. You will find information about a challenge I am sponsoring in the crop and how you could win a $40.00 gift certificate for my shop in the same post! If you do decide to participate, my challenge is number 19. As always, I love your comments! Thanks!
Find the file here.

Wednesday, December 30, 2009

Doiley Edge Circle Cut File to share inspired by Capadia


Just this last week Capadia Designs had a cut file and tutorial on making a doily edged circle with a crown. I just got my Hannah Montana Cartridge and wanted to try it. Here is my version, and a page I made with it!
Before I share my cut file, I want to take a few minutes to ask you to consider a donation to the Crop Out Diabetes online fundraiser, January 29 through February 5, 2010. My niece; who is 10 years old, was just diagnosed this past year. The holiday season was a very different one for our family. Who knew how important counting carbs could be!? How every snack brought into her class room may require checking sugar levels and or insulin doses? I still know so little about this disease, but I do know that it is serious, and life changing. I know of a college age boy who died this year, who had Juvenile Diabetes. It is the fear of every Mother whose child has diabetes.
I am holding a challenge for this crop, with a $40.00 gift certificate for my Etsy store as a prize. You only need to make a small donation of $5.00 or more to participate in any of the challenges. If you have been considering my covers and been put off by price or your budget, please consider making a donation and entering the challenge. Or maybe, you have downloaded a cut file, and looked for my tip button...I don't have one. Files are for sharing, but I would love a donation to a worthy cause as a thank you for my files! To find out more about the Crop Out Diabetes online fundraiser, please click on the links at the top and bottom of my blog or right here. You can find the cut file here. You will need Hannah Montana and George for this cut file. I will be going through my Gypsy and looking at all the crowns for this type of cut file again! Thanks Diane!

Wednesday, December 16, 2009

Cut File to Share: Teachers gift #3


Here is another teachers gift I made, you can find the cut file here. I don't know if you can read my hand writing but it says, "3 reasons I love to teach..." Then the pages of the book say, June, July and August. Funny, and true! I would love to have my summers off with my boys when I find a job!
You will need George, Base Camp, Plantin Schoolbook and Locker Talk. If you don't have the time to make this for Christmas, you could use it at the end of the year as a teacher appreciation gift.

Tuesday, December 15, 2009

My 1st Gypsy project: A Teachers Gift!


I just finished my first Gypsy Project, a mini album for my son's Kindergarden Teacher. Everything in the class room is frog themed. So, I knew I wanted to make a frog mini album. I can't believe I found this frog in the Lyrical Letters cartridge! Did you know he was there?! I did add the toes. I love the toes on tree frogs and so, I added circles from George. We speak of George at crops reverently, what would we do without George!

And here is another gift for the classroom aide...a Christmas recipe book. All the teachers get gift cards, but they seem so impersonal to me, that I like to make a little something. I don't bake, but I do scrap!

Monday, December 14, 2009

Fancy Circle file: Here's what I did!


A while back I shared a SCAL2 fancy laced edge circle cut file. It was my most popular file of 2009. I finally got around to scraping with it, and thought I would show you what I did with it.
My six sisters and I do a $5.00 gift exchange every year. It has become a challenge to see who can come up with the best bargain. This year, I think they will like my gift. A picture of our parents on their wedding day. Just one brother has the wedding album and the only copy of this picture. While most of us have digital copies. I thought they might like a framed copy.
So, I went a little over budget, but not more than $0.30! Hope my sisters are not reading the blog this week!
I used an acrylic frame from Want2Scrap, CTMH paper, and ink, Ink A Dink a Do stamps (on the Mom and Dad label), bling from Want2Scrap and CTMH.
If you would like to get this cut file, please see my older post here!

Friday, December 11, 2009

Preparing Pieces for Assembly


After cutting out your chipboard and paper you will want to follow the steps below before you assemble your purse:
Stamp your purse before moving to the next step. For this purse I pulled out my stitching stamps from Sassafrass Lass and made a scalloped boarder at the top. I used pink embossing powder to add dimension. Add pictures if desired.

Preparing Purse Pieces for assembly
1) Cover chipboard with paper using glue and aligning edges and holes. Allow to dry. Be sure you have stamped and added photos before proceeding to step 2!
2) Cut clear contact paper to the exact size of the outside front purse piece and adhere to both purse front pieces on the inside of purse. Use your Cricut spatula to smooth out bubbles, or a Pampered Chef brown scraper. Repeat on all pieces.
3) Cut two pieces of clear contact paper ½ ‘ bigger than the purse front on all sides. Miter the corners before folding and adhering.
Center over pattered paper and wrap around to the back. Smoothing out air bubbles as you work with a pampered chef brown scraper or your Cricut spatula. Repeat on all pieces.
4) Pierce contact paper with awl, anywhere hole punch or cut with craft knife in the holes cut with Cricut along sides. Repeat the same procedure for side pieces,placing the larger clear contact paper on the front and wrapping around to the back.
5) Attach purse feet to the bottom piece, placing them in from each corner 1 inch. If you cannot find the purse fee pictured at the right, you may substitute over sized brads.
6) Using your purse handle ends as guides, place your large eyelets in the front piece of the purse and the back piece of the purse at the top, centered in the handle end.

Thursday, December 10, 2009

Purse supply list & Crop for Cure Link


Ok, so here is the promised supply list:
Chipboard
Cricut Expression
Deep Cut Housing Blade
Solid Cardstock (for lining)
Patterned Cardstock (for outside of bag)
Purse Handle (Available at most JoAnn Fabrics or Michaels)
4 Eyelets
4 Rings
4 Purse feet (Available at most JoAnn Fabrics or Michaels)
Clear Contact Paper
Ribbon or Yarn
Zig 2 way Glue or Large Xyron Machine
Needle point needle or crochet hook
Scissors
Stamps (optional)
Ink and Embossing powder (optional)
Photos (optional)
Rhinestones (optional)

When you cut your chipboard, use the deep cut housing blade and a fresh mat. This will keep your cuts acurate and make them all the way through your chipboard.

Also, I want to provide a link here for the Crop Out For a Cure, a fundraiser for Juvenile Diabetes. I am planning on offering a challenge with a prize, so if you like my covers check it out! They have some wonderful sponsors and at least one Gypsy to give away. I will have more information on this event later, but if you want to check this out, make a donation or help find more information here. They will even have a crop in Wisconsin in January, but it is too far for me to attend:(

Wednesday, December 9, 2009

Purse Cut File to Share for SCAL2: An Inexpensive Gift


Here is one of my gift ideas to make on the cheap! I collected my cereal boxes for the chipboard. Used Basic Grey Paper, stamps, embossing powder, large eyelets, album rings, purse handles and feet (from JoAnn Fabrics with a coupon)and yarn. It's also a great way to use the paper you think is too pretty to cover with photos or to cut up for small cards. I fussy cut this paper to show off the peacock, and put my photos on the back of the handbag.
I learned how to make this purse from Melissa Johnson, a CTMH consultant. She always has the most wonderful tips in her classes. She used a Zutter to make the holes. I don't have a Zutter, but it occurred to me that I could make a cut file. Also, she used a ribbon with a whip stitch to sew the purse together. I used my crochet hook and some fringe yarn.
In order to not overwhelm you with a long post, I will be making several posts on this project. If you like this, download the file here today, and come back tomorrow for your supply list, then again, for the instructions. As usual, I request you leave your note of encouragement in the comments! Thanks!

Sunday, December 6, 2009

Christmas Tree Cut file to use with Legos to share


A while back Capadia Designs had a post on a Japanese company that is offering punches to work with Legos. I was so excited, and tried to see if we can purchase here in US. No luck yet, but I have children who love legos. So today we tried it make a Christmas tree with our Cricut. Of course, I made the mistake of creating the cut file while the boys played and by the time I got the holes correct on the big block pieces, they had moved on to another toy. So, here are my tips. If you want to make your own hole cut file, the holes on the 2 x 2 block work well on that block only. As I copied mine using the same placement for the 4 x 4 block and the 6 x 6 blocks, the spacing became too big and I spent lots of time, trying to get this to a workable cut file. It is still not perfect, however, it is good enough for my 5 and 10 years olds. Check out our results and if you like this imperfect cut file, find it here.
You will need George Basic Shapes for this one. Please leave me a post of encouragement if you download. Let me see your tree with a picture on the Cricut message boards. I think this would look great with white puff paint, bling, buttons, eyelets and more. I think I know what me and the boys will be doing for snow day crafts this year! Lego Cricut creations!

Friday, December 4, 2009

My Gypsy "Eye Glass Case"


The case that came with my Gypsy just seemed a little to much like a wet suit. So, I had an excuse to sew. Well, here is the eye glass case I made for my Gypsy and a little pull with ribbon and a vintage button for my stylus. I love vintage buttons! Been looking for a place to use this one, reminds be of an acorn. I looked through my stash and found something with black and pink. Not sure why PC chose orange to go with the pink and black and not green.
I cut this without a pattern and got a little over confident. Those of you who sew and have sewn two left legs know what I'm saying. Meant to cut the flap to extend over, but as I usually do, I decided to go with it and use it as an opportunity to embellish. Another item from the stash, a frog. Can you tell I used to work in fashion design?!

Thursday, December 3, 2009

What would you like to carry your Gypsy in?

Well, it's here! My DH has purchases a Gypsy for me for Christmas. So, of course I had to make sure it worked and apply for my $100 worth of cartridges. And as you may know about me, I had to make it clothes or should I say a handbag?
So, I wondered what would I like in my Gypsy cover. Well I want an "eye glass case" style. Like the one Cricut provides only cuter! And since I am a closet messy person, I am also a purse messy person. So, I want a velcro close flap on this case, so it does not fall out into my messy purse. Next one of the women on the Cricut boards mentioned she wants a pocket for extra stylus. Yes, I want that. This style is for running errands that require waiting. Doctors offices, school pickup, etc. Don't really need cords for this. Don't you think the stylus is calling for a beaded pull, or maybe a vintage button pull?
Now onto the purse style. This I want to use when I will be out of the house for a crop. So, it will need to hold the charging cord, and the connection to the cricut cord, and the Gypsy.
Do you have ideas of what you would like to see your Gypsy in? Let me know and I will use your suggestions to make my Etsy version. Anyone who leaves a comment, with your ideas will be entitled to free shipping on one item from my Etsy store. This item may be in stock, or ask me to issue you a coupon for a future purchase. Leave your contact info, if you are interested in my free shipping for your opinion offer. Thanks!

Monday, November 30, 2009

Another Gypsy Give Away at The Gypsy Spot


Just stumbled upon this give away, but move quick! The drawing is December 1st. Also, this looks like an interesting blog about the Gypsy...
Here is the link.

Friday, November 27, 2009

SVG version of Lace Edged Circle

Ok, here is a SVG version of the file below...a big thanks to Michelle Bowley for help converting the jpg to svg for me. Also, if you can give me some tips, maybe I can figure it out myself and next time post the svg. I converted my jpg into a bmp in paint, then opened it in Inkscape. When I scanned it in Inkscape, I have a mass of dots around the edges of the file. I did not know how to delete them en mass and some overlapped the image. So, not sure if I need to take a better photo, do something different in conversion, or in Inkscape (maybe my scan settings are wrong?).

Wednesday, November 25, 2009

Fancy Circle SCAL 2 Version Cut file to share


Happy Thanksgiving!
I am so thankful for my family on every Thanksgiving. This year, I am also so thankful for my Cricut, my blog, my sewing machine and my scraping friends, both online and here at home. So, here is my file to share today. I am going to use it to scrapbook a photo from my Mom and Dad's wedding. Do you realize, I have only a digital copy? I think it's time if was scrapbooked or framed.
I think this version more closely resembles the inspiration page from Memory Makers below. The design is from a font called PC ornaments. I think I am getting the hang of this program, now if only I could get Inkscape!
Please leave a comment if you download the file. Please don't share the file, but ask friends to visit my blog to download and don't sell my files or use them in items you sell.
Here is the file.

Sunday, November 22, 2009

Fleur de Lis Circle Cut file to share


Saw a picture Memory Makers March/April 2008 that inspired me to make a cut file. The patterned paper is by Hambly and the page is by Melanie Coombers in England. Here is the inspiration, and below if the screen capture of the cut file.
Here is the link for the file. You will need George and Accent Essentials for this file. Please be sure to leave a note of encouragement if you download. Ok, that photos is so bad, I cut the file, but I added a circle to the center after I saved it above. So if you want my look in blue, add a circle in the center.

Also, want to have a file swap inspired by my cut file? Wouldn't this idea be great for other shapes, besides the fleur de lis? Well make your own, then leave me a comment on where to find the cut file. Thanks! Lets have some SCAL users try this too! I would love to know how to get these items exactly 22.5 degree apart. Wish I lived close to Penny Duncan!
Don't know how to make this look? Use the instructions in my archived posts for making a snowflake, only divide 360 degrees by the number of shape you want. In the case above each fleur is 22.5 degree apart. Then place a circle in the center.

Saturday, November 21, 2009

Repetition with SCAL finished page


So, here is my finished page with the file from the last post. I love the vintage look to the page. I stamped the green and white snowflake and embossed it. The bling in the middle of the "O" is the sparkle burst brad from Karen Foster. And the time piece, oh, I wish I could tell you where to get it! I got it as a sample when I worked as an assistant fashion directory back in the 1990's. I have held onto it for years, because I loved it. I finally found a spot for it. Here on this page, it reminds me of how quickly time passes, my nieces and nephew in this photo are now taller than me!
Do you see how I stamped an image and created the lace paper to match. Repetition with SCAL, give it a try.

SCAL idea to try


I am going to an all day crop today and I so happy to go! I worked with my SCAL this week and had two ideas that I thought worthy of recommending other SCAL users try. Here is my first one to share. Check back later for my finished page and 2nd idea...
Repetition of a design
I love clear acrylic stamps, especially Close to My Heart. I also love to repeat a design or motif when I scrap. I decided to work on learning to trace bit map images and started by making a lace paper inspired by my stamps. Here is how I did it:
1) Stamp the image in black ink on white paper
2) Take a photo of your image with your digital camera. To prevent reflections and get a nice rich black, hold a piece of white cardstock at the top of your image and aim your camera just above your stamped image on the white cardstock (perpendicular to stamped image), but including your stamped image.
3) Open your photo in Paint and save as a bmp
4) Open Inkscape and import your bmp file created above in step 3
5) Use the Trace bmp function in the Path menu
6) Save your svg
7) Open SCAL 2 and create your lace paper.
These images are copy writed, so don't share them! I am only using this to create a single page of paper for my own albums.

Sunday, November 15, 2009

Wedding Cakes with a Cricut!?


Have you seen this site? She uses a Cricut to cut the icing for Wedding Cakes. I know there are creative people out there, but I never would have thought...

Thursday, November 12, 2009

ABC Circle Cut file to share for SCAL 2 users


Oh, my gosh! So, excited and happy today about my latest cut file. I know, I am easily amused! One of my favorite blogs Clever Someday had a video tutorial a while back with how to create circular text, and I finally figured it out yesterday. Thanks so much Clever Someday! I have a different version of Microsoft Word and could not figure out how to use the steps she listed. So, I will add my how to's below for you new SCAL 2 users who might have the same version of Microsoft Office Word I do.
1) Open Microsoft Office Word
2) Click on the Insert Menu
3) Select the Word Art Icon
4) Choose a Word Art Style, I chose the curve in black.
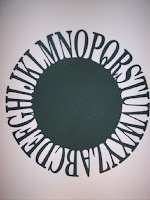
5) In the Edit Word Art Text box, select your font style and size and type in your title or letters and click OK. In my case, I typed in A-Z.
6) Choose Change Shape from the tool bar mini menu (towards the center)
7) Select the Outline Circle
8) Stretch your Circle out by dragging from the handle in the lower right hand corner
9) Hit your Print Screen button
10) Open Paint
11) Paste in your screen capture
12) Select the edit square and draw a box around your text circle only
13) Hit Copy
14) Open a new Paint document (without saving the screen capture) and paste in your copied text circle
14) Save the file as a jpg
15) Open Scal 2 and Select the Trace from the file menu, select the jpg file saved in step 14
I added a circle in the middle and welded the two items to get my cut file. Here is the file, for those of you who would like it. Please leave me a note of encouragement if you download! Thanks!
I saw a cut file like this in a catalog, and knew that I could make it. When I saw Clever Somedays tutorial, I thought I would try it. I plan to use this in my boys school albums.

Sunday, November 8, 2009

Back Pack Cut file for storing report cards DS Version


Here is a version for DS, using George and Opposites attract. Please leave me a note of encouragement if you download the file. Thanks!

How to Accomodate the 3D Back Pack Pocket Page

Here is the side view of the back pack cut file above, I am using to store my sons report cards.
I promised I would share how I accommodate my 3 dimensional back pack cut file below in the spine of my scrapbook in my last post. Please find the instructions below. You can use this idea for other junky items you feel the need to scrapbook, or for other pocket pages. Some things I have used it to accommodate, are pocket pages for my children's first birthday, and baptism cards. I don't save every card, but one's that I wish I still had. So, cards from Grandparents and Aunts and Uncles on special occasions can be saved this way.

How to accommodate your 3 D backpack in a post bond album:

Supplies you will need
1) Post bound album
2) Spine shims or foam board (Get the Spine shims from Close to My Heart or make your own with Foam Board). Here is a picture of a spine shim I got a package of them at a garage sale for $0.25.

3) Post Extenders (Available at Michaels or from Close to My Heart)


Instructions:
1) Open your album at the back cover and flip up your post screw cover flap
2) Using a screwdriver, unscrew the screw holding your back flap on. SAVE THE SCREWS for reassembly!
3) Remove the back cover, and determine where you want your chunky 3 D item. I am putting mine as the last page in the album.
4) Screw in Post Extenders.

5) Place shims before the chunky 3 D page. If you have no shims, make a pattern on the foam board, using the margin of your page protector as a guide. Punch holes for the post. In this case I used three shims, to equal the thickness of my back pack page.

6) Put page, and album back cover into place
7) Screw album screws back into place and fold down flap.
Below is a picture of the sandwich I used in my spine from the side view.

Please feel free to leave me a post with questions. Thanks!

Tuesday, November 3, 2009

Back Pack Cut file for storing report cards SCAL 2 version


Just around the time I started my blog, I downloaded a file from the Cricut Message board to cut a paper back pack. This was created by an artist named Nancy. I love the detail she put into this bag, including the front pocket and the straps. It is one of my all time top five favorite cut files. If you like Nancy's work please visit her blog here and request the file. I used Nancy's file above to make end of year teacher appreciation gifts. Please note, I am not sharing the file above, just showing you how it inspired me! See my file below.

So, I thought on it a while and figured out a way to put her idea on my scrapbook pages. I knew I wanted to use it in my children's school albums, to store their report cards. I tried to make my first version with the DS, but kept getting the Red X error message. The first time in three years, but it lead me to my SCAL 2 again. I am very happy with my results and will share the files. Here are the photos of my version for a scrapbook page.
It is made from two cut files, the first has the back pack and the pocket flap. The second is the flap for the back pack and the pocket. I made the bottom wider, to make it look more back pack like. Here are some tips if you use my file:
1) Score the lines where I made the tabs parallele to the edges and then one quarter inch away, closer to the raw edge. This will give you a very generous gluing area.
2) Use a heavy duty tape like Terrifically Tacky Tape by PC.
3) Place some pop dots in the corners of the bag to keep it from flattening in your album, or use foam tape along the inside sides.
4) To help the flaps lay closed, place a self adhesive velcro dot under both flaps.<
5) Check back for my next post with tips on how I use foam board strips in the spine of my scrapbook, to accommodate this page in top loading albums.
The paper is Cloud Nine and the brass embellishment on the flap is Stampin' Up. You will need SCAL 2 for this cut file. Here is the link for Base and pocket flap
Here is the link for the pocket and the flap of the back pack

Sure Cuts A Lot 2 Give Away at SVGCuts.com


SVGCuts.com is having a drawing for Sure Cuts A Lot 2. Check it out at:
http://svgcuts.com/blog/?p=3769
Watch for some files I created using my SCAL 2 soon...I have a back pack for holding my children's report cards, and another snowflake.

Wednesday, October 28, 2009

Today the Fabric Spoke to me and I listened!


One of my Etsy friend told me that fabric speaks to her. Today, I heard it and I listened. I had a request for a red, black and white Expression Cover. So, I sent out some photos and my client picked the fabric. She asked me to choose more red or more black. I love red! So, the biggest piece is red. I had considered using a lime green on the sides for fun, but once I pieced the body portion and saw how elegant it was, I knew I had to finish the sides in the same colors as the piece they neighbored. I mean the fabric spoke to me. And then it said, "Ribbon Rose embelly! No, fabric yo yo for me!"
I added some ribbon leaves in the lime green and love it! Have to say that I love making covers for paper crafters! Even if they pick the fabric or the colors, their design sense if wonderful.

Saturday, October 24, 2009

2010 Planner Cut file to Share


I have a planner addiction! My planner of choice right now is the M Eye Book. It all started three years ago while attending an end of year crop at Archivers. The planner and three pages were included in the price of the crop! Now every year, I return to Archivers and get a new planner (with a coupon). I make a new cover and move my photos from last years planner to the next year. Can you believe it is gonna be 2010?!
I know that it is only October, but if you have school age children you may want to start your planner early like me! So, here is my cut file for my cover. Made with Home Decor, Home Accents, and Doodletype.
I am also going to share my favorite pages. The first is a photo of my Mother. She passed away at the age of 61 and every photo I have of her is precious! So, you know she had to be in the planner! The stamps are CTMH and Autumn Leaves.
Then a picture from a visit to Lake Michigan, a trip we make every year and a treasure from my childhood I am determined to share with my children.
Next a photo of some of my family. I loved the ribbon and the silhouette of them both in the baseball caps.
Another tip, if you use this planner and hope to one day move this photos to an album, cut the page 8 inches x 12 inches, and fold it in half. Scrap both sides and insert it in the planner. Then when you move it to your 12 x 12 album, you will only need to glue it to your 12 x 12 page and add a title for journal block!
I will try and post my back cover cut file later...

Friday, October 23, 2009

My ScrapMaBob is here!


Thanks Christmas with the Cricut and the Original Scrapbox! I just got the ScrapMaBob delivered today and I love it. I had another similar drink holder trash bag by CM and knew it was a good thing. But I have to say I like the ScrapMaBob better. The cup holder is bigger, the trashbag is bigger (and I won't need to get refills), and I like that the trashbag mount is on the front of the cup holder, not the side. When you are at a crop, it is sometimes too cozy with the side mount.
The third picture is of my CM cup holder trashbag.
I must confess though that for both products I felt the trash bag was just not pretty enough. If you follow my blog, you know I am looking for excuses to get out the sewing machine. So, for both, I made my own trash bag with Michael Miller fabric. I think both companies would do better with a prettier bag. I have seen the work you ladies make and you love beautiful things. I actually considered making bags for the CM cup holder, but the wire for holding the bag takes too long to bend and it is difficult to make. Now I am wondering if anyone might be interested in a bag made to fit the ScrapMaBob...

The black bag pictured is the one that came with my ScrapMaBob. And I would like to say that this cup holder/trashbag is a tool I suggest you have doubles of, one for home and one for the crop! I always have a bag packed with a paper trimmer, scissors, and adhesive. Then I can get ready for a crop and know I have the basics. I am now adding a cup holder/trashbag to my packed tote!

Sunday, October 18, 2009

A SCUT Pom Pom Trim file to share


Well, after spending about an hour and a half on my DS pom pom file, I was determined to try my SCAL 2 again! I just knew there had to be a better, faster way. This time it took me 20 minutes, and I think I could've been faster, if I used it more often. It's has a size for the card maker and one for the scrapbooker. I made the trim bigger than the card so that the edges could be trimmed. Find the scut file here (SCAL version 2). I am also happier with the look of this trim. I used the V from Arial font to hang the pom pom part. I struggled in DS to find a piece to use, but did not think of a V!

LinkWithin

Related Posts with Thumbnails