background

Saturday, January 7, 2012

2012's First Moxie Entry


Did you see Moxie Fab World's Tuesday Trigger this week? The inspiration photo is called by the numbers (see below). It's this quilt fabulous?! Well, when Moxie's inspired by quilts, I'm inspired by Moxie! So I had to give this a try! Other excuses I am using to scrap this page and avoid house work are:
*my 2012 resolutions to keep up with scrapbooking 2012 events (today is my son's 8th birthday party, so I'm on target),
*post more often to the blog and
*use my paper stash!
I started with a piece of white die cut paper from a kit I got from the Scrapbook Rewards Card site. If I recall, it was a three month kit you signed up for and my have been by Creating Keepsakes. Of course when the ubber yummy dies arrived, I broke the kit up to file them by color. I left some of the punched piece in the page to get the look of quilting on the white portion. Behind the die circle holes I punched holes using my Creative Memories circle punch. Now, I have a whole lot of scraps in my stash, but be the quilter in me, so I gonna tell you the paper company names I know are in there and hope you can recognize some! There are papers by Bo Bunny, The Robin's Nest, DCWV, TLC, Me and My Big Ideas, Kaleidoscope, and Bazzil. I also used my Cuttlebug Swiss Dot folder on some of the yellow.
Underneath the white die cut I used the Creative Imaginations corrugated cardboard paper. It reminds me of the staging in the inspiration picture on a wooden table.
My title is made with the Graphically Speaking Cricut Cartridge. I just welded the Great boy and the circle b and then cut the boy of the cut. I added stickers for To from Creative Imaginations and the 8 is from TLC (yes I have been scrapping that long)! Now that library card was given to me as part of a swap, so you might try and google one!
Now before I sign off on this post, I would just like to encourage you to visit Moxie Fab World and check out all the wonderful entries in this weeks challenge. I have to admit that I was a bit intimidated to enter my page because there are so many wonderful artists participating in this challenge.

Friday, January 6, 2012

Dahlia Thank You Card


I just finished my thank you card to Heartfelt Creations and am sharing it today. I used the Dahlia die and the stamp set Moonlight Dahlia Set, both from Heartfelt Creations. I stamped it with CTMH White Daisy Pigment ink and used CTMH white embossing powder. I then colored it with Copic markers to add depth to the red card stock. I used a white sequin from Michaels in the center and a Fairy dew drop from The Robins Nest in the center of the sequin. The sentiment is Anna Griffin. The embossing is Sizzix for Stampin' Up.

Thursday, January 5, 2012

Lego Party Treat Boxes with my Cricut Imagine!


This year, as usual, my boys want a Lego themed party. So, I pulled out my Sweet Treat Boxes cartridge that I got for Christmas and modified a box in the Cricut Craftroom to make Lego Ninjago Cupcake boxes.
You might be asking, why did she use the Imagine, aren't these boxes so simple I can use my Expression? Well you can! I just put yellow colored paper in the Imagine and printed the eyes in black. I did not want to mess with gluing the small black pieces, so I just printed them with my Imagine on the colored card stock. I'm in a hurry as usual and have a lot of boxes to make, so this seemed the smartest way to go to me!
For the box, I added a rounded corner rectangle from the CCR basic shapes that are free. This was used to cut a hole for the face. I had to mess with the size of the top and bottom of the box, as I was unable to get mine the to fit using the dial size. Once the box was cut, I used my paper trimmer to cut the scallops off of the box bottom. If you are working with this box you should note that the top segments must be assembled in a particular order to close. Look for the shortest set and start with that. Then work you way up to the longest segments. I showed my first box to my 8 year old last night and he loves them! Find the files for cutting the boxes and for printing the eyes HERE.

Tuesday, January 3, 2012

Cricut Mini Dust Cover Now Available!


Just a note to let you know that I now offer a dust cover for the Cricut Mini Machine! Since this machine's plastic cover, does NOT cover the entire opening in the machine, you may want to consider a dust cover to keep the dust out of your Cricut Mini and off your mats!
As with most of my covers, my clients like to custom order their covers in colors and prints to match their tastes and crafting spaces. So, I don't keep a lot of inventory. To see my current inventory and already sold covers, please visit my Etsy Scrappincover store or Scrapguild store.
Custom orders are welcome on the Cricut Mini and all of my other machine dust covers! I also make covers for the Cricut Expression, Cricut Original, Cricut Create, Cricut Imagine, Your Story, Silhouette, Pazzles and more. Just drop me a note with your machine type, color scheme, and pattern choice and I can send you photos of fabric for approval and a cost quote.
And if you visit my blog for my cards and or layouts, please scroll down to see my recent posts. For some reason blogger is listing them out of order. So the red work card is currently my third post down, when it should be my second. And the posts are not showing up in Facebook if you are following me as a Networked blogger.

Monday, January 2, 2012

A Change of Plans for My Planner 2012


This year when I went to Archivers to get my 2012 planner, they no longer carried my favorite planner. The sales associate showed me one by Pinecone Press and it was pretty enough to me to purchase. The papers are by My Minds Eye. I am still missing my old planner, but hope this years planner will be more of a keepsake for my boys.
My previous planner had drop in page protectors for each month. I would reuse the pages from last years planner when the planner changed. But this year, my pages won't fit size wise or color wise. So I will be scrapping as the year progresses. For January I am using the sketch from Once Upon a Sketch. See the sketch below. Now, my planner page is a bit pre-made. As a matter of fact the kit comes with sketches and supplies to finish the planner. But, even when I take a class or follow a sketch, I like to add my own touches. So, I am straying from the Pinecone Press kit and adapting the Once Upon a Sketch to fit my rectangular page.
To start, I pulled out my French Manor Cricut Cart and cut my clock face. The title is License Plate Stickers by the the Paper Loft, the swirl is Prima, flowers are so old I'm not sure where they're from,and buttons from the stash.


Some things I just can't live without in my planner are the month overview, and a pocket for receipts. So, I made those and added them Pinecone Press, if you could add these next year, I think I could be persuaded to get your kit again!

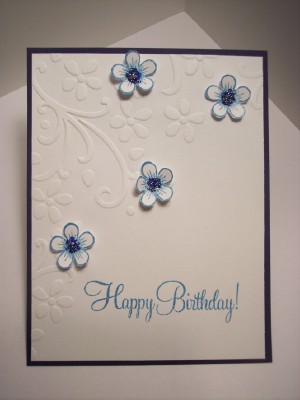
Birthday Card Inspired by Our Little Inspirations blog


I am so loving Pinterest! It gives me links to blogs by all sorts of talented artists. One I found recently was Our Little Inspirations. She made this beautiful card with an SU embossing template I already have that you can see here. I did not have the punch she used but decided instead to use a Heartfelt Creations stamp and die. I added some Art Glitter gala glitz to the center of my flowers and used less flower embellishments than the inspiration card. The original card was a sympathy card and I wanted mine to be more cheerful for a birthday. The sentiment on my card is CTMH.

Sunday, January 1, 2012

Redwork Inspired Card


Did you see the beautiful page on The Heartfelt Creations blog that looked like red work? I loved it so well, that when I won the Heartfelt Creations giveaway of $50.00 gift certificate I bought the Sunburst stamp set and matching dies! Of course, I have been back to the Heartfelt Creations site and can't find the photo to share with you. I can't figure out how to view older posts and it is not yet in the gallery. I did save it to my Pin Boards if you want to see the picture HERE.
I used the stamp set, with embossing powder and added some Art Glitter D25 Confection Dazzlers in the center of the image and a few circles on the bigger motifs. I wish you could see this in person, it looks so much better than in the photo. The sentiment is again Close to My Heart. The embossing folder was borrowed at a friends, and I think it was Sizzix. The red and white paper has been in the stash for so long, I couldn't tell you who it was from!
Well, after writing this post, it occurred to me that I did not yet make and send Heartfelt Creations a thank you card. Oh, well, the housework will wait and I will have a post for tomorrow too! Back to the craft room!

LinkWithin

Related Posts with Thumbnails