


It’s that time of year again: Garage Sale season! In this economy, many more of us are holding garage sales and shopping garage sales. I love visiting them and looking for pieces to embellish. At my first sale of the season, I found an old sewing box in the shape of an iron. I thought it would be the perfect thing to embellish. And since it was a sewing box, I thought it would be the perfect thing to embellish with a zipper flower. I used zipper tape to try the Maya Road Zipper Flower Tutorial. You can find their tutorial at: http://mayaroad.typepad.com/mayaroad/2011/02/zipper-flower-tutorial-one.html I loved their idea of cutting extra petals! Their zipper tape had metallic teeth that popped on the flower. My zipper teeth were the same color and I wanted some contrast, so I got out my Art Glitter and above are the results. Isn't it pretty!?
To get the glitter to stick to my zipper teeth, I used my Art Glitter Ultra fine tip again.
The tiny bead of glue was perfect for the zipper teeth. You will see as you use this that the glue will drop to the spots in between the teeth after applying. Just sprinkle the glitter onto the teeth and flip the zipper tape over, then sprinkle on again on the underside and allow to dry before sewing and gluing.
I then followed the instructions from Maya Road and added a base of cardstock or felt. Following their directions; and adding my base, I did the following:
1) Cut one 12 inch piece of zipper and separate the two sides
2) Cut two or three 3 inch pieces of zipper, using one half of the zipper. You should have 4 pieces.
3) Apply your glue and glitter and allow to dry

4) Using a hand needle and thread, run a basting stitch along the outside fabric edge of the 12 inch zipper piece. Pull to coil your longest piece of zipper, creating a staggered effect with the zipper teeth outside the previous layer. Tack in place with stitches or glue gun.
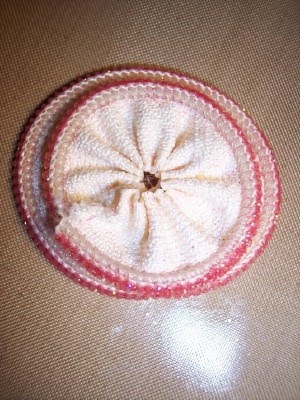
5) Using the same thread and needle, run a basting stitch on the other three pieces of zipper and gather.
6) Create curved petals and tuck them under the flower rolls in the flower created in step 3. These petals will look better if you go for the rule of three and try to create the look of three outside petals. See top picture.

7) Tack in place with glue gun or thread.
8) Punch out a 1 ½” circle and glue your flower to it for a paper craft project, or to felt for a sewing project.
9) Add a button, rhinestone or bead in the center with glue or a thread and needle.
To embellish my sewing box, I painted it cream and chalk inked the edges. I covered it with some My Mind’s Eye paper from the Lost and Found Line, added my zipper flower, a rolled felt rose and some wrinkled seam tape. See the bottom of the post for the complete list of supplies.
So, hit those garage sales for your next craft project and pull something out of your stash today and kicking it up a notch with some Art Glitter!
Supplies Used:
Art Glitter Hibiscus 297 Ultrafine Transparent (choose any color you like)
Glue Gun and sticks
My Mind’s Eye Lost and Found Paper
Stampin Up Chic Botique Stamp
My Favorite Things rolled Rose Die
Seam Tape
Wooden Box
Modge Podge
Circle Punch 1 ½”
Button
Ivory Cardstock
SVG Rolled flower from Jill D-Zines (Ivory flower with red center)
Stickles X-mas Red (paper flower center)

I love it so cute what a lucy find nice job love the ribbon
ReplyDeleteHugs