background

Showing posts with label Dew Drops. Show all posts

Tuesday, November 22, 2016

Dress Form Christmas Tree with Quarter Scale Form


Last year I saw a beautiful dress form Christmas tree on Facebook and knew what I wanted to do with a quarter scale dress form I have had for years and used as a door stop.  I started this dress form tree project, by gluing buttons, dew drops and other embellishments to the bodice area with a low temp glue gun.  I added evergreen picks from Michaels with a staple gun.  Below you can see the work in progress in my crafting space.

To transition from the picks to the waistline, I used some red petals I got from Mon Ami Gabby and a velvet ribbon from American crafts.   I love the fairy quality of these petals!   I used a rhinestone buckle at the center front of the ribbon.  


To help fill in gaps in the "skirt" portion, I added some holly leaves I cut with my Cricut Winter Woodland cartridge, more petals, and some JoAnn Fabrics 6" organza ribbon.  I added some scrap ribbon, and a poinsettia with more pick embellishments from Michaels as well.  On the evergreen picks I glued a few roses by Recollections.


Another close look at the neckline detail.  I can't remember where I got these pretty stick pins!  Can you see the red and white stick pins?  Love them!


I made this for my niece because I want her to have a special Christmas tree from her Auntie!  Her nickname is La Princesa, so I felt I could make a fairy tale dress for my fairy tale niece!  So, she had to have a bustle right?!


A side view of the bustle.  

I love this project so much I want one for myself!  I went on ebay and found some 1/2 scale dress forms.  Well, that's out of the budget, sigh!  I will begin the garage sale hunt next Spring!  I feel like I just finished an unconventional challenge on Project Runway!  


Supplies 
Quarter Scale Dress Form
The Robin's Nest Dew Drops
Mon Ami Gabby embellishments
Buttons
Glue Gun
Staple Gun
Michaels Evergreen Picks
Joanns 6" Organza Ribbon
Recollections Boutique Fleur Rose
Recollection Poinsettia
American Crafts Velvet Ribbon
Cricut Winter Woodland Holly Leaf
Mon Ami Gabi Flower Petals


Thursday, May 9, 2013

Art Glitter Paper Cake Part One


Do you need an idea for bridal or baby shower favors?  How about a beautiful paper cake that can be a table centerpiece as well?  Above is a sneak peak of top of the cake.  Be sure to visit the Art Glitter blog HERE.  to see the rest of this project and the trail of butterflies up the side of the cake!  Below find the details on the box construction.  These instructions are for a three layer cake with a total of 54 boxes.

Instructions:

Box Cutting:

1.  For the bottom layer, cut 18 box bases in the Close to My Heart Artiste cake box with a width of 9 inches, using your patterned paper.  I used K & Company Ancestry.com paper.
2.  For the middle layer,  cut 18 box bases in the Close to My Heart Artiste cake box with a width of 9 inches, using your patterned paper.  I used K & Company Ancestry.com paper.
3.  For the top layer,  cut 18 box bases in the Close to My Heart Artiste cake box with a width of 9 inches, using your patterned paper.  I used K & Company Ancestry.com paper.
4.  For the bottom layer first row, cut nine box tops in the standard Close to My Heart Artiste cartridge to match the box base in size 9 inch patterned paper.
5.  For the bottom layer second row, cut nine box tops with a welded rectangle at the end of the box top, in white card stock to match the 9 inch box base.
6.  Line the Heartfelt Creations Die up with the score line on the box top and run the top through the die cut machine.

7.  For the middle layer, cut 18 box bases with a width of 7 inches in patterned paper in the patterned paper.
8.  For the middle layer bottom row,  cut 9 box tops in the standard Close to My Heart Artiste cartridge to match the box base in size 7 inch patterned paper.
9.  For the middle layer, second row, cut nine box tops with a welded rectangle at the end of the box top, in white card stock to match the 7 inch box base.
10.  For the top layer first row, cut nine box tops in the standard Close to My Heart Artiste cartridge to match the box base in size 9 inch patterned paper.
11.  For the top layer second row, cut nine box tops with a welded rectangle at the end of the box top, in white card stock to match the 9 inch box base.

So, when you are finished with your cutting you should have the following:
18 quantity box bases in patterned paper 9 inch wide
18 quantity box bases in patterned paper 7 inch wide
18 quantity box bases in patterned paper 5 inch wide
9 quantity box tops in patterned paper to match 9 inch box base
9 quantity box tops in patterned paper to match 7 inch box base
9 quantity box tops in patterned paper to match 5 inch box base
9 quantity box tops in white paper to match 9 inch box base
9 quantity box tops in white paper to match 7 inch box base
9 quantity box tops in white paper to match 5 inch box base

Box Assembly Instructions:
1.  Using the score marks made with the cutter, score your box bases and fold along score lines.
2.  Using the score marks made with the cutter, score the box tops and fold along score lines.
3.  Glue the box bases together using tabs.
4.  Glue the box tops together using tabs.  To glue the detailed cut of the lacy die side, trim the tabs down to show die detail and glue closed with a glue pen.  
5.  Place matching box tops on the first row of the top cake layer and glue the 9 pieces of the layer together.
6.  Place white box tops on the top row of the top cake layer and glue the 9 pieces of the layer together.
7.  Then glue the top row on top of the bottom row of the top layer.  This layer is too small for holding favors and is just for show.  By gluing them together, the cake will be more stable and decorations of flowers are easier to place.
8.  Repeat steps 1-4 for the middle cake layer pieces being sure to not glue the finished boxes together.
9.  Repeat steps 1-4 for the bottom cake layer pieces being sure to not glue the finished boxes together.
When finished assembling your boxes, you should have nine boxes for each cake layer like the two boxes below, for a total of 18 boxes per layer (one row same color top, one layer white top).

To finish the cake, be sure to check out the post today at the Art Glitter blog HERE.  


Friday, April 12, 2013

Daisy Days Blog Hop with The Robin's Nest

Welcome to the Daisy Days Blog hop with The Robin's Nest!  Thanks for stopping by all of the blogs on the hop!  To follow the hop line up, simply click on the blog listed at the bottom of this post or to the right!  The fun starts at  Robin's blog.  And The Robin's Nest is offering blog candy!   Each blog will have a prize package, "Daisy Package" with a value of $15.00 and it will include Tear drops, paper and embellishments.  One Grand Prize winner will get $25.00 towards the Robin's Nest on-line store and will be posted on the Robin's Nest blog on Sunday April 21st   Be sure to leave a comment on all the blogs along the hop for your chance to win!

I thought I would use this hop to talk about how to pull together a mini album for a great look!  Here are my tips:
1)  Use a great paper line from the same company!
2)  Use a theme:  I used travel.
3)  Use a consistent shape:  I used daisies!
4)  Use a few consistent inks, markers and embossing powders that coordinate with your color theme.  I chose my color theme by using the colors in the albums and adding neutrals.
Growing up, when we heard my Dad say he was taking the scenic route, we were sure to get lost, but we also knew that we would see the off beaten track beauty and back roads sites.  I want to teach my boys to record their memories and enjoy the journeys on all of their vacations and trips!  Since I often associate wild flowers with these scenic routes, I thought the daisy theme of this blog hop was perfect for my travel album theme!
I started with a mini album I picked up at my local dollar store called Inspired Traveler by Creative Imaginations.  I added beautiful paper and embellishments by The Robin's Nest.  Below I used a Close to My Heart Stamp set (USA) and a Heartfelt Creations Stamp set (Script inside the map) on the Robin's Nest  Discovery Glitter Swirl paper.  Some other tips for mini albums:  use those scraps you love in small touches to make embellishments!  Find your theme and shape ideas on Pinterest!  Just search for the item you want to use to pull it all together and you'll find lot of ideas!  Scrap pages ahead of time and bring travel albums on the trip.  Have the kids journal on the road trip!

Below are some of the pages made with the Marvy Uchida Flower punch and Dew Drops by The Robin's Nest.  


I love these fishing chippies from The Robin's Nest and had to work some into our travel mini album!  I just cut a bit of brown card stock and clipped the chippie onto it.  Of course my Uniball white ink pen ran out of ink and I have a new one on order, so please excuse the missing faux sewing stitches!


Supply List
The Robin's Nest Getaway Dew Drops
The Robin's Nest Teal Classic Glitter Card Stock (cover)
The Robin's Nest Daisy Stripe Honeycomb
The Robin's Nest Brown Classic Glitter Card stock
The Robin's Nest Fishing Chippies
The Robin's Nest Pearl Dew Drops
The Robin's Nest Pinetrees Card Stock
The Robin's Nest Viva la France Rubon
The Robin's Nest Fresh Mowed Grass Dew Drops
The Robin's Nest Teal Fleur Card Stock
The Robin's Nest Tropicana Fleur Card Stock
The Robin's Nest White Snow Glitter Card Stock
The Robin's Nest Discovery Glitter Swirl
The Robin's Nest Autumn Tag Kit
Piccolo Enamel Powder Adhesive
Piccolo Vintage Copper Enamel Powder
Little Yellow Bicycle Fresh Print TRAVELER paper
Marvy Uchida Flower Punch
White Card Stock
Green Card Stock
Inspired Traveler Mini Album by Creative Imaginations
Cricut George Cartridge
Cricut Opposites Attract Cartridge
Cricut Graphically Speaking Cartridge
Close To My Heart Adventure USA Stamp
Stampin' Up The Open Sea Stamp (Globe Image)
Creative Memories Circle Punch
Heartfelt Creations Stamp
Glue Dots
Close To My Heart Inks
Brown Marker
Uniball White marker
Flower Bling
Chalk inks


Saturday, February 23, 2013

How to Handle Heritage Photos

Ever wonder how to scrap your poor quality heritage photos?  You may want your children to know their ancestors and see the resemblance to them, but often those heritage photos are not the best quality.  So, today I am sharing some tips how to make those heritage photos into fabulous scrapbook pages.
1)  Start with special treatment for your photo!  Here I used Plaids Photo Transfer Medium and some canvas to give the photo some great texture and an ephemera like quality.  This is a great way to handle those scanned heritage photos and make them look authentic!  The instructions for how to use this product are on the back of the packaging and it was so easy.  Just be sure to allow your self 24 hours for the transfer medium to set and a few hours for the fabric to dry after removing the paper before finishing your page.
2)  Devote a whole page to the photo!  If you are an avid scrap booker, this may be hard to do, but you may only have one photo of your ancestor, so live it up and do a single page with a single photo!
3)  Use special papers, die cuts and embellishments!  This will also help you use that single photo on a single page!  I created this shamrock using Cricut Craftroom Software, and a single motif from Damask Decor.  I use The Robin's Nest Classic Glitter Card stock in Khaki for the shamrock and matted it on white.  To create the mat in the software, I had to use hearts, circle and a comma for the stem.   Then, I backed it with more of the Classic Glitter Card stock in gold.  This paper is so pretty and the gold flecks look embossed!  I cut the title with Cricut's Sophisticated Cartridge in The Robin's Nest Glitter Rope on Red Card stock, making sure to run the glitter rope down the cent of my letters.  I added a rubon from The Robin's Nest Family rubon set in the lower left hand corner, some ribbon and a journaling block also from The Robin's Nest.  I chose a shamrock because this ancestor was Irish and I thought it a great ideas to share around St. Patrick's Day!
The Robin's Nest is running a special on their Tear Drops this month:  20% off!  Find the tear drops HERE.  NO need for a coupon, you will see they are already marked down! 

Supply List
The Robin's Nest Red Glitter Rope on Red Card stock (title)
The Robin's Nest Khaki Glitter Card stock (shamrock)
The Robin's Nest Gold Classic Glitter Card stock (Background)
The Robin's Nest Family Tree Rubon
The Robin's Nest Red Journaling 
The Robin's Nest River Bend Tear Drops
The Robin's Nest Green Fleur Card Stock
Plaid Mod Podge Photo Transfer Medium
Websters Pages jewel
White Card stock
Red Card stock
Ribbon
Cricut Sophisticated Cartridge
Cricut Damask Decor Cartridge
Cricut Craft Room software
Stampin Up Die
Circle Cutter

Friday, January 11, 2013

All That Glitters

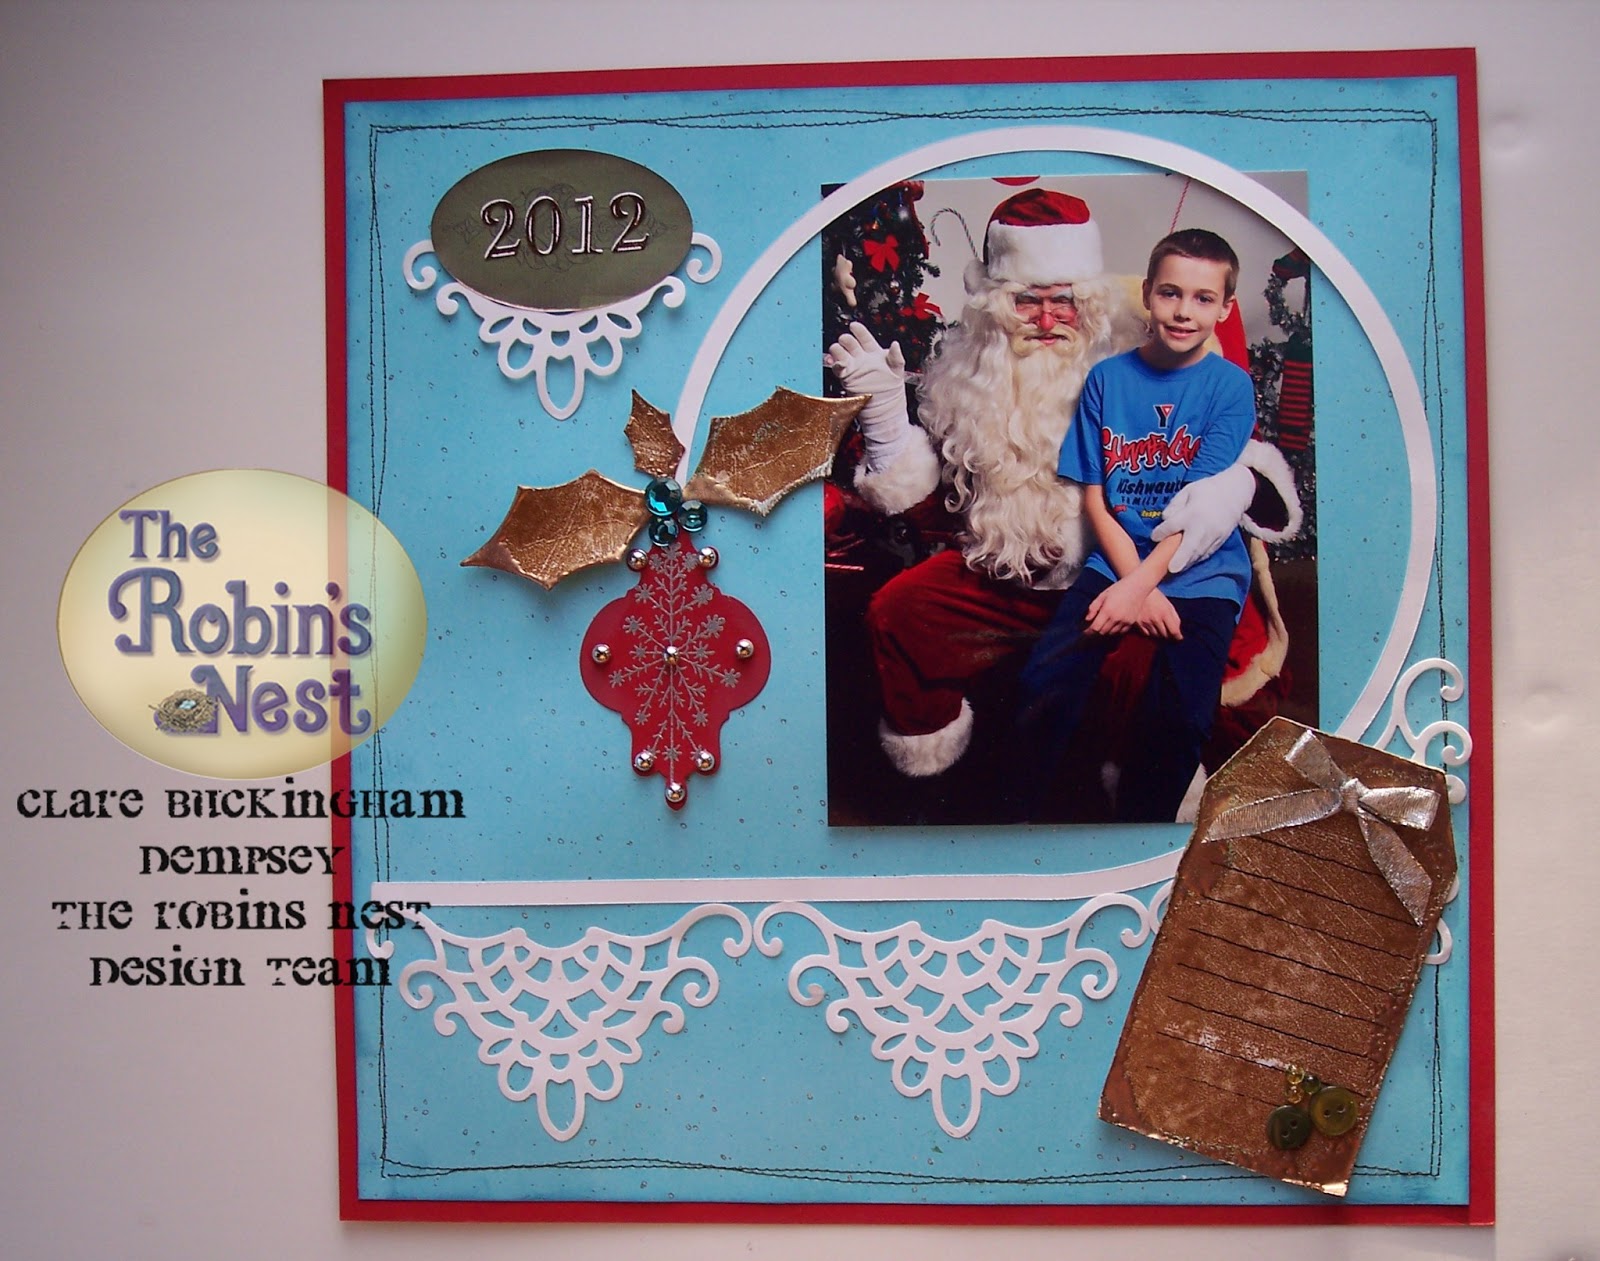
I am always faithful to scrapbook the Santa pictures and my Christmas photo cards when I get them.  So, today I am sharing this years photo with Santa page.  This is the perfect season to use all that glitters with beautiful papers from The Robin's Nest, and beautiful stamps and dies from Heartfelt Creations!  I started with a plain piece of red card stock and stitched a sheet of The Robin's Nest Teal Glitter Card stock on top.  I wish you could see this glitter card stock in person, as pictures just don't do it justice!  It is more of an embossed look with flecks of silver embossing on top of the card stock and The Robin's Nest offers this in multiple colors.  I want them all!

On top of the base papers, I cut a circle with a tail using Sure Cuts a Lot software and hung the Heartfelt Creations ornament from the circle.  To make this embellished circle cut, you can just think of the circle as a clock face and cut it at 9:00, then make a straight line from 6:00 in a clockwise direction.  The ornament was made with Heartfelt Creations HCPC 3335 Elegant Snowflake Medallion Pre-Cut Set and Heartfelt HCD 705 Creations Holly Ornament Die.  I used Silver Dew Drops from the Robin's Nest.  I also cut the holly leaves with the HCD 705 die. 
The tag is from The Robin's Nest, and I cut up the holly leaves from other tags to repeat the use of this beautiful copper colored paper. I embossed both the leaves and the tag with Piccolo's Vintage Copper Enamel Powder.  It is so rich looking with The Robin's Nest tags!
The title is made with an oval tag from The Robin's Nest Animal Tag Sticker set.  I love when I can use a sticker set in more than one theme.  The numbers are also The Robin's Nest:  gold glitter letters.
I cut four scroll shapes using Heartfelt Creations Perfect Petals Die and put three under my circle shape.  I then trimmed the top two curls off of the last shape and used it under my title.  This is a great way to repeat a design and make it the right scale for your needs.  It is also a great way to stretch your dies to cut more than one shape!  And while we are talking about dies, I want to give you a tip on how to use the beautiful detail dies you find at Heartfelt Creations.  Cover the die with clear packing tape, so that the sticky side faces the cutting edge.  Run the die through your die cutting machine with some scrap paper and you will now have the NON-stick side of the tape facing up in the die cutting side.  This will make removing your paper from the die a breeze!
Be sure to check out The Robin's Nest Store this month for specials on their card and tag kits for 20% off.  Here is a link for the sale items.  Use the coupon code cardkitpromo.  I love to make up my birthday cards for the whole year in January.  Why not use these kits to get your own cards made?


Supply List
The Robin's Nest Teal Glitter Card stock
The Robin's Nest Glitter Gold Letters
The Robin's Nest Safari Tag Kit
The Robin's Nest Black/White/Silver Dew Drops
The Robin's Nest Poinsettia Dew Drops
Heartfelt Creations Perfect Petals Die Template
Heartfelt Creations Holly Ornament Die Template
Heartfelt Creations Elegant Snowflake Medallion PreCut Set
Red Card stock
White Card stock
Stampin' Up Journaling stamp
Stazon Black Ink
Buttons
Vintage Copper Enamel Powder by Piccolo
Enamel Powder Adhesive in roll on bottle
Sure Cuts A Lot Software (optional-Circle with tail, may be cut by hand)
Ribbon
Teal Rhinestones
Silver ink
Silver embossing powder
Sewing Machine (optional you can use a marker)


Friday, June 22, 2012

All Good Things Tips

As I post my last project for the design team at The Robin's Nest, I thought it might be fun to share a few of my a favorite tips for getting the best results while paper crafting.
First, use beautiful products and paper.  I love the beautiful paper at The Robin's Nest!  Their elegant papers are perfect for Wedding season!
Second, don't forget the details.  Try fussy cutting pretty paper, making your own embellishments, inking the edges with distress inks, sewing on your projects, and doodling with glitter gel pens.  Here I fussy cut the Silver Paisley on Black Glitter paper to make the leaves and stems.  I also used a gel pen on my label to highlight the printed sentiment and the label border.  This was made with my Cricut Imagine, Martha Stewart Elegant Cakes and Elegant Edges and the Cricut Craft Room software.
Tie it together with repetition.  Most design theory recommends odd numbers, hence three flowers.  For this project, I used the circular swirl motif from the Cricut Paper Lace Cartridge to repeat the shapes and forms I found in The Robin's Nest Silver Paisley on Black paper.  I added the Bold Damask Decor stamp to my label to add that same shape and used the dew drops on my sentiment, my circular motif and the floral spray.  Silver was repeated in two papers and the dew drops.

And finally, add dimension:  To get dimension on this wedding card, I used the Black Glitter Rose paper to create a rolled rose.  If you use this technique you will find that the largest petals are in the center of the flower, so begin rolling your flower from the outside, and roll towards the inside.  Before gluing, gently roll the edges of the petals with the silver tipping back to highlight this detail.   I also added some of The Robin's Nest Dew Drops from the Black/White/Metallic Mix.  Dimension can be flatter than these rolled roses to fit in a scrap book, just achieve dimension on pages, with layered flat paper, inking your edges, and some pop dots, or low profile embellishments if you wish.

I would like to thank The Robin's Nest for having me on their design team for two terms!  I have really enjoyed working with all of the talented designers and look forward to seeing your new products and designers!


Supplies
The Robin's Nest Black Glitter on Card stock
The Robin's Nest Silver Paisley on Black 
The Robin's Nest Black/White/Metallic Mix Dew Drops
The Robin's Nest America Words (Wine Colored Card stock on back side)
Silver Card Stock
Black Card Stock
White Card Stock
Inkadinkadoo Bold Damask Stamps
Cricut Imagine
Cricut Martha Stewart Elegant Cakes (Sentiment)
Cricut Elegant Edges Label Shape
Cricut Paper Lace
Sakura Gell Roll Pen
Hot Glue gun
My Favorite Things Die-Namics Rolled Rose Die (Wine colored roses)

Friday, June 8, 2012

Michigan Momento Box

I just love all the tray boxes everyone is scrapping with!  This month The Robin's Nest Design Team got a chance to work with McGuffey Workworking trays.  I put together another keepsake for my boys, to help them remember our summer trips to Michigan.
To start the tray I painted it with some acryllic craft paint in tan.
Supply List
McGuffey Woodworking Wood Tray
Acrylic Paint
The Robin's Nest Fresh Mowed Grass Dew Drops
The Robin's Nest Teal Flowers
The Robin's Nest Glitter Teal Journaling
The Robin's Nest Teal Stamp
The Robin's Nest Aquamarine Glitter Cardstock
The Robin's Nest Brilliant Brown Glitter Cardstock
The Robin's Nest Paris Bliss Ribbon
The Robin's Nest Paris Stickers
The Robin's Nest Calamity Jane Diagonal Glitter Cardstock
The Robin's Nest Time Rubon
The Robin's Nest Beach Stickers
The Robin's Nest Glitter Mocha Daisy (back side is striped)
The Robin's Nest Glitter Awning Paper
The Robin's Nest Glitter Gold Letters
Purple Cows Punch
And don't forget you can win some Robin's Nest Goodies, by entering their monthly challenge using the sketch below.  Find all the details here for your chance to win $25.00 gift certificate for their online store!

Friday, April 27, 2012

Lucky Me Mini Album

This month The Robin's Nest is swapping product with Want2Scrap. So, I got a package with some goodies from both companies and had to make this adorable Lucky Me mini album! There are a lot of items on the supply list this time, so I will be high lighting the items from The Robin's Nest and Want2Scrap. If you see something that I haven't listed please let me know and I will get you the details. I started with Want2Scraps Me Tabbed Album and covered it with The Robin's Nest Classified Card stock. To highlight the motif in the Classified card stock, I colored it with Copic markers. The Lucky was cut with Cricuts Indie Art in The Robin's Nest Lime Glitter Chipboard, using the deep cut blade with a multicut of 2. I love how easily The Robin's Nest Chipboard cuts and how well it matches my projects. I added the Want2Scrap Shamrock Chipboard Embellishment, covered with The Robin's Nest Glitter Black Starfish (green paper) and colored it with Copics again. I added the rolled rose from My Favorite Things in felt, a punched leaf, some rubons and a button with string to finish my cover.
Pages two and three were covered with The Robin's Nest Glitter Black and White Animal Stripe, and Red Sorbet Glitter Card stock. The Queen title was created with Microsoft Word using the Word Art function and then cut in Sure Cuts a Lot using The Robin's Nest Gold Glitter Chipboard. The crown is Want2Scrap painted with gold wash. I then used some embossing paste, with a stencil I cut with my Cricut and Sophisticated and glittered with Art Glitter.
Oh, I will be using this technique again! I added some Golden berry dews drops from The Robin's Nest
On pages 4 and 5, I used The Robin's Nest Black and White Clock paper with a title from the Storybook Cartridge from Cricut. The pink glitter is also TRN Shocking Pink Sorbet Glitter Card stock. The heart is made with Want2Scrap Chipboard Shapes Style D. All I did is overlap the bottom of two swirls to form the bottom and glue. I painted this with Terri Sprouls Mixers in Rose Pearl mixed with Crystal Lacquer by Sakura and added a few pearl dew drops by TRN and I have a beautiful embellishment for less! The swirl was created with Black/White/Silver Dew Drops and some black stickles. Oh, and that fabulous paper, also TRN, is Glitter Black and White Glitter Swirl.

On pages 6 and seven the papers are TRN Silver Fleur de-lis and Glitter Letter paper. I made another flower using the TRN White Flowers and pink dew drops. The sewing machine was cut with the Heritage Cricut cartridge and I stamped the dress form. The Create is cut in TRN Glitter Silver Chipboard with my Cricut using Home Decor and the scissors is from Wall Decor. The Everyday is from Creative Memories and is on top of the TRN black glitter Journaling.
And the last page was cut with TRN Silver Paisley on Black. Love this fabulous paper! I then used some glitter chipboard letters from my stash, but these cut be cut with TRN glitter chipboard too. So, next time your working on a mini album and your wondering how to pull together all your photos and their colors, give this black and white look a chance with beautiful papers by TRN!

Supply List
 The Robin's Nest Classified Card stock
The Robin's Nest White Flowers
The Robin's Nest Silver Fleur de-lis
The Robin's Nest Black Glitter Journaling
The Robin's Nest Glitter Black and White Border Swirl
The Robin's Nest Glitter Black Starfish
The Robin's Nest Lime Glitter Chipboard
The Robin's Nest Shocking Pink Sorbet Glitter Card stock
The Robin's Nest Silver Paisley on Black
The Robin's Nest Glitter Black and White Animal Stripe
The Robin's Nest Red Sorbet Glitter Card stock
The Robin's Nest Black/White/Silver Metallic Dew Drops
The Robin's Nest Glitter Silver Chipboard
The Robin's Nest Golden berry Dew drops
The Robin's Nest Glitter Gold Chipboard
Want2Scrap Me Tabbed Chipboard Album
Want2Scrap Shamrock Chipboard Embellishments
Want2Scrap Chipboard Shaped D
Terri Sprouls Mixers Rose Pearl by Sakura

Friday, April 13, 2012

Flower Tutorial with The Robin's Nest


Today I am sharing a quick an easy flower tutorial made with Teal Flower by The Robin's Nest. This technique has been used my sewers but I adapted it to use with these embellishments and glue dots for a no sew method.
You will need 4 of the smallest scalloped flowers and one of the medium scalloped flowers from The Robin's Nest Teal Flowers. And don't worry they have more colors.
1) Distress ink all of the small scalloped flowers and fold in half.
2) Place a glue dot in the center of the flat medium size flower and attach one of the folded small scalloped flowers as shown in the picture below.

3) Rotate the base flower 90 degrees and attach another small scalloped flower folded in half
4) Rotate again 90 degrees and attach a third flower
5) Rote again 90 degree and place the last flower so it looks like a closed box top (under, over, under, over).
6) Glue three of the Classified Dew Drops from The Robin's Nest terrifically tacky tape
7) Scrunch up the half circles to give them some dimension. Here is a close up of the finished flower. So much quicker and easier than getting out the sewing machine or thread and needle!
For the die cut detail, I added some of The Robin's Nest Mini Dew Drops at the grid intersections. This was cut with French Manor in taupe card stock. I cut the Fleur de lis with Sure Cuts A Lot inside The Robin's Nest Teal Stamp. And for a little fun, I put the crown from The Robin's Nest Paris Clippies on my nieces head. Please see below for a full list of supplies.
Supplies
The Robin's Nest Brown Glitter Paper
The Robin's Nest Teal Stamp
The Robin's Nest Teal Dew Drops DD-167
The Robin's Nest Classified Mini Dew Drops
The Robin's Nest Cotton Candy Dew Drops
The Robin's Nest Teal Flowers
The Robin's Nest Glitter Teal Jouraling
The Robin's Nest Viva la France Rubon
The Robin's Nest Paris Clippies
The Robin's Nest Paris Bliss Ribon
Taupe card stock
K & Company Classic K Margo Fabric Stitched Brads
EK Sucess Jolee's Botique Gem Bride
Paper Flower source unknown

LinkWithin

Related Posts with Thumbnails