background

Saturday, April 27, 2013

For the Font Fanatic

This month The Robin's Nest is teaming up with Gel-a-tins.  I was sent an alphabet stamp set for my projects that I love, but what to do that was new?  I started thinking about all those alphabet paper laces that were so big a few years ago and one of my favorite design elements ever:  a circle.  So, I wondered how I could combine the two?  Moxie Fab World helped with the solution, with this weeks Tuesday Trigger:  Pretty Little Petit Fours.  Do you see the circle in the background (well it's really an oval but I love circles)?  
Here's my solution, and I have to say I am so pleased with the results!
Here is how I got this look:
1.  Cut a 7" circle in the middle of a white piece of card stock.  If you want a nice circular stamped image, this is key!  Ink the inside edge of circle with Versamark and use Teal You What embossing powder to emboss the circle.

2.  Layout a "test" version of your letter circle (see photo above).  I tried to vary the width of the letters around the circle.  So, this means you may need a wide letter on the sides and a high letter on the top, mixed with smaller letters in between.
3.  Once you are happy with the layout begin stamping your letters in Versa Mark ink.
4.  Use the Teal You What embossing powder and heat set.
5.  Fussy cut your letter circle using scissors and or Exacto Knife.
The chevron is a Close to My Heart Stamp.  The clock face is The Robin's Nest.  The label is cut with CCR basic shapes and the stickers are Basic Grey.  For black in the center of the flowers on the inspiration photo I wanted bling.  I combined Want2Scrap with Diamond Dew Drops from The Robin's Nest.

This months The Robin's Nest Sale:  Sorbet Paper Collection!
This months team up:  Gel-a-tins

Supplies
The Robin's Nest Shocking Pink Glitter Sorbet Card Stock
The Robin's Nest Classified Card Stock (Background)
The Robin's Nest Black and White Clock Cardstock
The Robin's Nest Obsidian Diamond Dew Drops
White Card Stock
gel-a-tins LOL Oversized Mix Stamp set
gel-a-tins Teal You What embossing powder
Versamark ink
Close To My Heart In the Background Flair Stamp Set (chevron)
Want2Scrap Black Bling Swirl
Cricut 
CCR

Sunday, April 21, 2013

The Robin's Nest Daisy Blog Hop Winner

The Robin's Nest  has announced their Daisy Blog hop winners here.    Please be sure to check the ChatteringRobins blog to see if you have won at another stop on the hop!
So, now to announce the winner at my blog of the $15.00 gift certificate to The Robin's Nest Store:  WINNER IS:  Cheryl
Cheryl, please send me your email address at cjdempsey9 at msn dot com.

Friday, April 19, 2013

Create Your Own Circle Swirl with Your Favorite Stamps!


Here is another heritage page, I created with Heartfelt Creations Delicate Twisting Asters Pre-Cut Set.  I hand drew the circle and added the stamped images, so that they looked like they are one piece.  For the center of the flowers I used a gold glitter pen over the entire center and highlighted the stamped image with some Stickles.

Supplies
Heartfelt Creations Delicate Twisting Asters Pre-Cut Set
American Crafts Ribbon
The Robin's Nest Red Journaling Block
Copic Markers
Metal Together Tag
DCWV Mod-Retro Stack Paper (yellow and white)
Close To My Heart Paper (green)
Gold Stickles

Saturday, April 13, 2013

While Waiting on the Garden

This months The Robin's Nest Sale:  Sorbet Paper Collection!
This months team up:  Gel-a-tins
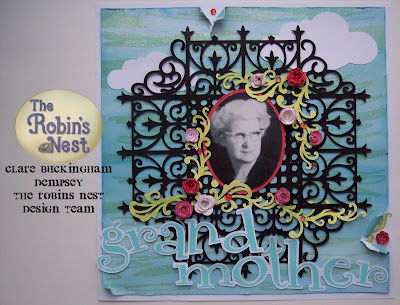
Spring has been so slow to start this year and I have been anxious to see some flowers. So, I thought I might make some this Spring, while waiting for the garden. I started with beautiful paper from The Robin's Nest, some dies and Cricut Cuts and scrapped another page for my heritage album.
For my trellis, I used the Cricut Ornament Iron cartridge and Cricut Craft Room to make a single gate into a trellis. I just copied the piece until I had four gates, and rotated it 90 degrees for each piece after the first. I hid some of the pieces that were too small and made my image uneven and love the look! I added a flourish to the corner and welded all the pieces. I cut it in black card stock and used foam tape to pop it off the page just a bit.  Below is a photo of the single gate, single swirl and the final trellis on my page photo.  I have always wanted to try metal work, but I cannot afford another craft and love that I can design and cut on my Cricut!
For the rolled roses, I used The Robin's Nest Shocking Pink Glitter Sorbet, Red Glitter Sorbet and White Card stock (inked edges with pink ink) and and cut them using Close to My Heart Cricut Artiste cartridge. Since The Robin's Nest card stock has such great heavy quality, I use and ball tip roller on my flowers before rolling them.  This helps soften the paper for a great natural look.  To get these to dry quickly, I like to use a low temp glue gun.  Note that I used some mini dew drops for the centers of some of my roses (can you see it in the center of the red rose below?  I also scattered a few Flame dew drops near the vine.
The vine is cut with The Robin's Nest Kiwi Glitter Sorbet Card stock with the Close to My Heart Art Philosophy Cricut cartridge. I wove the vine in and out of the trellis. Don't be afraid to clip this vine as needed to make it work! The clouds are Close To My Heart cartridge.  I love the cloud trend!
I wanted a subtle title, so I stamped it using gel-a-tins Teal You What embossing powder on white card stock.  It works so well with the Aqua Glitter Sorbet paper!  The title is stamped with gel-a-tins Laugh Out Loud Oversized Mix stamp set.  Here's a tip for those imperfect stamped images when using embossing powder. Stamp your image, and added embossing powder. Be sure to heat set your embossing powder FIRST. Then, fill in the missing areas with a Stampin' Up blending pen.  Can you see my white spot on the letter "e" below?
Sprinkle the embossing powder over the area just colored with the blending pen and heat set. Problem solved! The back ground paper is The Robin's Nest Aqua Marine Glitter Sorbet Card stock. I distressed the edges and added a few peak boo elements.  Be sure to check out the sale on the Glitter Sorbet paper!  The colors and sparkle are so fabulous!  No need for a coupon, paper is already discounted!

Supply List
The Robin's Nest Aqua Marine Glitter Sorbet Card stock (background sky)
The Robin's Nest Kiwi Glitter Sorbet Card Stock (vine)
The Robin's Nest Red Glitter Sorbet (Photo mat & flowers)
The Robin's Nest Shocking Pink Glitter Sorbet card stock (flowers)
The Robin's Nest Flame Dew Drops
Black Card stock
White Card Stock
gel-a-tins LOL Oversized Mix Stamp set
gel-a-tins Teal You What embossing powder
Versamark ink
Close to My Heart Artiste Cartridge
Close to My Heart Art Philosophy Cartridge
Cricut Ornamental Iron Cartridge
Cricut Craft Room Software

Friday, April 12, 2013

Daisy Days Blog Hop with The Robin's Nest

Welcome to the Daisy Days Blog hop with The Robin's Nest!  Thanks for stopping by all of the blogs on the hop!  To follow the hop line up, simply click on the blog listed at the bottom of this post or to the right!  The fun starts at  Robin's blog.  And The Robin's Nest is offering blog candy!   Each blog will have a prize package, "Daisy Package" with a value of $15.00 and it will include Tear drops, paper and embellishments.  One Grand Prize winner will get $25.00 towards the Robin's Nest on-line store and will be posted on the Robin's Nest blog on Sunday April 21st   Be sure to leave a comment on all the blogs along the hop for your chance to win!

I thought I would use this hop to talk about how to pull together a mini album for a great look!  Here are my tips:
1)  Use a great paper line from the same company!
2)  Use a theme:  I used travel.
3)  Use a consistent shape:  I used daisies!
4)  Use a few consistent inks, markers and embossing powders that coordinate with your color theme.  I chose my color theme by using the colors in the albums and adding neutrals.
Growing up, when we heard my Dad say he was taking the scenic route, we were sure to get lost, but we also knew that we would see the off beaten track beauty and back roads sites.  I want to teach my boys to record their memories and enjoy the journeys on all of their vacations and trips!  Since I often associate wild flowers with these scenic routes, I thought the daisy theme of this blog hop was perfect for my travel album theme!
I started with a mini album I picked up at my local dollar store called Inspired Traveler by Creative Imaginations.  I added beautiful paper and embellishments by The Robin's Nest.  Below I used a Close to My Heart Stamp set (USA) and a Heartfelt Creations Stamp set (Script inside the map) on the Robin's Nest  Discovery Glitter Swirl paper.  Some other tips for mini albums:  use those scraps you love in small touches to make embellishments!  Find your theme and shape ideas on Pinterest!  Just search for the item you want to use to pull it all together and you'll find lot of ideas!  Scrap pages ahead of time and bring travel albums on the trip.  Have the kids journal on the road trip!

Below are some of the pages made with the Marvy Uchida Flower punch and Dew Drops by The Robin's Nest.  


I love these fishing chippies from The Robin's Nest and had to work some into our travel mini album!  I just cut a bit of brown card stock and clipped the chippie onto it.  Of course my Uniball white ink pen ran out of ink and I have a new one on order, so please excuse the missing faux sewing stitches!


Supply List
The Robin's Nest Getaway Dew Drops
The Robin's Nest Teal Classic Glitter Card Stock (cover)
The Robin's Nest Daisy Stripe Honeycomb
The Robin's Nest Brown Classic Glitter Card stock
The Robin's Nest Fishing Chippies
The Robin's Nest Pearl Dew Drops
The Robin's Nest Pinetrees Card Stock
The Robin's Nest Viva la France Rubon
The Robin's Nest Fresh Mowed Grass Dew Drops
The Robin's Nest Teal Fleur Card Stock
The Robin's Nest Tropicana Fleur Card Stock
The Robin's Nest White Snow Glitter Card Stock
The Robin's Nest Discovery Glitter Swirl
The Robin's Nest Autumn Tag Kit
Piccolo Enamel Powder Adhesive
Piccolo Vintage Copper Enamel Powder
Little Yellow Bicycle Fresh Print TRAVELER paper
Marvy Uchida Flower Punch
White Card Stock
Green Card Stock
Inspired Traveler Mini Album by Creative Imaginations
Cricut George Cartridge
Cricut Opposites Attract Cartridge
Cricut Graphically Speaking Cartridge
Close To My Heart Adventure USA Stamp
Stampin' Up The Open Sea Stamp (Globe Image)
Creative Memories Circle Punch
Heartfelt Creations Stamp
Glue Dots
Close To My Heart Inks
Brown Marker
Uniball White marker
Flower Bling
Chalk inks


Tuesday, April 2, 2013

I Made The Art Glitter Design Team

I am so excited to tell you that I made the Art Glitter Design team for 2012-2013!  I love their glitter, glues and other products!   I love to embellish my paper Cricut cuts with glitter and dew drops!  On this layout, I embellished my flower with Art Glitter and dew drops and my title with diamond dew drops.  One of the things I love to do with The Robin's Nest Diamond Dew Drops, is embellish a title.  I use a cursive style font that is not too fat cut with my Cricut and add the diamond dew drops point to point along the title.  I get the look of a fabulous expensive embellishment for less!  Below is a close up of the title with the diamond dew drops applied.

I also cut my poinsettia with Cricut's Joys of the Seasons and embellished the edges with Art Glitter's Showgirl Dazzlers.  The center of the flower is embellished with green glitter and dew drops by The Robin's Nest.  This is a great tip, if the dew drops you want to use in the center of the flower aren't showing up, just glue glitter in a matching color behind the clear dew drops to make their color pop!

Supply List
Fussy Ric Rac JoAnn Fabrics
Buttons
Bling flowr
Prima (green leaves)
White Daisy


LinkWithin

Related Posts with Thumbnails