background

Monday, October 31, 2011

Harvest/Halloween Blog Hop with The Robin's Nest Design Team!


Welcome to the The Robin's Nest Harvest/Halloween Blog Hop! Please start the hop at the Chattering Robin's Blog and return there if you get lost! If you have already started the hop, you may have arrived from here from Jan's blog. There is candy on hop, and to qualify for the drawing you must follow all the blogs, and comment on all the blogs along the hop! Each blog has one gift certificate for The Robin's Nest store in the amount of $15.00 and there is a $50.00 grand prize as well! Please watch for the winner's name to be posted on November 6, 2011! Today I am sharing my project for a dew covered spiderweb! You can display it in a window (photo below) or use it on a page like the one above.
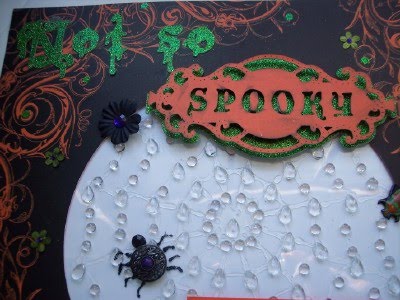
I have loved spiderwebs and all my life I have been amazed by them! Sometimes in life, we come across these fragile moments in nature, like a dew covered spiderweb and try to preserve them. So, I thought it might be fun to try and capture the beauty of the dew covered spiderweb with The Robin's Nest Dew drops. I started by googling spiderweb and found one on Flicker here. I found a photo of a dew covered spiderweb and noticed that at the intersections on the web, the dew formed drop shapes. Along the spokes of the web, the dew gathered in round drops.
I pulled out my salad packaging and cut the lip off the packaging cover with my scissors. I printed out a spiderweb on paper to trace and placed it under my packaging. I sorted out the dew drops before starting so I could work quickly. Using Rangers Liquid Glass I began tracing the web and worked from the center outward. It dries quickly, so I worked small areas at a time. Simple project, inspired by the most talented artist I know: Mother Nature!
Once I had my spiderweb, I cut a circle in the middle of the Halloween Swirl, so I could show the beautiful paper and put my spiderweb in the center. I added a matted photo and cut my title using The Robin's Nest Lime Green Glitter chipboard for the base of my title. The orange title is from Happy Hauntings Cricut Cartridge. I added a spider made with a button and some Stickles and a few flowers. I love how my oldest son is so interested in spiders and bugs. We just might have an entomologist in the family one day! Please find your next stop on the hop after the supply list!
Supplies
The Robin's Nest Lime Green Glitter Chipboard
The Robin's Nest Dew Drops
Prima Flowers
Want2Scrap Purple Bling
Close To My Heart Green flowers
Button (Spider body)
Stickles Black (Spiders legs)
K & Company Bug
Cricut Happy Haunting Cartridge (title)
Below is a list of stops along the hop, but if you get lost at any time, please stop by The Chattering Robin's Blog to finish the hop! I used dew drops from The Robin's Nest Hydrangea Freedom colors.
Clare Dempsey's Blog (you are here)
And your next stop on the hop is Peg Round's blog here!

Tuesday, October 25, 2011

Using the Glitter Lace Technique on Fabric


I love the Art Glitter Videos, and one of my favorites is the Glitter Lace Card by Barbara Trombly. You can find the video here (link is http://www.youtube.com/watch?v=xdljEFJ57po). This week I set out to see if I could get the same look on fabric and enter it in the Moxie Fab Challenge: Autumn Woods Tuesday Trigger Challenge. The Moxie inspiration photo is at the top. The lace look is a bit more subtle; on fabric, but just as beautiful with Art Glitter! Here is what you will need to make this card:


Art Glitter Dries Clear Designer Fabric Glue

Another Glue that dries tacky such as The Rubber Café or Zig 2 Way glue

Art Glitter 343 Chestnut Ultrafine Opaque Glittter

Art Glitter 86 Angel Dust Ultrafine Transparent Glitter

Art Glitter 295 Ensalada Ultrafine Transparent Glitter

Ivory Canvas Fabric

Ivory Calico Fabric

Assorted Ribbons

Metallic Card stock


Cut a piece of canvas at least 1 “ larger than your Art Glitter lace sheet on all sides. This is more than you will need for your card, but will allow for cutting later. Press any wrinkles out of your fabric and allow to cool. Working on top of a sheet of Parchment paper (shiny side up) or a Teflon craft mat, apply your dries tacky glue and smooth over the surface of your ivory canvas fabric. I used the Rubber Cafe glue. Here is a photo of the canvas fabric with the dried glue.

You will want good coverage so that the surface for the lace will be flat when glue dries. Allow to dry overnight. In the morning, remove the canvas from the Parchment paper and apply the Art Glitter Lace on top of the glue. Because these glues (Rubber Cafe or Zig 2 Way) dry tacky you will be able to reuse your Art Glitter lace later! Smooth the lace onto fabric and make sure it is adhering well. Begin by pooring your darker color first (for this card Chestnut) and tap off the excess. You will want to see the video for the specifics! Then remove lace and poor on the Angel Dust glitter. Highlight the flower centers with the Art Glitter Dries Clear Fabric glue and apply the Ensalada color. Allow to dry.

Cut the card base with metallic card stock. Cut the calico smaller than the card base and pull a few threads on every side to achieve a frayed look. Glue the calico onto the card base with the Art Glitter Dries Clear Fabric Glue. Glue the glittered lace fabric on top using the Art Glitter Dries Clear Fabric Glue.

Monday, October 24, 2011

I'm a Minion Monday


Two weeks ago I started a new feature called Minion Monday, and today I picking up with the feature and sharing a blog that I follow: Amazing Paper Grace. The first Minion Monday I shared a follower of my blog, today I am sharing one I follow. Please check out Becca's blog for beautiful paper crafting and great inspiration! Always pretty, with perfect touches you will find gorgeous cards, tutorials and more at Becca's blog!

Sunday, October 23, 2011

Wii Remote Treat Box to Share


Someone on the Cricut Message boards recently posted some adorable treat and cake boxes that were made with a new cartridge. Since the budget is tight
these days, it got me thinking...what could I make for my boys birthdays with cartridges I already have? How about a treat box that looks like a Wii remote? Above you can see my photos and you can find the Cricut DS file here. I would love your comments if you like this enough to download. And please, do not sell these items or my file. If you want to share the cut file, please refer your fellow Cricut lovers to my blog!
To cut this you will need George Basic Shapes and Lyrical Letters (for the plus sign), some Cricut Markers or Chomas Markers, glue, and ribbon. You will see a small line near the bottom of my box, this is not in the cut file. My machine is old and well loved and sometimes it drags my Chomas markers a bit. I was so excited to share the file, that I put it up with the
mark on the box!

Put your paper on the mat, load your markers and cut the Pen marking page first. Switch to the blade, DO NOT unload your mat, and cut the Layer 1 Page. I only added score marks on the final side as I think the flaps show you where to score and I am not fond of them. I added a bit of ribbon to look like the strap and called it done. I made it to scale, so you should be able to fill it with small candies, such as M & M's or candy corn. Thanks for stopping by!

Saturday, October 22, 2011

Card Making with The Robin's Nest and Viva Las Vegas Stamps!


This month The Robin's Nest Design Team is product swapping with Viva Las Vegas Stamps! I usually make cards with my stamps, so I used three of the Viva Las Vegas Stamps to make up three cards.
The first card is made with Viva Las Vegas Fan Lady on a Balloon Stamp. I love the quirkiness of the balloon and how beautiful the shape is. It took me several glances to realize her skirt is a balloon! I used The Robin's Nest Little Girl Crown Paper, both sides (stripe on the other side), pink organza ribbon. The frame is cut with the Art Philosophy Cartridge by Cricut in brown card stock. I added some of The Robin's Nest pink Dew Drops and distressed the edges and the card is done! The sentiment is from the K. Andrews Designs Fashionable Friends Set.

The second card was made with the same paper from The Robin's Nest: Little Girl Crown Paper, The Robbin's Nest Dew Drops, Viva Las Vegas Singer Sewing Machine 2 1/2 x 2 1/2, a bit of sewing trim I had in the stash (I think from JoAnn's),and the sentiment is from Clear Art Stamps Sew Special Set. I love cutting details that will show off the other side of my paper! I added some of The Robin's Nest pink Dew Drops and distressed the edges and the card is done!

The last card is made with The Robin's Nest Winter Snowflake Paper, I used the paper as the navy background and fussy cut one snowflake for the front. I then stamped the Viva Las Vegas Steampunk Christmas Tree, and added a bit of stickles to everything to add a bit of sparkle and pull the whole thing together! The striped paper
flake Stripe paper. The snowflake was made with a McGill punch and I added The Robin's Nest Precious Girl Dew Drops to the snowflake and the sentiment. I fussy cut a circle from the Viva Las Vegas Christmas Tree and stamped Joy on top. The sentiment is a Close to My Heart Set.

Monday, October 10, 2011

Minion Monday: My Follower's Blogs


I'm starting a new feature today and sharing with you some of my followers blogs, in random order. I'm calling it Minion Monday, after my son's picked up a new favorite word "Minion." I looked it up, and follower is one of the definitions. So, each Monday I'll be featuring a blog of one of my followers that I have enjoyed visiting and follow.
Today's featured blogger is Amanda Remus. Here blog is called 3 Little Monkeys Designs. Amanda scrapbooks and makes cards. I love her scrapbook pages! She has just started digi scrapping, so if you don't digi scrap, look for more traditional pages in her older posts. Amanda has a wonderful sense of color and embellishment style that still allows her photos to show through. Like me she also has boys and appears to have a ribbon habit!
I love this mini album page (pictured above)! The whole mini album is beautiful and you just might want to check it out at here blog here.

Saturday, October 8, 2011

Party Lights for Less with Art Glitter!


I love a look for less and this time, I'm working on holiday and party decorations with salad packaging and Art Glitter. I cut the triangle box using my Cricut Tags, Bags, Boxes and More Cartridge and glittered it to look like candy cor
n. Some other ideas to try are cut the purse box and use it for a girls birthday party! Cut the same triangle box and make Christmas tree lights, or cut a square box and make ABC blocks for a baby shower. The possibilities are endless.Here's how to get the look for less:

Supplies:
Plastic packaging such as salad box tops, Cricut Clam shells etc
Deep Cut Blade and Housing
Cricut Machine (you could use a Sizzix
Die or template if you don't have a Cricut)

Scoring Tool
Scissors
Hole Punch
Low Temp Glue Gun and glue sticks
Strand of lights

Preparing the Box:

Begin by cutting the lip off of your salad lid packaging with a scissors so that it lies flat. Apply it to your Cricut mat. Change your blade in the Cricut to the deep cut blade and housing, cut the box using the Tags, Bags, Boxes and More Cartridge.Punch a hole for the light and score your folds before applying the glitter.
Creating the Lights:
Begin applying the Art Glitter dries clear glitter starting with the darkest band of color area first. Shake off excess glitter and apply the glue and glitter to the next color area. Allow to dry and glue box together using low temp glue gun.

I also did a glue comparison for you and found that the Art Glitter Dries Clear adhesive is far superior. The photo below has the Art Glitter glue on the left and the Provocraft Terrifically tacky tape on the right. Can you see how much richer the Art Glitter glue made the glitter?!
I wish you could see these live,the picture does not capture the full richness of the Art Glitter Glue and you will find, the liquid glue a better value too!


Now just insert your light through the back of the box and you have a great look for less! Give Art Glitter a try next time you need some great party lights!

Halloween Banner with The Robin's Nest


I love making banners for special occasions and holidays! For this Halloween, I pulled out The Robin's Nest Halloween papers and made a fun banner! The base banner piece is cut with The Robin's Nest Glitter Purple Bats Card stock. I cut the banner piece with my SCAL 2, but you can cut your own and trace it onto the paper. I have found that a digital cutter is so helpful, when you have to cut many items for a project such as a banner.


The next layer is a scalloped circle cut with Cricut Mini Monograms, in orange card stock. The rosettes are made with Tim Holtz's Rosette die in The Robin's Nest paper. I love this die and have found that the best way to glue this is with a low temp glue gun. Work from the back side with a plain circle punched in matching cardstock. Save the nice scalloped circle cut with the die for the top! You will find it difficult to center the first circle perfectly and get your folds in place. I also love the stability that having a circle on both sides adds. So, I add my die punched circle last.


On top of that I punched a white circle and inked the edges with purple ink to repeat the purple from the purple bats! I On top I punched a small scalloped circle in Lime Green The Robin's Nest Glittered Chipboard. I placed this circle a bit off center to look eyeballish and perfectly scary! The letters are from Paper Pizazz Typewriter alphabet. I liked the spooky quality of the letters. It is best to use a liquid glue on top of the glittered chipboard or card stock. Tape runners don't seem to hold items on top of glitter. Below is a picture of all of my layers on my banner from left to right they show the banner top to bottom.


You can display a two word banner as I did on a door in two layers, or across a mantle. Just insert a shape or motif in the middle to separate your words when you display this across a mantle. I would love to add a spiderweb to this one for displaying on my mantle. Hopefully, I can find the time to make one!


Supply list


The Robin's Nest Polka Dot paper


Orange Cardstock


White Card stock


Purple ink


Paper Pizazz Typewriter Alphabet


Ribbon


Cricut Mini Monograms


SCAL2

Saturday, October 1, 2011

Where in the World Are Celebrating World Cardmaking Day?


World card making day! You know you are a serious paper crafter when...you know it's World Card Making Day! So, I'm celebrating here in Illinois with a card made with my newest Cricut cartridge: Damask Decor and I found a challenge just perfect for pulling it out of the box! I'm entering this in the Case Study CSC59 challenge!
The inspiration card and the design team cards all had beautiful bows! I'm bow challenged, so I used a piece from some vintage jewelry instead. The rhinestone circle and stamps are CTMH! The ribbon is Making Memories. I used Dew Drops from The Robins Nest for petals for my flower, to repeat the sparkle from the rhinestones.
Hope your World Cardmaking Day and every other day are filled with joy!

School Blog Hop Winners

The winners for the School Blog Hop are:

edwinabrown at comcast dot net

and the winner selected for the Cloud Nine gift card is:

Krista from Krista's Paper Cafe
If you are a winner please contact Jamie for more info on claiming your prize!

LinkWithin

Related Posts with Thumbnails