background

Thursday, December 19, 2013

Holiday Curb Appeal

Supplies
Art Glitter 346 Chunky Transparent Winter White Glitter
Art Glitter D63 Nuts Slices
Art Glitter Dries Clear Glue
Floral Picks Michaels
Steel Heart Sled or sled with runners
Scarf
Skates
Ribbon
Basket
Plastic Ornaments Walmart
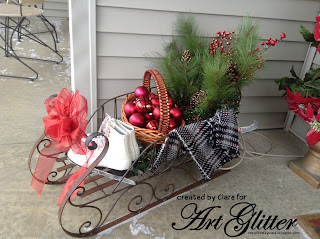
This year Clare really wanted a touch of nostalgia for her holiday curb appeal and she added some sparkle and shine with Art Glitter.  Clare thinks that Art Glitter is a great way to add sparkle and shine to outdoor decorations that have limited light on a dark winters night!   She started with an old pair of skates, picked up for cheap shopping garage sales over the summer.
To add some sparkle to the skate blades, Clare used Art Glitter D63 Nuts Slices.  Clare thinks the Slices are a perfect way to mimic the way ice forms on the window panes (see image below found here).

 The sled was found at a local craft sale, but you could use an old sled with runners!  Clare then embellished some plain pine and berry floral picks from Michaels.   She used Art Glitter 346 Chunky Transparent Warm White Glitter on the pine cones and the berries.  

To fill in the sled, Clare filled an old basket with shatter proof plastic ornaments, an old scarf and a Christmas garland wrapped around the bottom of the floral picks.  A bow on the front and Clare finished the sled.  A quick and beautiful project.  

Clare loves to use a  project like this is to cover her cords from the view from the street.  


Tuesday, December 10, 2013

Why I Like Art Glitter Better Than Stickles


Supplies
Art Glitter D29 Confections Dazzlers
Art Glitter 175 Retro Red Ultrafine Pearlescent
Art Glitter Dries Clear Adhesive
Art Glitter Ultra Fine Tip
The Craft's Meow Vintage Ornaments Stamp Set
Zva Zva Creative Pearls
Copic R59
Copic E29
Close To My Heart Stamp
Ribbon
Stampin' Up buckle slide
Patterned Paper

When I first started embellishing my paper projects Stickles were all the rage and I bought a few bottles.  But I stumbled upon Art Glitter at a local store called Peddler's Den and saw immediately it was much better.  So here is my list of reasons that I like Art Glitter glues and glitters better:
1)  Art Glitter Glue dries much quicker!  How many times have you put something on top of a stickled project or touched your stickles only to find it isn't dry.  I sometimes has stickled a project in the morning at a crop and had to wet when I leave the crop hours later.  I find AG dries within minutes!
2)  Art Glitter has a finer line.  If you use the Art Glitter Ultrafine tip, you will find that is a much finer line than the line from the Sticles.
3)  Art Glitter easier to use.  I often get a hand cramp when squeezing Stickles and have to store them upside down to get the most out of a bottle.  Art Glitter glue comes out easily and I need not apply presure.
4)  Art Glitter has more varieties in color!  Stickles has 65 colors and Art Glitter has 179 color of just the Ultrafine Opaque Glitter.
5)  Art Glitter has more varieties in texture!  Some of the textures are Ultrafine Opaque, Ultrafine Transparent, Ultrafine Opaque Hologram, Chunky Opaque Hologram, Microfine Opaque, Gala Glitz, Shards Vintage Glass Glitter, Fine Vintage Glass Glitter Slice Glitters, Art Hexi Glitter, Funky Opaque, Flake, Earth Textures, Glass Beads and many more.
6)  Art Glitter lasts longer.  I have used many of my Stickles bottles on project, while the Art Glitter lasts forever, and their glue bottle is larger and lasts for many projects.
7)  I can use Art Glitter for temporary tattoos!  I confess, I like the idea of the tattoo, just not the life of a tattoo, so I like to make mine with Art Glitter!  Be sure to not use their glass glitters when making these!  No Stickles for my glamour projects.
To make the project above, I stamped the ornament  with Craft's Meow Vintage Ornaments.  I am so sad they are closing!  I did get a change to shop their sale and had to use the great stamp immediately!  I scraplifted the card layout from one of the DT members but have lost the link.  I high lighted the edge with  Art Glitters Retro Red using the Ultrafine tip and used the Confection Dazzlers and the ultrafine tip for the snow like dots on the cream paper and in the oval on the ornament.  I colored the Zva Zva pearls with the Copics and found the Cardinal Red made my pearls to pink, so I used a second Copic color Burnt Umber.  Don't forget you can use more than one color to get the color to match your project!

Wednesday, December 4, 2013

Angel Sympathy Card with The Robin's Nest

I needed a special sympathy card with an angel and found just the one I wanted at the Silhouette store.  I welded the wings with a scalloped circle that I got for free and made a frame.  I embellished the frame with mini dew drops from The Robin's Nest.  Purple paper is from Club Scrap (in the stash forever!) and the angel wings were cut with silver vellum.  I high lighted the back ground of the angel to make her stand out with Copic Markers and used white Stickles around the wing edges.  Stamp is Close to My Heart.

Tuesday, December 3, 2013

Folk Art Pillow with Art Glitter


Supplies
Art Glitter Fantasy Fiber
Dimensions Needle Felting Kit (Clare found this at Michael's for $3.99 retail before coupon)
Old wool garment or scrap fabric
Pillow form
Sewing Machine
Iron
Snowflake template (Clare used Home Accents Cricut Cartridge)
Tailors chalk or white fabric marking pen

If you know Clare, you may know she is always trying to work in some fabric or textiles crafts with Art Glitter products.  This years she was so excited to try an old technique with a new product:  Needle felting with Art Glitter Fantasy Fiber.  And Clare found a way to try this technique on the cheap too!
Clare started by taking apart an older wool dress.  She used a garment that was at least 80 % Wool tomake felted wool.   She washed and dried it at the hottest temperature and then ironed it.  She cut it to fit her pillow form, leaving an opening in the back so that she could swap out the pillow cover after the winter season.

Clare cut a snowflake template using the Cricut Home Accents cartridge.  She then traced it onto the right side of the pillow front using tailors chalk.  Using the Dimensions needle felting kit and the Art Glitter Fantasy Fiber, Clare filled in the snowflake design.  And the Fantasy fiber worked wonderful for this!  It did NOT break!   Clare is sharing a video HERE she made on how to needle felt with Art Glitter Fantasy film here.  Here is how the pillow looks half way done.
Once the design was filled, Clare used an iron to heat set the snow flake design.  Place a piece of parchment paper on top of the design and then, set using a medium setting for 3 to 10 seconds.  Or just leave it without ironing for a faux fur look!


Saturday, November 30, 2013

Paper Wreath: Overcoming Creative Block with FCCB Challenge 188

I put together another paper leaf wreath for Christmas and needed to cover some bare spots in the back ground.  I had some creative block and could not figure out how to fill them in.  So, I set it aside for a week.  Then I ran across FCCB Challenge #188:  Sparkle and Bling and knew what to do:  glitter!  Sometimes, all I need to get over creative block, is a good challenge!  So here is my wreath made with Winter Woodland, some buttons and Art Glitter 47 Vine, Basic Grey paper and other paper.

Sunday, November 24, 2013

Pumpkin & Paper Turkey with Art Glitter and Cricut

I saw some beautiful metal garden art pumpkins at our local craft fair this fall and as usual, decided I could make a better one for less with paper!  So here is my pumpkin and paper turkey using Cricut Close to My Heart Artiste, Cricut Ribbons and Rosettes, and Cricut Create a Critter.  I cut six of the rosette pieces and glued them together.  I folded them and then added the Art Glitter using the ultra fine tip and 56 Pumpkin for the brown paper with orange glitter, and 343 Chestnut for the brown glitter on the orange rosette.  The brown back portion of the tail is Cricut Artiste, the fan folded portion is Ribbons and Rosettes, and the turkey is Create a Critter.


Wednesday, November 20, 2013

Work the Stash Wednesday: Still Playing in the Leaves

If you are like me, you have a stash of Cricut cuts that you may have already cut, but never used.  I cut these leaves for a paper wreath and had left overs.  Just couldn't bring myself to throw them away as they were so pretty!  So, I used them to gift tag and embellish this years batch of pumpkin butter.  I like to make it for my children's teachers around Thanksgiving to let them know I am thankful for them.  Leaf is from Sophie, rosette is Tim Holtz die, stamps are CTMH (sentiment says Grateful for You).

Sunday, November 17, 2013

Simple Sparkle

Supply List
Small Water Color Brush
Anna Griffin Embossing Folder
Patterned paper
WhiffOFJoy.com Shopping Willow Stamp
K. Andrew Designs Fashionable Friends Stamp Set (sentiment)
Paper Doily


One of Clare's favorite glitter techniques is a simple way to add sparkle strips.  It is made with double sided sticky tape and looks great on a card or a page.  Clare got this look by just cutting the double sided sticky tape and notching one end.  She removed one red side and adhered the tape to the project.  She then removed the final side of the red tape protector and pored on the Art Glitter.  Clare stamped  her shopping girl and colored her with Tombow Markers, using the Blending Mister and a small water color brush.  One of Clare's favorite things to do with the Tombow markers is to distress her paper edges!  It is difficult for to find distressing inks in brighter colors.  So, Clare' often runs the markers along the edge of the paper, using the paint brush side of the Tombow Marker and then blending it with the Blending Mister and a small water color brush.  Clare used this technique to get the yellow edge on the plaid paper stripe behind the doily.  And this is also a great way to repeat the color in your stamped image.

Wednesday, November 13, 2013

Work the Stash Wednesday: Leaf Wreath

I have wanted to make a leaf wreath forever and am finally getting around to it this year.  I thought it was the perfect project for work the stash Wednesday since I have had some of this card stock forever!  I followed the tutorial I found at Popper and Mimi here, but used a Cricut leaf from the Sophie cart.  The title journal block and letter stickers are The Robin's Nest.  The flower is Mon Ami Gabby.  I used CCR to create a file with leaves and cut one sheet each in orange, yellow, green, brown, and red card stock.
I have to warn you that this project is addictive!  But the price is great!  I spent less than $2.40 on paper and the card board was free!  I splurged on the flower for $2.99.  Now I want to make one for every season.  Below you can see a screen capture of the CCR file.  I will try and share it later, but my computer with CCR won't connect to the internet today.

Tuesday, November 12, 2013

Inspired by Card Creations: A Flower File to Share

I loved the Kim Hughes card featured in Card Creations Volume 7 with Lillies of the Valley and stitching.  I visited Kim's blog and could not find any post on this project.  Since I could not determine if there was a cut file for sale (or a punch or die), I decided this was simple enough for me to create a SVG for and I am sharing it here.  
Kim used this in a rectangular shape, but you know I had to add a circle!  To see a picture of Kim's card, be sure to visit the link above.

Monday, November 11, 2013

A Sympathy Card & A Thank You!

I am behind on my thank you notes, so today while working on a Sympathy card I'm going to say thank you in this post to Fantabulous Cricut Challenge Blog and Zva Creative for the prize package.  I was the random winner of challenge 181 Have your cake.  I can't believe all the goodies in the prize package (photo below).  I was able to use the Zva Pearl Swirls in a sympathy card today.  Papers and stickers are Anna Griffin, stamp is really old Angel Co.

Friday, November 8, 2013

Finish it Friday with Fantabulous Cricut Challenge Anything Goes

Today I am sharing a Christmas page I made using the following Cricut Cartridges:  George (circles), Close To My Heart Art Philosophy (Square doily), and Joys of the Season (leaf and berry sprig).  I am entering it in the Anything Goes Challenge at Fantabulous Cricut.  
The paper is K and Company (except chevron) and the snowflake rosettes are Tim Holtz.  I love the Tim Holtz rosettes and was so excited to find the snowflake die at It's Always Fabulous on Etsy.  The red stars are Queen and Co.

Wednesday, November 6, 2013

Work the Stash Wednesday

If you have scrap booked as long as I have, you may have a large stash of paper that you have promised you will use.  So, today I am using some of my stash and sharing a page I made with a photo from a family Christmas card.  The snowflake is made with Winter Lace Cricut Cartridge, and the title is Martha Stewart Seasonal Cake Cartridge.  The paper is Basic Grey and I have had scraps of it forever.  It was just too pretty to put in the recycle bin, so I have fussy cut the poinsettias and added them to the page.  The brads are Close to My Heart.  Small snowflakes are made with Martha Stewart punch and then punched with Creative Memories Circle punch.

Sunday, November 3, 2013

Shared it Sunday: A Christmas SVG Title

You may be sharing on Facebook all the things you are thankful for this November on a daily basis or seeing all those sharing things they are thankful for, and all this sharing has reminded me of things I am grateful for.  One of the things I am grateful for is my blog and online crafting friends, so I thought it time to share a SVG I made for a Christmas page.  If you like this title, enough to download it, I would love for you to comment here and let me know.  It might encourage me to make and share more SVGs.  I am thankful that I can cut SVGs on my Cameo!
The SVG has "C" on one end of the circle and the rest of the word "hristmas" on the other end.  I love this look!  Here is the link for the file.    Below you can see how I used it on a page.  Wondering about that translucent doily?  It's Stampin Up die cut in wax paper.  I like to use wax paper between my card stock and detailed dies to make the card stock easy to remove and sometimes the wax paper is just too pretty to throw away.  I thought it was a great addition to this page and the winter and snow!  The other snowflakes are Martha Stewart punches and the paper is old Fiskars.

Friday, November 1, 2013

Adding Sparkle to Holiday Projects

Joy Card


Supply List
White Card Stock
Red Card Stock
K & Company patterned paper
K & Company Rub on
Martha Stewart Snowflake Border Punch
Teal Marker
Red Swiss Dot Card Stock
Red Ink
To create this card, Clare stamped and cut a Christmas tree using Northwoods Berry and Leaves Tree Stamp.  Clare applied Art Glitter dries clear glue using the Ultrafine tip to the ribbon only on the tree stamp.  She added Art Glitter 332 Red Rocket  Chunky Opaque Hologram Glitter and allowed it to dry.  She then matted it on red card stock and cut around it.  She cut a white mat and faux stitched it with a teal marker.  She matted that on some red Swiss dot card stock.  She punched the Martha Stewart snowflake border along the edge of the white card stock and adhered  the border to the back of the K & Company patterned paper.  She used a K and Company Rub on for the Joy to the World Sentiment.  She then assembled all the mats and borders.  
Christmas Tree Star Page


Supply List
October Afternoon Good Cheer:  Falling Snow Paper
Cream Card Stock
Red Card Stock
Red Ink
Forever in Time Gem Swirls

Silhouette America Merry Christmas Title
Clare loves to stretch her stamps to make multiple images with one stamp.  For this project she used the tree stamp to create a star.  To create the star, she stamped and cut 12 Christmas trees using Northwoods Berry and Leaves Tree Stamp.  Clare cut out all 12 trees.  Using Art Glitter Ultra fine tip and Designer dries clear glue; Clare applied glue to the ribbon only on all 12 trees.  She added Art Glitter 332 Red Rocket  Chunky Opaque Hologram Glitter.  She allowed the glue to dry and using 6 trees placed them in a circle to form a snow flake, matching ribbon ends.  She adhered the trees to red card stock and cut around snowflake to form a red mat.  
Using the next six trees overlapping ribbons, she created a smaller snowflake on red card stock.  She adhered the trees and cut out the smaller snowflake.  She adhered the larger snowflake to page, and adhered smaller snowflake inside larger snowflake, alternating tree points.  Clare cut her photo in circle and placed in center of the snowflake, fussy cutting the baby’s hand and feet because they were just so sweet she could not crop them out! 
Clare created the title using a Silhouette file and the Cameo to print and cut the title.   She added the Red Rocket to the title using the Ultra fine tip as well.  She added bling in the lower right hand corner.

A Little Sparkle Page 

Supply List

K & Company  Patterned Paper
Cricut Disney Tinker Bell Cartridge (fairy and title)
Small Water Color Brush
Karen Foster Sparkle Burst Brads
Want2Scrap Red bling
Red Card Stock
White Card Stock
Cricut CTMH Artist Cartridge (ornament)
Fiskars paper crimper (top of ornament)
Microtip black marker
Gold Card Stock

For this project, Clare wanted to try using the Tombow marker to color Tinkerbell.  Clare loves how vibrant these markers can be and that they can also be as soft as a water color paint!  If you have every tried to cut a Tinkerbell and all of her little parts (eyes, fillagree wings, lips, etc) you may understand that Clare find cutting these tiny pieces, lifting them from the mat and gluing them too frustrating!  So she loaded the Chomas creations pen holder in her Cricut and drew the detail Tinkerbell to use as a coloring guide.  She replaced the pen holder with the blade and cut a separate Tinkerbell black out in white card stock.  She placed the pen drawn Tinker bell behind the blackout Tinkerbell on a light box and colored it with the Tombow markers.  

For the skin color, Clare blended Tombow 933, 743, 055.  For the Wings, Tink's Eyes and the large Christmas ornament, Clare used Tombow 452.  Clare is so excited to play with these markers again, because of all the water color posibilities with the control of a marker!  To keep the water content low, Clare sprayed as she worked onto a scrap piece of clear plastic and added more water as needed.  You can find lots of videos on using these markers on Youtube.  Just search for Tombow marker tutorials.  
Clare also used the Chomas pen holder for the title outline and then colored it in with Tombow 452.  She then applied Art Glitter Blue Angel to the title and Tinkerbell's wings using the Ultrafine tip.  She added a few rhinestones and a Sparkle burst brad and a Christmas Card Photo.  The top of the ornament was crimped with Fiskars paper crimper to look like a real ornament in gold card stock.  


Wednesday, October 16, 2013

A Season of Blessings Card

Supply List
Art Glitter Designer Dries Clear Glue
Art Glitter Ultra fine glue tip
Art Glitter 280 Lime Rind
Art Glitter 110 Taupe
Art Glitter D95 Guava Art Hexi Transparent
Northwood Stamp P9239 Berry and Leaf Tree
Copic Markers
Velvet Ribbon
Zipper
Orange Card Stock
DCWV Brown Card Stock
Green Check patterned paper
CTMH chip board arrow
CTMH Flourished Blessings Stamp
Momento Black ink
Distress Ink
Glue Dots
Pop Dots

Clare stamped the fall scene using Momento black ink, so that she could use alcohol markers without the image smearing.  She colored the image and used the Art Glitter Designer Dries clear glitter and Ultrafine tip to apply the 280 Lime Rind Glitter to the leaves and centers of the Sunflowers.  She applied 110 Taupe to the cornstalks in the same manner.  
To achieve the texture I the mums, Clare applied several small dots to some of each flowers petals, but not the entire flower.  She sprinkled on the D95 Guava Art Hexi Transparent glitter.   To add dimension and glitter to the cornstalks, she used Art Glitter Taupe and she used Lime rind on the sunflowers, pumpkin stalks, and leaves. To get the fine detail, Clare loves the Art Glitter ultrafine tip and Designer dries clear glue! She then set this aside and allowed it to dry.  Once dry she matted it on brown card stock.
She stamped the sentiment onto a piece of chipboard and distress inked the edges.  She then matted the arrow on a bit of orange card stock.  She added a scrap of khaki colored zipper and a scalloped velvet ribbon using glue dots.

Sunday, October 13, 2013

And the Winner Is...

And the winner of the Cricut Expression Dust cover is:  lindaplus3.  She said:  Sooooo cute,,, gives me ideas,, thank you and the cover is so pretty :).  Thanks Linda!  I will contact you via email for shipping address.  Thanks!

Thursday, October 10, 2013

Cake Challenge Birthday Card

I'm up for another challenge to get a project done.  This one is a birthday card and I am entering it into Fantabulous Cricut Challenge Me Monday:  Have Your Cake Challenge 181.    The Happy Birthday to you and bottom line of music is from Paper Lace 2, welded to a circle from George in CCR and the cupcake is Cricut Close to My Heart Art Philosophy Cartridge.  I cut some overhead clear sheets to make a see through card front and placed the lace cut on top.  I doodled some faux stitching and place a bit of ribbon under the cupcake motif and the card is finished.

LinkWithin

Related Posts with Thumbnails