background

Thursday, December 19, 2013

Holiday Curb Appeal

Supplies
Art Glitter 346 Chunky Transparent Winter White Glitter
Art Glitter D63 Nuts Slices
Art Glitter Dries Clear Glue
Floral Picks Michaels
Steel Heart Sled or sled with runners
Scarf
Skates
Ribbon
Basket
Plastic Ornaments Walmart
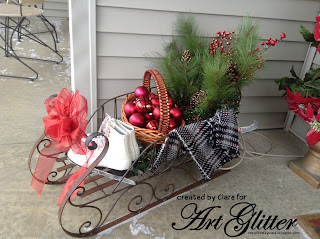
This year Clare really wanted a touch of nostalgia for her holiday curb appeal and she added some sparkle and shine with Art Glitter.  Clare thinks that Art Glitter is a great way to add sparkle and shine to outdoor decorations that have limited light on a dark winters night!   She started with an old pair of skates, picked up for cheap shopping garage sales over the summer.
To add some sparkle to the skate blades, Clare used Art Glitter D63 Nuts Slices.  Clare thinks the Slices are a perfect way to mimic the way ice forms on the window panes (see image below found here).

 The sled was found at a local craft sale, but you could use an old sled with runners!  Clare then embellished some plain pine and berry floral picks from Michaels.   She used Art Glitter 346 Chunky Transparent Warm White Glitter on the pine cones and the berries.  

To fill in the sled, Clare filled an old basket with shatter proof plastic ornaments, an old scarf and a Christmas garland wrapped around the bottom of the floral picks.  A bow on the front and Clare finished the sled.  A quick and beautiful project.  

Clare loves to use a  project like this is to cover her cords from the view from the street.  


Tuesday, December 10, 2013

Why I Like Art Glitter Better Than Stickles


Supplies
Art Glitter D29 Confections Dazzlers
Art Glitter 175 Retro Red Ultrafine Pearlescent
Art Glitter Dries Clear Adhesive
Art Glitter Ultra Fine Tip
The Craft's Meow Vintage Ornaments Stamp Set
Zva Zva Creative Pearls
Copic R59
Copic E29
Close To My Heart Stamp
Ribbon
Stampin' Up buckle slide
Patterned Paper

When I first started embellishing my paper projects Stickles were all the rage and I bought a few bottles.  But I stumbled upon Art Glitter at a local store called Peddler's Den and saw immediately it was much better.  So here is my list of reasons that I like Art Glitter glues and glitters better:
1)  Art Glitter Glue dries much quicker!  How many times have you put something on top of a stickled project or touched your stickles only to find it isn't dry.  I sometimes has stickled a project in the morning at a crop and had to wet when I leave the crop hours later.  I find AG dries within minutes!
2)  Art Glitter has a finer line.  If you use the Art Glitter Ultrafine tip, you will find that is a much finer line than the line from the Sticles.
3)  Art Glitter easier to use.  I often get a hand cramp when squeezing Stickles and have to store them upside down to get the most out of a bottle.  Art Glitter glue comes out easily and I need not apply presure.
4)  Art Glitter has more varieties in color!  Stickles has 65 colors and Art Glitter has 179 color of just the Ultrafine Opaque Glitter.
5)  Art Glitter has more varieties in texture!  Some of the textures are Ultrafine Opaque, Ultrafine Transparent, Ultrafine Opaque Hologram, Chunky Opaque Hologram, Microfine Opaque, Gala Glitz, Shards Vintage Glass Glitter, Fine Vintage Glass Glitter Slice Glitters, Art Hexi Glitter, Funky Opaque, Flake, Earth Textures, Glass Beads and many more.
6)  Art Glitter lasts longer.  I have used many of my Stickles bottles on project, while the Art Glitter lasts forever, and their glue bottle is larger and lasts for many projects.
7)  I can use Art Glitter for temporary tattoos!  I confess, I like the idea of the tattoo, just not the life of a tattoo, so I like to make mine with Art Glitter!  Be sure to not use their glass glitters when making these!  No Stickles for my glamour projects.
To make the project above, I stamped the ornament  with Craft's Meow Vintage Ornaments.  I am so sad they are closing!  I did get a change to shop their sale and had to use the great stamp immediately!  I scraplifted the card layout from one of the DT members but have lost the link.  I high lighted the edge with  Art Glitters Retro Red using the Ultrafine tip and used the Confection Dazzlers and the ultrafine tip for the snow like dots on the cream paper and in the oval on the ornament.  I colored the Zva Zva pearls with the Copics and found the Cardinal Red made my pearls to pink, so I used a second Copic color Burnt Umber.  Don't forget you can use more than one color to get the color to match your project!

Wednesday, December 4, 2013

Angel Sympathy Card with The Robin's Nest

I needed a special sympathy card with an angel and found just the one I wanted at the Silhouette store.  I welded the wings with a scalloped circle that I got for free and made a frame.  I embellished the frame with mini dew drops from The Robin's Nest.  Purple paper is from Club Scrap (in the stash forever!) and the angel wings were cut with silver vellum.  I high lighted the back ground of the angel to make her stand out with Copic Markers and used white Stickles around the wing edges.  Stamp is Close to My Heart.

Tuesday, December 3, 2013

Folk Art Pillow with Art Glitter


Supplies
Art Glitter Fantasy Fiber
Dimensions Needle Felting Kit (Clare found this at Michael's for $3.99 retail before coupon)
Old wool garment or scrap fabric
Pillow form
Sewing Machine
Iron
Snowflake template (Clare used Home Accents Cricut Cartridge)
Tailors chalk or white fabric marking pen

If you know Clare, you may know she is always trying to work in some fabric or textiles crafts with Art Glitter products.  This years she was so excited to try an old technique with a new product:  Needle felting with Art Glitter Fantasy Fiber.  And Clare found a way to try this technique on the cheap too!
Clare started by taking apart an older wool dress.  She used a garment that was at least 80 % Wool tomake felted wool.   She washed and dried it at the hottest temperature and then ironed it.  She cut it to fit her pillow form, leaving an opening in the back so that she could swap out the pillow cover after the winter season.

Clare cut a snowflake template using the Cricut Home Accents cartridge.  She then traced it onto the right side of the pillow front using tailors chalk.  Using the Dimensions needle felting kit and the Art Glitter Fantasy Fiber, Clare filled in the snowflake design.  And the Fantasy fiber worked wonderful for this!  It did NOT break!   Clare is sharing a video HERE she made on how to needle felt with Art Glitter Fantasy film here.  Here is how the pillow looks half way done.
Once the design was filled, Clare used an iron to heat set the snow flake design.  Place a piece of parchment paper on top of the design and then, set using a medium setting for 3 to 10 seconds.  Or just leave it without ironing for a faux fur look!


LinkWithin

Related Posts with Thumbnails