background

Saturday, March 28, 2020

I am Not a Stamper

I have been paper crafting for 20 years and over those years, I have amassed a stash that includes just about every type of paper crafting supply and tool out there.  For many years, I also collected stamps and stamping supplies, but in the last several years I have finally realized I am not a stamper.  So, this week when I saw the Simon Says Stamp blog video on Heat Embossing with Copic Coloring I was tempted again to pull out stamps and give it a try.  
But wait, I am not a stamper and my stamp collection had nothing like the beautiful floral image in Yana's video.  So that got me thinking...what if I could make that image with Anna Griffin images and my Cricut?  So, this is my take on this technique, using my Cricut, Cricut pens, Anna Griffin supplies and Cricut cartridges. 

Here is how to get the same results below. 

Directions
Use the Cricut file shared on the Cricut Community board, or create your own using the Cricut  Phrases Cartridge inverted rectangle and the floral spray from Anna's Lace Cards and Embellishments Cartridge.  Chose the drawn image.  Attach any drawn images to the cut shape and draw and cut the image using the Cricut.  For this first step, use the Cricut Lavender marker.  You are just getting an outline for coloring.  DO NOT UNLOAD YOU MAT!  Carefully, remove the drawn and cut image from the mat without removing the negative shape from the mat (see photo above).  


Using the Anna Griffin Violet Chamelon Marker and the Copic Violet Marker, color in the drawn image.  Now carefully add it back to the mat being sure that your drawn image matches the image on the screen (see photo above).  SWAP THE LAVENDAR MARKER FOP THE CRICUT GEL TIP GLITTER PEN and hit the Cricut button on your machine, so that the image is redrawn on top of the coloring.  WATCH THE MACHINE AND HIT PAUSE AS SOON AS THE IMAGE FINISHES REDRAWING AND BEFORE IT TRIES TO RECUT THE MOTIF!  Now eject the mat and cancel the cut.  Below you can see the gold on top of the colored image.  Photos just don't do this technique justice!  And I cannot believe how well the patterned paper in my stash matched with the Cricut image!
Cut your title.  I ungrouped this font and then welded it and at some point it lost it's name, but I realized later that Anna has a Cricut font I wish I had used instead, called Anna's Fancy Lettering!  Cut the corners using a die.  I used Heartfelt Creations Fleur Border Die set, because I don't have any Anna corner dies, but her's will work well!  Glue the title at an angle to fill the white space in the inverted rectangle.  I used Anna Griffin Glitter stickers for this project, but you can cut your own with Anna's Cricut cartridges instead.  


Supplies
Anna Griffin Patterned paper (12 x 12 paper)
Anna Griffin Perfect Pallette Chameleon Violet Marker
Anna Griffin Lace Cards and Embellishments Cricut Cartridge
Anna Griffin Glitter Stickers 
Copic Violet V09
Heartfelt Creations Fleur Borders and Pocket Dies (corners)
Cricut Ultra Fine Point Lavender Pen 
Cricut Gel Tip 0.8 Glitter Pen
Cricut Phrase Cartridge Inverted Rectangle (Purple and White center motif)
Cream or White Card Stock
Dark Purple Card Stock
Light Purple Card Stock
Font unknown
Wednesday, March 25, 2020

How to use Busy Patterned Paper for a Stunning Look


I have had Anna Griffin's Cream and Black patterned paper for awhile, but have struggled to figure out how to use it in a page.  When I saw Anna Griffin's blog post for using Gate Fold dies, I started to think about using it in a card. Then I recalled that sometimes the best rosettes are made with patterned paper and decided to use them on the arch pattern.  I lined my rosette die up with the pattern and using Anna's Magnetic plate was able to cut this so accurately!  I love the pattern created by making this rosette from patterned paper and the lacy look it adds!


I cut the gatefold in black metallic paper, and cut the inside pieces with some Anna Griffin black and cream patterned paper.  With all the sentiments from Anna Griffin Card kits I have, turns out I am out of sympathy sentiments.  So, I use Anna Griffin Lovely Layered Cards 2 Cricut and Anna's Elegant Embellishments Cartridges to print and cut my sentiments.  


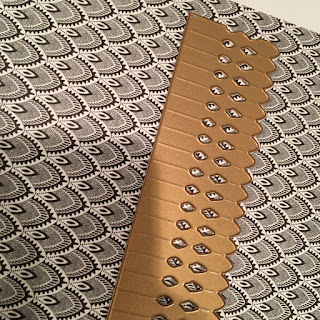
The border detail is from one of Anna's Card Kits.  I am so addicted to these little strips!  They are the perfect die to add a finishing touch to a card or page!  In fact, I think that I would order them if they were sold alone!  I also cut some of the patterned stripe paper to make a belly band for the card, added some organza ribbon over it and put the rosette on the top with the sentiment in the center.  I off to make my first dimensional envelope to mail this, wish me luck!

Monday, March 23, 2020

Try a Challenge for Inspiration!


I am keeping busy crafting while we all self quarantine.  Creating makes me happy, and I often play music or listen to audio books while crafting.  Not only do the music and books keep me happy too, but all this keeps me from watching the news incessantly and worrying too much!  

Challenges often provide inspiration for me when crafting.  I love them because they often stretch my skills to use an item I had not considered something I need to make something beautiful.  I saw the Anna Griffin Trelliage dies and decided that these were an item I was unable to stretch my craft budget to include.  This week the Friends of Anna Griffin Facebook group hosted a challenge to use the AG Trelliage dies, and posted that it was in the AG Pop Up Cricut Cartridge.  I own this one, so I thought I would give it a try.

I welded two of the arches and made a central frame.   Then I sliced another arch and made a border.  I printed and cut the flowers.  I made the title with a computer font and added a journaling die from K&Company.  This files is in the Cricut Community group, but I can't figure out how to share it here.  

Supplies

Anna Griffin Gold Foil Paper Pad Patterned Paper (Blue background)
Anna Griffin Vintage Butterfly Cricut Cartridge
Anna Griffin Pop Up Card Cricut Cartridge
Anna Griffin Green Bow
K&COMPANY Blue Awning Journal Pad Die cut
K&COMPANY Addison Specialty Paper Pack (Light Blue paper in title and behind cream die cut)
Blue Card Stock 
Cream Card Stock
Gold pearl card stock (planters)
Skin toned card stock (planter back layer)
Diskus Std Bold Computer font

Thursday, March 19, 2020

Creating Makes Joy!


I am a grade school librarian and like many school employees I am finding myself at home for some extended e-learning and spring break.  We are all stressing about this pandemic and keeping ourselves and loved one's safe.  I know how happy creating makes me so I have been making an effort every day to create something. 

I had pulled some rose window coloring sheets to share with my students along with some color wheel coloring inspirational photos for our St. Patrick's day library maker space.  Since I couldn't use this with the students, I decided to pull out my Anna Griffin Perfect Pallette Chameleon Makers and try it myself.  This is the first time they have been used!  I realized quickly I needed to pre-plan which color markers to use in which order.  So I pulled 12 markers and used them in a rainbow order.  I filled in some of the areas with black to really make the colors pop and to give the look of a stained glass window.  I found the coloring page here.  It is the Rose window in the French Basillique Saine-Denis. I found ideas for the color wheel here.


Supplies
Anna Griffin Perfect Pallette Chameleon Markers
Rose Window Coloring Sheet
Anna Griffin Pocket Embellishment Card stock Diecuts 
Anna Griffin Corner Pocket Embellishments
Anna Griffin Frame Die cut
Anna Griffin Planner Embellishments
Anna Griffin Card Kit
Anna Griffin Rosette
Copic Black Marker
Pop Dots

LinkWithin

Related Posts with Thumbnails