background

Thursday, August 29, 2013

Mini Album Magic


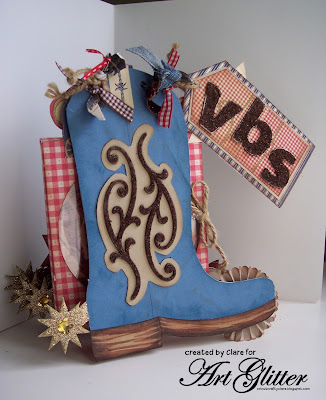
If you don't have enough time to scrapbook all your children's memories, consider scrap booking important events in a mini album!  Above you can see a mini album Clare Dempsey created with Art Glitter and Want2 Scrap to help her boys remember Vacation Bible School (VBS).  Want2Scrap has great mini albums to choose from for those important events and Art Glitter has all you need to make your finishing touches sparkle and shine!   

Front and Back Cover (see photo above)


Here are some ideas for making magical mini albums:
1)  Focus on the Highlights of the event.
For Clare's children, the highlights were Music, Snack, and Crafts!  For music, Clare allowed two pages and made box for the music CD (see photos above).  She used a free SVG from Penny Duncan Designs to cut her CD box.  She also allowed two pages for crafts and snacks (see photos below).

While Bible Verses weren't Clare's boys highlights, Clare felt it was important to recall these as part of VBS memories.  So she gave them two pages as well.  

2)  Use a paper collection to help support the event theme and unify your album design and color scheme.  Here Clare used Close to My Heart's Giddy Up paper pack for the album and supplemented it with Authentic's Pride paper line and some neutrals.
3)  Add some sparkle with Art Glitter to set your embellishments and finished project apart!  Clare loved using the Art Glitter Earth Elements on this project!  Just the right amount of sparkle and richness.  She describes it as being more rich than glittered flocking!  Pictures just don't do it justice and the smell of cacao is fabulous!  To glitter the edges of a folded rosette, be sure to fold and glue the rosette in place before adding glitter.  If you add them before folding, it won't fold well.  
4)  Plan ahead-before the event plan what photos you want.  You can even purchase a mini album, paper, embellishments and glitter ahead of time.  If you are scrap booking VBS, go on Friday and you can get a summary of each of the day's bible verses on one day.  Volunteer and you won't miss a thing!  
5)  Maximize Space-Use journaling labels and stamps to fill the white space in the mini and document those special memories!  Clare also added a title tag, and put a quote and journaling tag on the back side to maximize space.

Supplies

Close To My Heart Giddy Up Paper Pack
Close To My Heart Giddy Up Sticker Pack
Stickerpotomus Denim Alphabet
Miss Elizabeth Leather Alphabet
Cricut Old West Cartridge (Blue Glittered Bible Verses)
Cricut George Basic Shapes Cartridge (Star)
Spellbinders scalloped rectangle dies
Tim Holtz Rosette die
Cloud 9 Designs Simple Thoughts Boys Stamp Set (Memory Quote)
Fiskars Lil' Davis Designs Sentiments (Journaling block & circles)
K & Company Blue Awning Journal Pad label
K & Company Brenda Walton Peppermint Twist Paper (red and white gingham paper)
Sequins Michaels
Ribbon
Brads
Denim scraps
Metal Concho JoAnn Fabrics
Twine
Assorted Card Stock
CTMH Ink
Timeless Twine
Basic Grey Alphabet Stickers (1-5 on Bible Verses pg)

Wednesday, August 28, 2013

Wear it Again Wednesday: Make it Fit Again

Several years ago I bought a new dress for my niece's wedding and loved it.  Despite it's classic style, I can no longer wear it because my metabolism seems to be slowing with age!  Almost 10 pound heavier and the dress doesn't fit.  But I love it, so I began thinking about how to alter it to wear it to another wedding this weekend.  It is a black and white dress, so I decided to add a stripe down the side almost like a pair of tuxedo pants.  Below are my before and after pictures.  What do you think?  Will people know I altered the dress or did I do such a good job I can get away with it?

Hip Area:  Note how the first photo below shows pulling across the front in the before photo and the pulling is gone in the 2nd photo below (after adding side stripe).

Side View Note in the top side photo you can see the pulling across the front and it looks too tight across the bum.  In the second photo below with the side stripe, the pulling is gone and it fits across the bum.  


How did I do it?  I matched the fabric with some fabric I found at Hobby Lobby.  The print is actually a knit and the black is too!  Can't believe I found a black to match!  And then I prewashed fabric and ironed it.  I used my rotary cutter to cut a strip 2 inches wide (allowing a half inch seam allowance) I have a 1" stripe on the side.  Be sure if you use a knit for this technique that the stretch goes horizontally across the body and NOT up and down!  It only cost me $6.84 and I have plenty of left over fabric!  I think I like it better with the stripe!  Now all I need is some Spanx!

Saturday, August 24, 2013

Blue Birds for BBTB2 Challenge


Another week another Bitten by the Bug Challenge!  This one is called Summer Heat is for the Birds.  I thought it might be nice to make a blue card and think cool, especially as we are expecting the hottest week of the year here in northern IL.  I needed a card for my brother and sister-laws new house.  So, I used a house from Fold Art Festival (my new favorite cart) and the circle is from George.  I welded them in CCR and cut it in blue.
The white doily was inspired by all the beautiful doilies in Sophie.  Sophie had no bird doily, so I actually used a bird from Sophie and George's circle in CCR again, to make my own doily.  It really is easy to do, just create one bird roughly one 1/3 the size to fit in one quarter of the circle circumference.  If you use this size, you should need 12 to go around the entire circle.  So, divide 360 degrees by 12 you get 30.  Now rotate for each new bird 30 degrees from the bird to it's left as you place them clockwise around the circle.  So, the second bird rotates 30, the third bird 60 degrees.   You need only create three birds, group and copy to create the next nine and then just weld.  And here is a tip to make working with CCR easier, CCR does NOT seem to like welding grouped objects.  So, to get my doily to weld properly, I had to ungroup the birds!
The crocheted embellies are CTMH, the stamp is Angel company, the chip board is Want2Scrap, and the pearls are Queen and Co.

Tuesday, August 20, 2013

Boy Birthday Resource: Mosdigitalpencil

I am always struggling for birthday card idea for my preteen and teen boys.  Just a few weeks ago, I found www.mosdigitalpencil.com and love her boy designs.  Today I am sharing a card I made using  Video Boy.  I colored it with Copics. The paper is My Big Ideas, stamp is Stampin' Up and just a few buttons finish it up.  Thanks Mo!

Monday, August 19, 2013

Craving Navy Inspired by Anna Griffin

I love Anna Griffin products and missed purchasing her new dies last time they were on QVC.  On Sunday Anna's Facebook page had a card made with the dies and an announcement that the dies would be available on QVC England.  I loved Anna's card (photo below) and needed to make a card for upcoming wedding, so I used it to inspire my card.


Since the invitations were navy and white I decided to enter my card in Moxie Fab Worlds: Craving Navy Tuesday Trigge,.  Looks like I missed the widget cut off...Monday morning must be too lateI loved the use of white and stripes in the Moxie inspiration photo, so I made sure to use them in my card.  To get the look of Anna's dies (until I can get them), I used Cricut's Damask Decor and cut the shape  in white and taupe.  I used Stampin' Ups Sizzix embossing plate to emboss the navy card stock.  The subtle print mat is K and Co.  The flowers and vines are all stamped with Close to My Heart Stamps.  The Best is Stampin' Up, the Wishes in Angel Company.  The striped paper is The Robin's Nest.  I used Art Glitters Blue Gala Glitz in the center of the roses.

Friday, August 16, 2013

Reach for the Stars with Penny Black


I had so much fun last week with the Bitten By the Bug challenge, that I thought I would try it again.  This weeks challenge is The Moon and the Stars Challenge.  I used A Child's Year and Nursery Rhymes in CCR to make the pink girl and the moon shape.  I love her crown of stars!  The sentiment is Penny Black Eloquence Stamp set.  The pearl swirl is Want2Scrap, ribbon is Stampin' Up, Solid Glittered papers is The Robin's Nest Glitter Sorbet, large pink polka dot paper is Bella Boulevard, green paper is CTMH, and doily from Etsy.

Tuesday, August 13, 2013

A Place To Play and Learn

Here is a sneak peak at my project on the Art Glitter blog today.  Love the book recycle and "Roledex" feel!  Take a look at all the details here.
Supply List
Art Glitter Ultrafine Opaque 234 Turquoise
Art Glitter Ultrafine Opaque 18 Purple
Art Glitter Ultrafine Pearlescent 18 Purple
Art Glitter D56 Dragonfly Dazzlers
Art Glitter Designer Dries Clear Adhesive
Art Glitter Ultrafine Tip
Art Glitter Sticky Tape
Art Glitter Transparency Sheet
Art Glitter Permanent Ink
Want2Scrap Rhinestones 72 Navy Blue
Want2Scrap Designer Embellies ATC Tags-Chipboard
Piccolo Vintage Copper Enamel Powder
Piccolo Enamel Powder Adhesive
K & Company Adison Blue Garden Swirl Paper
K &Company Chipboard letters
Book
Stampin' Up Doily Die
Inkadinkado Morphic Bugs Stamp Set
Tim Holtz Embossing folder
Chipboard letters (Joanns)


Tuesday, August 6, 2013

Is it Flag Day Yet?

Family legend says my Mother hung the flag on the first day of school.  I don't believe she was celebrating the first day of school as a national holiday, I think it just fell on flag day and my Mother was teased about it. Maybe having 11 children go back to school was a national holiday to her!  It is a happy day and a sad one at the same time.  I cut the scalloped rectangle with Cricut CTMH Artiste.
Today I am sharing my back to school page this year and entering into Bitten By the Bug's School Bus Challenge.
I used Locker Talk for the bus and A Child's Year for the Mother and Child and welded them in CCR.  Paper and title are DCWV and number stickers are Basic Grey.

Monday, August 5, 2013

I Keep Going in Circles

I keep scrapping in circles!  If fact, if you follow my blog you may have noticed a circle obsession.  I have a Pinterest board of scrap booking pages and it is filled with circle pages, and if you are circle obsessed, you can find it here.  Now if that doesn't get your creative mind spinning, I don't know what will!

And today I am sharing a page I created inspired by a Catherine Lane layout with Graphic 45 paper (see Catherine's layout above).  I love all of Catherine's work and follow her blog and FB page! I can't get over her use of multiple prints and how well they all work together!
For my layout, I used paper from my scrap stash and cut the snowflake with Cricut's Winter Lace. I cut the circle with my Cricut using George, and then cut it in half. Along with the circle in the Cricut cut, I added a circular journal stamp, and a Fancy Pants embellishment with a circle.

Supply List
Please excuse some of my guesses as this is from my scrap stash!
October Afternoon Falling Snow (candy cane stripe base paper)
Basic Grey (green square on top of candy stripe)
K & Company Paper (Green cathedral window horizontal stripe paper)
K & Company flower stickers
Creative Memories (blue print vertical stripe)
DCWV sticky back 24" x 12" paper (light candy cane stripe vertical)
white card stock
Fancy Pants Circle Frame
Journaling Stamp 


Thursday, August 1, 2013

In for a Penny in for a Pound: More with Penny Black


I played a little more with Penny Black and my Copic Markers today.  Here is the same Penny Black Sweet Dahlia Cling Stamp in yellow and red.  I think the red is my favorite!  I needed two birthday cards so, I hand wrote a Happy Birthday border around one of the stamps and stamped another with Pink By Design stamps.  Which one do you like best, red, yellow or purple?

LinkWithin

Related Posts with Thumbnails