background

Sunday, June 21, 2020

Doodling to Get a Finished Look


I have had Anna Griffin's Nifty Nested Layers in the stash for some time, and this week I was inspired to get them out by a challenge on the Friends Who Love Anna Griffin Facebook group.  At first, I struggled with how to use this blue and cream with my stash of blue and cream.   So, I got on Pinterest and searched the color combo.  I found an oriental rug with the light blue, and cream and pops of dark navy.  So, I had my color inspiration, but I needed to tie everything together.  

I got out a Copic marker and a Cricut fine tip marker and began to doodle with them to finish the page.  I made straight lines around the edge of the doily to get the look of embroidery.  I then used the Copic marker around the edge of a cream flower.  I added some pearl embellishments, Anna Griffin butterflies and a bird, and a title cut with the Cricut.

Some other tips I used to make this page more polished:  I cut the inside of the back ground paper out and carefully centered the motif inside the Nifty Nested layer doily.  I also matted the photo in blue and gold to draw the eye to it.  To keep the title from getting lost, I use metallic blue and cream.

Thursday, June 18, 2020

Border Die Does Double Duty for Lace with Anna Griffin


If you are like me, you love when you find more than one way to use a die!  Today, I am sharing a lace doily I made with an Anna Griffin border die and some fussy cutting.  Here's how to get the look:


  1. Cut a piece of white or cream card stock 5" x 12 and fold it in half length wise.
  2. Carefully tape the border die to the card stock, making sure the straight line of the die falls just outside the lengthwise fold.  This will create a mirrored image when the die is cut.
  3. Carefully remove the paper and the paper chads, and unfold the border strip.
  4. Carefully cut the die where indicated by the photo to create a row of hearts (see the pencil shading below).  I love that not only can I make a new motif, but it has hearts!
  5. Cut 3 heart strips following steps 1-4 above.
  6. Using glue dots, overlap the heart strips matching the leaf motifs.  Then back with contrasting paper and fussy cut.

Wednesday, June 17, 2020

Take Your Rosettes Up a Notch


I am addicted to easel cards and LOVE anything Anna Griffin!  This week I pulled out an Anna kit and made a card.  I wanted a bit of red on this beautiful yellow Anna Griffin Card and added the dramatic metallic oval center. It is Anna Griffin metallic paper embossed with an Anna Griffin folder.  It felt a bit heavy alone, so I pulled out a rosette I made a while ago and added it.  I am a bit of a rosette addict, so I share how I made this fun look!


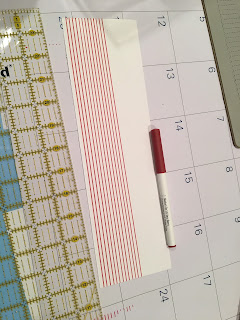
Using a clear ruler, white card stock and a red marker.  Draw red lines equal distance part along the length of the card stock.  Tape the paper to the die cut and run it through the die machine.  Glue the rosette and allow it to dry or cool.  I hold mine rosette in place while gluing using a Creative Memories circle cutter.  Then cut the rosette in half to place it behind the motif.  Below you can see a blue one I made too!  


Play with your markers to see which ones you like best.  This blue one was made with a Cricut medium tip marker.  The smaller striped  red one (left) below was also made with a Cricut Marker and the larger red stripe was made with a Copic marker (right).  This style of rosette is also fabulous for a Fourth of July project!


LinkWithin

Related Posts with Thumbnails