background

Monday, January 2, 2012

Birthday Card Inspired by Our Little Inspirations blog


I am so loving Pinterest! It gives me links to blogs by all sorts of talented artists. One I found recently was Our Little Inspirations. She made this beautiful card with an SU embossing template I already have that you can see here. I did not have the punch she used but decided instead to use a Heartfelt Creations stamp and die. I added some Art Glitter gala glitz to the center of my flowers and used less flower embellishments than the inspiration card. The original card was a sympathy card and I wanted mine to be more cheerful for a birthday. The sentiment on my card is CTMH.

Sunday, January 1, 2012

Redwork Inspired Card


Did you see the beautiful page on The Heartfelt Creations blog that looked like red work? I loved it so well, that when I won the Heartfelt Creations giveaway of $50.00 gift certificate I bought the Sunburst stamp set and matching dies! Of course, I have been back to the Heartfelt Creations site and can't find the photo to share with you. I can't figure out how to view older posts and it is not yet in the gallery. I did save it to my Pin Boards if you want to see the picture HERE.
I used the stamp set, with embossing powder and added some Art Glitter D25 Confection Dazzlers in the center of the image and a few circles on the bigger motifs. I wish you could see this in person, it looks so much better than in the photo. The sentiment is again Close to My Heart. The embossing folder was borrowed at a friends, and I think it was Sizzix. The red and white paper has been in the stash for so long, I couldn't tell you who it was from!
Well, after writing this post, it occurred to me that I did not yet make and send Heartfelt Creations a thank you card. Oh, well, the housework will wait and I will have a post for tomorrow too! Back to the craft room!

Saturday, December 31, 2011

Happy New Year: 2012


Thanks for stopping by my blog on New Years day! I like to wish all of my followers and visitors a Happy New Year!
Are you making resolutions? I haven't yet officially, but I'd like to post more in 2012. So let's get started.
This is a page I created for my last family Christmas card for 2012. Well, it's hard to tell for sure since my family is so large. I hope to get some more late! I used My Minds Eye paper, Creative Imaginations Die (Red and White die), My Minds Eye chipboard sticker, Sizzix dies (green glitter) and Joys of the Season (White Pointsettia). I glammed up the white Cricut cut by adding some Art Glitter Berry Red glitter in the center. Over the glitter, I placed some Robin's Nest Dew Drops. I love the glitter under the clear colored dew drops! On the edges of the poinsettia, I used Art Glitter D25 Confection Dazzlers. I can't get over how professional and store bought this embelly looks and I made it myself!
The border under the photo mat is a Martha Stewart boarder punch I used at my friends last crop. She had a business of hosting crops and has wonderful supplies and organizational skills. She no longer hosts paid events, but has friends over once in awhile. I attended her New Years Eve crop and made the page there. Thanks Bridgette!

Friday, December 30, 2011

Advent Calendar Completed on Time


Well I finished all seven of my Advent Calendars on time! I am just getting around to posting pictures today. Not sure if anyone really wanted the CCR files, so if you would like them, please leave a comment I will get them to you.
Here are some close ups of my days. The Bell and the snowflake are both cut with the Cricut.
The sled is from Joys of the season and I filled it with color on my Imagine with Snow Angel. The cone is made with a DieNamics die from My Favorite Things and rolled together and stapled to make a cone. I used a glue dot at the bottom, as the stapler wouldn't reach. The banner is CTMH Art Philosophy filled with Snow Angel image, enlarged and centered using CCR.
The frame is cut with Fancy Frames cart in brown card stock, with a white black out image. My sisters can add any photo they wish or a bible verse. The red label is Snow Angel.
The teal ornament is also Snow Angel. The triangle box is a freebie from Craft Secrets and can be found HERE. I just added sticky back velcro to the bottom of the box, so my sisters and fill it with goodies next year!
The file folder is Sizzix die. I think this could be used for another bible verse, or tickets!


The Snowman is Snow Angel cart. The purse is Imagine More Cards and I made it with lip gloss in mind. Everyone needs some Berts Bees or Chapstick, don't they? I loved that I could get 4 of these boxes with CCR in one sheet of paper! If I cut it on my Imagine alone, it will only fit one on a single page.
The rosette was made by printing out the Snow Angel "sweater" paper, and cutting it with Tim Holtz's Rosette die. If you have Ribbons and Rosettes you could try this too! I just got the cart after I finished this, and still need to find time to play! The Christmas day was made with free sheet music image I found on the internet and the poinsettia I did NOT make with my Cricut. There must be a cartridge you can use for this! Try searching in the CCR for a poinsettia! The dress is made with a Sizzix die. I sold most of my Sizzix dies when I purchase my Cricut, but kept this one, as I love fashion images!
I just realized while writing this post, that I never took a picture of the whole calendar with every piece. Will have to bug my sisters for a picture and post later! I did not make my families Christmas celebration as I was at my husband's families celebration. My sisters told me that when it was time to open presents, they all asked to open mine first. Guess I'm doing well with my $5.00 budget!

Tuesday, December 27, 2011

Challenge at Fantabulous Cricut #91


Tonight I worked on a Get Well card for my uncle and am submitting it to the Fantabulous Cricut Blogs, Challenge Me Monday #91: Tags. I used my Imagine and the Mystical Garden Cartridge. I pulled out this cartridge, because the patterns remind me of my father's neckties and it seems masculine. I made my tag with George, Basic Shapes and embossed it with the swirls Cuttlebug folder. The sentiment was printed on my home computer and the border was made with Martha Stewart's Iron Gate punch.

Monday, December 26, 2011

Black and White Christmas Elegance


When I saw the Case Study Challenge #70, I knew exactly what I wanted to do with it: scrap book my sisters Christmas card! The inspiration card from the Case Study challenge has such black and white elegance (2nd photo), with a touch of teal and my sisters card had the same color scheme! I made this my own, by adding the deep red to the color scheme, and love the results (top photo)!
To get started, I pulled out my Cricut Imagine and my Damask Decor cartridge and worked in the Cricut Craft Room to make a beautiful circular motif in the print only mode. I can get the look of the Teresa Collin's Black and White Cartridge, with the Damask Decor cartridge, the Imagine and CCR while I wait for the cartridge to fit into the budget. I then stamped some snowflakes with Gelatin Fancy Flakes - Big set around the Damask Decor image.
I loved the rosette inspired poinsettia I made for one of my Christmas cards and had to make another to go into a scrapbook! This one has another vintage button center, a beautiful glass button in black and gold! The rosette and the red paisley motif are both cut from The Robin's Nest Red Paisley paper.
The grey snowflake border is Martha Stewart Skyward Snowflake punch. I used the same punch to make the round snowflake at the top of the embellishments, just punching two of the sides opposite each other.
The teal and grey snowflake is Cricut When it's Cold Outside cartridge, embellished with The Robin's Nest Cotton Candy Dew Drops. The silver doily is Wilton. The back flower, with white details is a Stampin Up Rubon embellished with some rain drop stickers from Cloud9 Designs. I love this little folk art look!
The black and white stripe paper is Basic Grey. The teal polka dot stripe is made with Coordinations paper and the Cuttlebug Swiss dot folder.

Friday, December 23, 2011

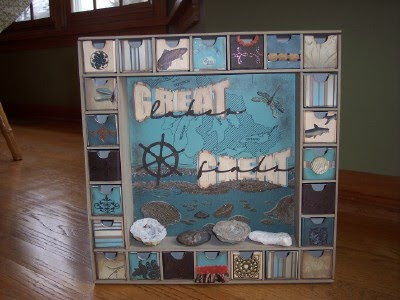
Great Lakes Great Finds Box


So much to share today: Another idea for those Advent calendars that did not get scrapped before Advent, and how to make fabulous titles with Word Art from Microsoft Word! Last year I purchased the Kaisercraft Advent Calendar and I finally finished it using beautiful papers from The Robin's Nest! This time instead of an Advent Calendar, I made a box for my boys rock collection! You might be able to pick some up an advent calendar on clearance the day after Christmas!
Every summer we visit Lake Michigan and the boys are always finding fossils and other rocks. If you make the Kaisercraft Advent Calendar I recommend you visit the Merly Impressions Blog HERE as the instructions on the Kaisercraft site were not helpful or detailed. I painted the box with acrylic paint and allowed it to dry. I used the assembly instructions found in the tutorial at the link above. For the drawer boxes you can find a list of all the beautiful Robin's Nest papers and embellishments at the bottom of this post.

Using The Robin's Nest Glitter Sea Shore paper I created the background for the inside square in the box. I trimmed off the glittered print at the bottom and trimmed the plain teal portion at the top, so that it measured 8 1/2" wide to fit through my printer. It is so trendy right now to have text and book like backgrounds on your pages. So, I found an image on the internet for free of the Great Lakes and printed it onto the top portion of the Glitter Sea Shorepaper. Be sure to make a test print on scrap paper first if you use this technique!
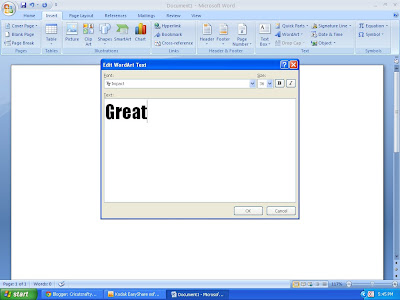
To make the title I used the Word Art in Microsoft Word. Here's how:
1) Open Microsoft Word and an empty document
2) Click on the Insert Tab at the Top of the screen.
3) Click on the Word Art Icon on the right hand sideChose the Word Art you want to use by clic
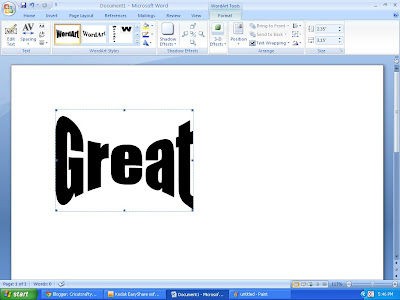
king on it. I wanted a word that was wider at the beginning and end of the word and narrow in the middle.

4) Chose the font you want and type your Text in the dialog box that appears and click OK


Above is how mine looked.
5) Drag to resize as desired


6) Print out this file if you have NO digital software that works with a cutter, for those of you with a cutter, skip to step 8
7) Temporarily adhere your printout to the paper you want to use in the center of the box and hand cut

8) If you have a cutter with digital software such as SCAL, Make the The Cutter or other, Hit the Print Screen button.
9) Open Paint software
10) Paste your screen print into the new paint document and save as a JPG image
11) Open your digitial cutter software and covert the JPG to the format used my your digital cutter. For SCAL2, this is click on the File menu and click Trace Image. Click Browse and select the photo you saved in step 10. Now you have your title! For the cursive font that says "Lakes" and "Finds" I used the Opposites Attract Cricut Cartridge and my Cricut DS software to weld the letters.
This box is great because you can place the bigger rocks on the shelf as pictured and limit your kids to smaller rocks to fit in the drawers. The Robin's Nest papers were perfect for a masculine box that even a Mom could love for her home decor!

Supplies Used
The Robin's Nest Glitter Sea Shore Paper (center of box)
The Robin's Nest Calamity Jane Stripe (Stripe mat for title & on drawers)
The Robin's Nest Glitter Witch Accessories Paper (Chocolate Brown ships wheel, drawers & title)
The Robin's Nest Veranda Love/Stripe Paper
Making Memories Ribbon
Vintage button
Microsoft Word Software
SCAL or other cutting software (optional)
Ribbon (not sure as it has been in the stash for sooo long)
Art Glitter (on Dragonfly)


LinkWithin

Related Posts with Thumbnails