.JPG)

Wednesday, October 9, 2013
Falling Leaves Thanksgiving Page
Tuesday, October 8, 2013
Silver Wedding Page with Heartfelt Creations
.JPG)
Today, I am sharing another page I submitted for the Heartfelt Creations Design Team try out. I didn't make the semi finals, but thought you might like to see this page. Sure hope you like it!
Supplies
Heartfelt Creations HCPC 3301 Hydreangea/Posy Branch PreCut Set (sentiment You're one in a million)
Heartfelt Creations HCPC 3301 Posy Patch Flowers PreCut Set
Heartfelt Creations HCD 701 Posy Patch Diecuts
Heartfelt Creations HCPC 2241 Innoscents Flowers PreCut Set (stamped on fabric flowers)
Nestabilities Blossom 2 (Used to cut fabric flowers)
Heartfelt Creations HCPC Delicate Twining Asters Set
Heartfelt Creations HCD 726 Delicate Asters Die
Heartfelt Creations HCD 728 Timeless Amour Die
Heartfelt Creations HCD 708 Decorative Window Die (used to create black swirls with silver pen around frame)
Heartfelt Creations HCPC 3375 Flora Grande 1
Heartfelt Creations HCPC 3374 Flora Grand 2
Nestabilities Blossom 3
Digital Cutter such as Cricut or Silhouette
My Minds Eye Lost & Found Paper
Delish Black printed Card stock
Silver Card Stock
Black Card Stock
Silver Glitter pen
Want2Scrap Navy Rhinestones
Want2Scrap Silver Pearls
Martha Stewart Rhinestones
Jolee's Botique White Dots Cabochons
Organza ribbon
K & Company Teal paper from Addison Collection (behind trellis heart shapes)
Ivory Organza Fabric
To get the look of this beautiful page just follow these instructions: Using silver card stock, cut 6 trellis heart motifs using the Heartfelt Creations Timeless Amour Die. Cut circle from a second sheet of the silver card stock and thread with ribbon and tie. Place teal paper behind the trellis hearts and mat inside the circle. Mat on black card stock. Cut two Decorative Window dies in black card stock and clip apart to form vines for flowers, doodle with a silver gel pen.
.JPG)
Create the largest flower using Heartfelt Creations Flora Grand Sets one and two (I believe these sets are retired, but I have been a fan of HC that long) on coffee filters already inked in blue and cut with Nestabilities Blossom 3. To get the best shape, clip to the center and curl edges around an artist paint brush handle. Fill flower center with Want2Scrap silver pearls. Create more flowers using the Heartfelt Creations Posy Patch Flowers and DelicateAsters Sets. Stamp label fussy cut from paper with sentiment from Hydrangea Posy Branch set (You're One in a million) paper already says "Perfect for me." Cut dotted stripe from printed paper. Crop photo into circle and tuck under edges of HC die cuts. Stamp the organza fabric with Heartfelt Creations Innocents Flowers Precut set, cut flowers with Nestabilities blossom Die, clip petals into the center. Place a clear glue dot in the center of the organza flower and crumple to create an unopened flower. I love that I can cut fabric with HC dies!
Monday, October 7, 2013
Gaming Boy Birthday Thank You Card
.JPG)
Saturday, October 5, 2013
Crazy for Creative Memories and Cricut Blog Hop
.JPG)
One of my scrap booking friends is a Creative Memories consultant and I have heard from her that the company is not doing well and will soon reemerge with a new name and some major change in their product line. I began a quest in August to purchase any of the Creative Memories Cricut Cartridges on my with list and wanted to share with others the cuts I love on them. So, I hope this small blog hop shows you what lovely images these carts have and maybe some ideas for using them!


And what's a hop without a prize?! So, I am giving away the following Cricut Expression or Cake Machine Dust Cover (NO machine included) with free shipping to US and Canada for the winner. To be entered to win, please leave a comment below with a way to reach you via email. To help protect your email from spam, leave the address in the following format "ssmith at hotmail dot com." Thanks for joining us on the hop!
The next stop on the hop is Alicia's blog: Golden Goddess Designs!
Blog Hop Line up:
Cricutcraftyclare- by Clare Dempsey (you are here)
Golden Goddess Designs by Alicia Bryant
Scrappin' My Stress Away by Lori Johnson Apgar
S.C.R.A.P. Guild of Northern IL by Clare Dempsey
Monday, September 30, 2013
Capture the Beauty of Autumn

This month Art Glitter is teaming up with Dreamweaver Stencils. Art Glitter is offering 20% off retail for $25 purchase is good with the code DW20 at their online store.

Supply List
Art Glitter 343 Chestnut Ultrafine Opaque GlitterArt Glitter 110 Taupe Ultrafine Opaque Glitter
Art Glitter 56 Pumpkin Ultrafine Opaque Glitter
Art Glitter 92 Bananan Ultrafine Tranparent Glitter
Art Glitter 280 Lime Rind Ultrafine Opaque Glitter
Art Glitter 79 Black Ultrafine Opaque Glitter
Art Glitter 85 Crystal ULltrafine Transparent Glitter
Art Glitter Designer Dries Clear Glue
Dreamweaver Metallic Gold Embossing Paste (leaves)
Dreamweaver LG 616 Leaf Texture Stencil
Dreamweaver Palette Knife
Dreamweaver LM2010 Paste Spreader
Dreamweaver Homemade Hawaiian Soap
Dreamweaver Stencils- "Autumn"-LM 295
Dreamweaver Double-sided Mounting Paper
Dreamweaver Metallic Fix 11 Ivy Garden
Dreamweaver Metallic Fix 02 Amber Glow
Dreamweaver Metallic Fix 15 Kimono Red
Basic Grey Take Note Journaling Card with Transparencies
Basic Grey Origins Authentic paper
Basic Grey Origins Revitalize paper
Cricut George Basic Shapes Cartridge
Cricut Art Nouveau Cartridge
Cricut CTMH Artist Cartridge
Cricut Craft Room Software
Flower bling
Yellow Card Stock
Black Card Stock
White Card Stock
Brown Card Stock
Clare Dempsey made this fabulous page to celebrate a niece's wedding using Art Glitter and Dreamweaver products to capture the beauty of Autumn! Clare started by using the Dreamweaver Leaf Texture template with Dreamweaver Embossing paste. To get the ombre look she mixed the Gold embossing past with the Amber Glow Metallic Fix and spread it over roughly half of the leaf stencil. She then mixed the Gold embossing paste with the Kimono Red Metallic fix and spread this over the half of the stencil not yet filled. Once the stencil was filled she sprinkled the Ivy Garden powder ONLY on the right half of the stencil (Clare says to be sure to do this while paste is still wet!) and allowed this to dry overnight. In the morning, Clare used a Swiffer cloth to buff off the excess green metallic paste. Clare then trimmed the card stock and cut the piece in half to make a border strip. By slipping the border strip under the circular die cut, no one can see that Clare had some missing leaves on the border strip and that it has a seam!
.JPG)
.JPG)
For the Autumn title Clare used the Dreamweaver double sided mounting paper and cut the frame with the Cricut. To make the application of the Art Glitter neat and accurate, Clare set the blade depth to a 3 and cut ONLY the inside line of the ribbon frame. She then set the blade depth back to a 6 and cut the outside layer of the frame all the way through the double sided mounting tape. Clare carefully pealed up the outside top layer ONLY and applied the Art Glitter with a fine tipped dry brush (see photo below). Maybe it is the painter in Clare, but she likes the control a brush gives her when applying the glitter. She says to use a dry brush and to clean the brush off between colors on some scrap fabric. See how Clare also soaped up the back of the Dreamweaver template and taped it in place before removing the center portion?
.JPG)
.JPG)
Clare flipped down the template and painted the word Autumn in Art Glitter. She carefully cleaned off excess glitter on the template, her hands and her work station and then flipped up the template to apply the white glitter. For the bottom portion of the title "Wedding", Clare cut the title using the Dreamweaver double sided mounting paper, a heavy duty blade, and the Cricut CTMH Artiste Cartridge. She used the dry paint brush technique for applying the different colors again. She then matted it on white paper and hand cut the offset white area.
.JPG)

Wednesday, September 25, 2013
1st Communion Page

Supply List
Heartfelt Creations HCPC Large Elegant Word Background Pre Cut Set
Heartfelt Creations HCD 730 Decorative Butterfly Corner Die
Heartfelt Creations HCPC Cross and Lilies Pre Cut Set
Heartfelt Creations HCPC 3439 Flirty Fleurs Pre Cut Set (flowered legs and arms of cross)
Heartfelt Creations HCPC 3301 Posy Patch Flowers PreCut Set
Heartfelt Creations HCD 701 Posy Patch Diecuts
Art Glitter Designer Dries Clear Adhesive
Green polka dot printed paper
White Card Stock
Yellow Card Stock
Blue patterned paper
Cricut Creative Memories Holiday Frames and Tags cartridge
Cricut Inspired Heart cartridge
Gold Stickles
Copic Markers in yellows, violets and blues
Momento black ink
Gold Card stock
Foam tape or dots


Here is how I made this cross: On white card stock (12 x 12) mark where you want the arms and center of the cross of fall and stamp with Heartfelt Creations Flirty Flowers Sprig. Stamp and cut Posies to match using HC Heartfelt Creations HCPC 3301 Posy Patch Flowers PreCut Set and
Heartfelt Creations HCD 701 Posy Patch Diecuts. Color with Copic or other markers and cut around stamped sprig, leaving white in the center for attaching smaller cross. Use Art Glitter Dries Clear glue to add Art Glitter Gold Gala Glitz to the center of the posies. Attach to the cross arms and legs. Stamp two smaller crosses using Heartfelt Creations Cross and Lillie set, color and cut up one cross to use flowers with dimension. Embellish the center stamp details with gold Stickles and be sure to allow to dry before touching! Mat on gold card stock and place in the center of the cross using foam tape or pop dots. Cut two each of the large and small corner butterfly dies from Heartfelt creations in white card stock. Use the two smaller corners on the top of the cross, and the larger corners in the bottom of the cross. Cut title using Cricut and mat on yellow card stock. Cut photo frame with Cricut and mat photo. Assemble page.
.JPG)
.JPG)
Thursday, September 19, 2013
Stamp Organization
.JPG)
.JPG)
.JPG)
I first found Heartfelt Creations an a local Scrapbook Expo, and loved their products! I love using their stamps and dies to make my own embellishments and to set my pages apart from the sticker scrapbook page! Below you can see a page I made with one of my favorite HC dies. It is actually a window that I cut apart to make a shamrock. Be sure to check out Heartfelt Creations for their beautiful stamps
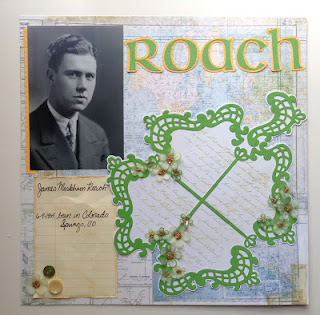 and matching dies!

Subscribe to:
Posts (Atom)