background

Monday, November 30, 2009

Another Gypsy Give Away at The Gypsy Spot


Just stumbled upon this give away, but move quick! The drawing is December 1st. Also, this looks like an interesting blog about the Gypsy...
Here is the link.

Friday, November 27, 2009

SVG version of Lace Edged Circle

Ok, here is a SVG version of the file below...a big thanks to Michelle Bowley for help converting the jpg to svg for me. Also, if you can give me some tips, maybe I can figure it out myself and next time post the svg. I converted my jpg into a bmp in paint, then opened it in Inkscape. When I scanned it in Inkscape, I have a mass of dots around the edges of the file. I did not know how to delete them en mass and some overlapped the image. So, not sure if I need to take a better photo, do something different in conversion, or in Inkscape (maybe my scan settings are wrong?).

Wednesday, November 25, 2009

Fancy Circle SCAL 2 Version Cut file to share


Happy Thanksgiving!
I am so thankful for my family on every Thanksgiving. This year, I am also so thankful for my Cricut, my blog, my sewing machine and my scraping friends, both online and here at home. So, here is my file to share today. I am going to use it to scrapbook a photo from my Mom and Dad's wedding. Do you realize, I have only a digital copy? I think it's time if was scrapbooked or framed.
I think this version more closely resembles the inspiration page from Memory Makers below. The design is from a font called PC ornaments. I think I am getting the hang of this program, now if only I could get Inkscape!
Please leave a comment if you download the file. Please don't share the file, but ask friends to visit my blog to download and don't sell my files or use them in items you sell.
Here is the file.

Sunday, November 22, 2009

Fleur de Lis Circle Cut file to share


Saw a picture Memory Makers March/April 2008 that inspired me to make a cut file. The patterned paper is by Hambly and the page is by Melanie Coombers in England. Here is the inspiration, and below if the screen capture of the cut file.
Here is the link for the file. You will need George and Accent Essentials for this file. Please be sure to leave a note of encouragement if you download. Ok, that photos is so bad, I cut the file, but I added a circle to the center after I saved it above. So if you want my look in blue, add a circle in the center.

Also, want to have a file swap inspired by my cut file? Wouldn't this idea be great for other shapes, besides the fleur de lis? Well make your own, then leave me a comment on where to find the cut file. Thanks! Lets have some SCAL users try this too! I would love to know how to get these items exactly 22.5 degree apart. Wish I lived close to Penny Duncan!
Don't know how to make this look? Use the instructions in my archived posts for making a snowflake, only divide 360 degrees by the number of shape you want. In the case above each fleur is 22.5 degree apart. Then place a circle in the center.

Saturday, November 21, 2009

Repetition with SCAL finished page


So, here is my finished page with the file from the last post. I love the vintage look to the page. I stamped the green and white snowflake and embossed it. The bling in the middle of the "O" is the sparkle burst brad from Karen Foster. And the time piece, oh, I wish I could tell you where to get it! I got it as a sample when I worked as an assistant fashion directory back in the 1990's. I have held onto it for years, because I loved it. I finally found a spot for it. Here on this page, it reminds me of how quickly time passes, my nieces and nephew in this photo are now taller than me!
Do you see how I stamped an image and created the lace paper to match. Repetition with SCAL, give it a try.

SCAL idea to try


I am going to an all day crop today and I so happy to go! I worked with my SCAL this week and had two ideas that I thought worthy of recommending other SCAL users try. Here is my first one to share. Check back later for my finished page and 2nd idea...
Repetition of a design
I love clear acrylic stamps, especially Close to My Heart. I also love to repeat a design or motif when I scrap. I decided to work on learning to trace bit map images and started by making a lace paper inspired by my stamps. Here is how I did it:
1) Stamp the image in black ink on white paper
2) Take a photo of your image with your digital camera. To prevent reflections and get a nice rich black, hold a piece of white cardstock at the top of your image and aim your camera just above your stamped image on the white cardstock (perpendicular to stamped image), but including your stamped image.
3) Open your photo in Paint and save as a bmp
4) Open Inkscape and import your bmp file created above in step 3
5) Use the Trace bmp function in the Path menu
6) Save your svg
7) Open SCAL 2 and create your lace paper.
These images are copy writed, so don't share them! I am only using this to create a single page of paper for my own albums.

Sunday, November 15, 2009

Wedding Cakes with a Cricut!?


Have you seen this site? She uses a Cricut to cut the icing for Wedding Cakes. I know there are creative people out there, but I never would have thought...

Thursday, November 12, 2009

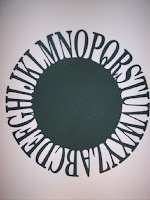
ABC Circle Cut file to share for SCAL 2 users


Oh, my gosh! So, excited and happy today about my latest cut file. I know, I am easily amused! One of my favorite blogs Clever Someday had a video tutorial a while back with how to create circular text, and I finally figured it out yesterday. Thanks so much Clever Someday! I have a different version of Microsoft Word and could not figure out how to use the steps she listed. So, I will add my how to's below for you new SCAL 2 users who might have the same version of Microsoft Office Word I do.
1) Open Microsoft Office Word
2) Click on the Insert Menu
3) Select the Word Art Icon
4) Choose a Word Art Style, I chose the curve in black.
5) In the Edit Word Art Text box, select your font style and size and type in your title or letters and click OK. In my case, I typed in A-Z.
6) Choose Change Shape from the tool bar mini menu (towards the center)
7) Select the Outline Circle
8) Stretch your Circle out by dragging from the handle in the lower right hand corner
9) Hit your Print Screen button
10) Open Paint
11) Paste in your screen capture
12) Select the edit square and draw a box around your text circle only
13) Hit Copy
14) Open a new Paint document (without saving the screen capture) and paste in your copied text circle
14) Save the file as a jpg
15) Open Scal 2 and Select the Trace from the file menu, select the jpg file saved in step 14
I added a circle in the middle and welded the two items to get my cut file. Here is the file, for those of you who would like it. Please leave me a note of encouragement if you download! Thanks!
I saw a cut file like this in a catalog, and knew that I could make it. When I saw Clever Somedays tutorial, I thought I would try it. I plan to use this in my boys school albums.

Sunday, November 8, 2009

Back Pack Cut file for storing report cards DS Version


Here is a version for DS, using George and Opposites attract. Please leave me a note of encouragement if you download the file. Thanks!

How to Accomodate the 3D Back Pack Pocket Page

Here is the side view of the back pack cut file above, I am using to store my sons report cards.
I promised I would share how I accommodate my 3 dimensional back pack cut file below in the spine of my scrapbook in my last post. Please find the instructions below. You can use this idea for other junky items you feel the need to scrapbook, or for other pocket pages. Some things I have used it to accommodate, are pocket pages for my children's first birthday, and baptism cards. I don't save every card, but one's that I wish I still had. So, cards from Grandparents and Aunts and Uncles on special occasions can be saved this way.

How to accommodate your 3 D backpack in a post bond album:

Supplies you will need
1) Post bound album
2) Spine shims or foam board (Get the Spine shims from Close to My Heart or make your own with Foam Board). Here is a picture of a spine shim I got a package of them at a garage sale for $0.25.

3) Post Extenders (Available at Michaels or from Close to My Heart)


Instructions:
1) Open your album at the back cover and flip up your post screw cover flap
2) Using a screwdriver, unscrew the screw holding your back flap on. SAVE THE SCREWS for reassembly!
3) Remove the back cover, and determine where you want your chunky 3 D item. I am putting mine as the last page in the album.
4) Screw in Post Extenders.

5) Place shims before the chunky 3 D page. If you have no shims, make a pattern on the foam board, using the margin of your page protector as a guide. Punch holes for the post. In this case I used three shims, to equal the thickness of my back pack page.

6) Put page, and album back cover into place
7) Screw album screws back into place and fold down flap.
Below is a picture of the sandwich I used in my spine from the side view.

Please feel free to leave me a post with questions. Thanks!

Tuesday, November 3, 2009

Back Pack Cut file for storing report cards SCAL 2 version


Just around the time I started my blog, I downloaded a file from the Cricut Message board to cut a paper back pack. This was created by an artist named Nancy. I love the detail she put into this bag, including the front pocket and the straps. It is one of my all time top five favorite cut files. If you like Nancy's work please visit her blog here and request the file. I used Nancy's file above to make end of year teacher appreciation gifts. Please note, I am not sharing the file above, just showing you how it inspired me! See my file below.

So, I thought on it a while and figured out a way to put her idea on my scrapbook pages. I knew I wanted to use it in my children's school albums, to store their report cards. I tried to make my first version with the DS, but kept getting the Red X error message. The first time in three years, but it lead me to my SCAL 2 again. I am very happy with my results and will share the files. Here are the photos of my version for a scrapbook page.
It is made from two cut files, the first has the back pack and the pocket flap. The second is the flap for the back pack and the pocket. I made the bottom wider, to make it look more back pack like. Here are some tips if you use my file:
1) Score the lines where I made the tabs parallele to the edges and then one quarter inch away, closer to the raw edge. This will give you a very generous gluing area.
2) Use a heavy duty tape like Terrifically Tacky Tape by PC.
3) Place some pop dots in the corners of the bag to keep it from flattening in your album, or use foam tape along the inside sides.
4) To help the flaps lay closed, place a self adhesive velcro dot under both flaps.<
5) Check back for my next post with tips on how I use foam board strips in the spine of my scrapbook, to accommodate this page in top loading albums.
The paper is Cloud Nine and the brass embellishment on the flap is Stampin' Up. You will need SCAL 2 for this cut file. Here is the link for Base and pocket flap
Here is the link for the pocket and the flap of the back pack

Sure Cuts A Lot 2 Give Away at SVGCuts.com


SVGCuts.com is having a drawing for Sure Cuts A Lot 2. Check it out at:
http://svgcuts.com/blog/?p=3769
Watch for some files I created using my SCAL 2 soon...I have a back pack for holding my children's report cards, and another snowflake.

LinkWithin

Related Posts with Thumbnails