background

Tuesday, August 31, 2010

Two for Tuesday: Your Story and Expression


Now that my boys are back in school, it is time to get the resume together and work on the Etsy stores! I have just finished up two covers I thought I would share this Tuesday. The first one is a cover for the Cricut Expression and or Cake Machine. I have had a wonderful response to this Michael Miller fabric and did not buy enough for customer requests! I recently went through the fabric stash and organized and realized, I could make another cover with the print in the flap. The pink tone on tone flourish fabric is from Hobby Lobby.

And my second cover is a custom order from Carrie at Greenbeancrafterole. I love her blog and work! She and I arranged a little swap and now I have a little of her work too! She is a big fan of pink and black skulls, and I have also made her two other covers in the same fabric (see photos below). I couldn't find my picture of the Expression cover I made her and actually had to visit her blog to copy it. I like how she cropped it. I will have to get out my Adobe photoshop a little more and play now that the boys are in school!

Carrie must have a beautiful craft room!

Monday, August 30, 2010

Swirlydoos Challenge at Scrapperlicious


I just finished my page for the Swirlydoos challenge at Scrapperlicious and I love it! Ok, my obsession with cobalt blue is showing! I have to give credit to some artist who inspired me here.
First, the page layout came from my new favorite sketch site: Beggahuna. A scrap book artist from Iceland. You have to visit this site, you will be inspired! Here is the original sketch from Beggahuna.

Second, Lollychops for inspiring me to get out my felt. She shared these amazing felt flowers made with circles and her Sizzix. Well, I tried the flowers and ended up with some left over circles. Like Lolly, I cannot throw away things without considering how to use them in a craft. So, I pondered on it and wanted to do something with my stash of eyelets. So, how about a little embellishment with eyelets and felt (see photo below)! Be sure if you do this that you back your felt with paper as the felt will stretch and your eyelets may fall out. You can also try to punch a hole one size smaller than your eyelet if you don't want to back your felt with paper. And I had to do a little hand embroidery, sweet! Notice I used the light blue embroidery floss? Too many whites in one page can make your whites look dirty, so use it sparingly and keep the same white paper. Lolly has also inspired me to get out my sewing and crochet needles and use them on my pages!
Like the inside scallop on the small circle picture? Yep, I finally got around to cutting the Gypsy file in my previous post! Other Cricut Carts used are the George, Basic Shapes for the circle frame, Gypsy Font for the title (see below) and Home Accents for the swirls.
The blue pearl brad is from Eyelet Outlet, the white lace paper I can't remember who is the source and will update the post when I find them! Almost all of the buttons are from Papertrey Ink. Oh, they had a beautiful booth at CHA!

Saturday, August 28, 2010

Basic Grey Challenge 27- Fabric


Another page for a Basic Grey Challenge # 27: Fabric. Here I used fabric covered buttons by Stampin Up. There is something about corduroy that speaks to me of back to school clothes (see picture below for close up of the button).
The paper is from the Urban Prairie Line, which I loved so much a bought two pads! I am also sharing the cut file for the Back to School title and you will need Locker Talk and Alphalicious to cut the file. Find the file HERE. See picture below for the close up of the cut file.
And no cut file for my second page, but I know many of us feel the need for a two page spread, so here is my layout for the second page.
I used the Mini Monograms scalloped square and fit it to page.
Here is my supply list:
Basic Grey Urban Prairie Weather Vane (swirly stripe)
Basic Grey Urban Prairie Hayfield (green floral)
Basic Grey Urban Prairie Bonnet (Pink & White floral background)
Basic Grey Urban Prairie Bountiful (Multi Pink floral background)
Queen and Co black flower
Stampin Up Buttons in Corduroy Pretty in Pink
Cloud Nine Design Rain Dot (at the points in the scalloped square and back of the bus)
Cricut Cartridges (Base Camp, Locker Talk, Alphalicious)
Jolee Button (turquoise and antique brass embellishment on yellow cardstock)
Want2Scrap pearl
Buttons
CTMH Stamp Serendipity (Circle of dots on yellow cardstock)
CTMH Stamp Treasures (Flower on yellow cardstock with pearl in center)
Recollections Rhinestone Stickers (pearls around the Jolee button on the yellow cardstock with stamped black dots)

Friday, August 27, 2010

A Fabric Drawing Friday!


You may know I am addicted to drawings...well today I thought I might share a contest with my fabric friends! Find this contest at Vintage Sheets! Visit their site and find out how to win the fabric pictured above, or a jelly roll of the fabric pictured above. What yummy fabric goodness!

Thursday, August 26, 2010

A New Favorite: Heartfelt Creations Stamps with Spellbinders


Last week I went to the Scrapbook Expo in St. Charles and spent way too much money! One of the items I splurged on was the Heartfelt Creations Stamps with Spellbinders. They had the most beautiful samples at their booth and you can find the on line at their website too! Look for their Gallery tab.
Now you know I don't buy many dies as an avid Cricut fan, but something about these dies that work with stamps appealed to me. Maybe it was the flowers, the bling in the center or the stamps. So here is how they work, you stamp with the Heartfelt Creations stamps, and color your image if desired. Then you carefully line up your stamped image with the die and run it through your die cutter. No hand trimming and the perfect cut!
I watched their video and would add the following tips for the new Heartfelt Creations user:
1) Stamp some practice images, and don't color them until you get the hang of lining this up in your machine.
2) Use the Scotch tape on your clothing first, before taping your die so it doesn't move (I got this tip from their video and it is important!).
3) Make the template as they suggest, and give your self an extra quarter of an inch one side. This will be the hinge side, where your tape will remain, as you remove your cut image. See the photo below with the wider white portion to the right, this is what I call my hinge side.

4) Run the scotch tape over both ends of your template for more precise cuts. Be sure to allow this extra room when stamping.
5) Have a piercing tool or tweezers handy to gently poke your cut image out of the die after cutting.
6) Move your die around the plate to get the best ware on your plate in your die cutter.
7) Use the Gala Glitz to Bling it up and finish it off!

The top card used the following supplies:
Hearfelt Creations Posy Patch Flowers Pre Cut Set
CTMH Best Wishes Stamp, Hollyhock ink to color flowers
Creative Memories Cricut Reminisce Accents Cartridge
Basic Grey Eva Papers
Spellbinders Custom Die Template for Heartfelt Creations
Bottom Card
All of the same supplies and
Hearfelt Creations Posy Boquet PreCut Set

Wednesday, August 18, 2010

Inside Scalloped Tutorial for DS and Gypsy


I get email notices daily from Oh My Crafts and loved the page layout in todays add. It inspired me to make a cut file for the inside scalloped circle. Today I am sharing a tutorial on how to get inside scallops on a circle in your Cricut DS software and with a little adaption you can also make one for your Gypsy. You will need the Graphically Speaking cartridge and the George Basic Shapes Cartridge to be able to cut this file.
1) Start by selecting Graphically Speaking as your active cartridge, and insert the square with the circle of dots.

2) Now copy the shape and Paste (go immediately to step 3 while shape pasted in is selected).
3) Click in the Shape Properties dialog box and type in the Rotation 33.8. I knew it should be close to 30 degrees and played around with is a bit until I got the circles to just over lap. Your mat should now look like the picture below.

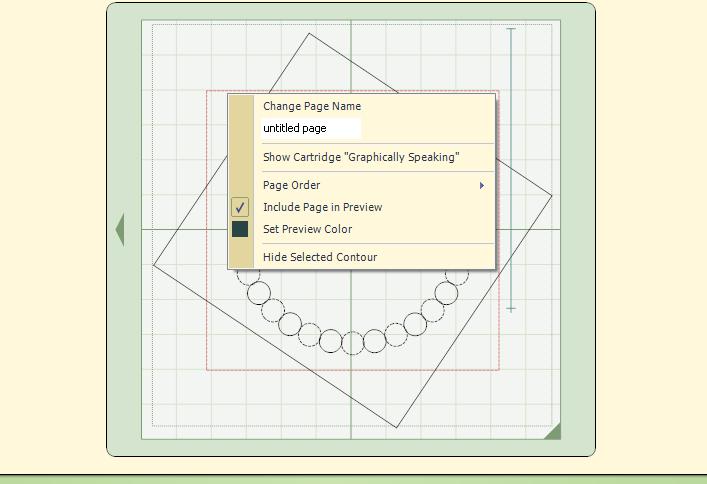
4) Select the outside edge of the original shapes square and right click
5) In the drop down box pictured below, select the Hide Select Contour

6) Save the file and quit the file, so that you can Hide Select Contour on your copied shape.
7) Reopen the file and repeat steps 4 and 5 on the outside edge of the rotated square
8) Select Weld for both of the shapes above
9) Change the active cartridge to George Basic Shapes and select the Shift Lock and Outline font icon
10) Insert the circle outline shape, and select Weld
11) Size and position the outline circle so that the inside edge falls in the center of your ring of scallop circles, and the outside edge falls outside the scallop circles as pictured below.

12) Check to see the file will cut as desired with the Preview
Now, have I got you thinking about making scallops inside your other shapes?! I know some of you will want to try this technique, and others will want the cut file. I wish I had more time for all my ideas and appreciate when others share their files, so, here is the Gypsy cut file. Your comments are appreciated! Thanks!

Tuesday, August 17, 2010

Cricut Spatual Tips and a New & Improved Scrapbag!


There is something about that Cricut Spatula that I find so appealing! I think it is sooo cute! I actually have 2, one for my scraping space at home and one in the crop tool tote. It is one of those tools I believe every scrapper should have two of. But I am forever losing it in my scrap room.
At bedtime last night, I was wondering how I might improve my scrapbag. It is my best seller at crops, but gets little notice at the Etsy shop. So, how to make it appealing to my online customers? Well, how about adding a place to hang your spatula? This way you will never lose it again! And if you don't use the Cricut, you can hang your scissors!

Here's my tip for cleaning your spatula: the Magic Eraser. I love my Magic eraser and realized that it would be the perfect thing for cleaning off my spatula with NO chemicals! Here is my dirty spatula before.
Just get it wet (as usuall) and scrub off the spatula. And here it is, all clean and new looking.

LinkWithin

Related Posts with Thumbnails