background
Tuesday, August 31, 2010
Two for Tuesday: Your Story and Expression
Now that my boys are back in school, it is time to get the resume together and work on the Etsy stores! I have just finished up two covers I thought I would share this Tuesday. The first one is a cover for the Cricut Expression and or Cake Machine. I have had a wonderful response to this Michael Miller fabric and did not buy enough for customer requests! I recently went through the fabric stash and organized and realized, I could make another cover with the print in the flap. The pink tone on tone flourish fabric is from Hobby Lobby.
And my second cover is a custom order from Carrie at Greenbeancrafterole. I love her blog and work! She and I arranged a little swap and now I have a little of her work too! She is a big fan of pink and black skulls, and I have also made her two other covers in the same fabric (see photos below). I couldn't find my picture of the Expression cover I made her and actually had to visit her blog to copy it. I like how she cropped it. I will have to get out my Adobe photoshop a little more and play now that the boys are in school!
Carrie must have a beautiful craft room!
Monday, August 30, 2010
Swirlydoos Challenge at Scrapperlicious
I just finished my page for the Swirlydoos challenge at Scrapperlicious and I love it! Ok, my obsession with cobalt blue is showing! I have to give credit to some artist who inspired me here.
First, the page layout came from my new favorite sketch site: Beggahuna. A scrap book artist from Iceland. You have to visit this site, you will be inspired! Here is the original sketch from Beggahuna.
Second, Lollychops for inspiring me to get out my felt. She shared these amazing felt flowers made with circles and her Sizzix. Well, I tried the flowers and ended up with some left over circles. Like Lolly, I cannot throw away things without considering how to use them in a craft. So, I pondered on it and wanted to do something with my stash of eyelets. So, how about a little embellishment with eyelets and felt (see photo below)! Be sure if you do this that you back your felt with paper as the felt will stretch and your eyelets may fall out. You can also try to punch a hole one size smaller than your eyelet if you don't want to back your felt with paper. And I had to do a little hand embroidery, sweet! Notice I used the light blue embroidery floss? Too many whites in one page can make your whites look dirty, so use it sparingly and keep the same white paper. Lolly has also inspired me to get out my sewing and crochet needles and use them on my pages!
Like the inside scallop on the small circle picture? Yep, I finally got around to cutting the Gypsy file in my previous post! Other Cricut Carts used are the George, Basic Shapes for the circle frame, Gypsy Font for the title (see below) and Home Accents for the swirls.
The blue pearl brad is from Eyelet Outlet, the white lace paper I can't remember who is the source and will update the post when I find them! Almost all of the buttons are from Papertrey Ink. Oh, they had a beautiful booth at CHA!
Saturday, August 28, 2010
Basic Grey Challenge 27- Fabric
Another page for a Basic Grey Challenge # 27: Fabric. Here I used fabric covered buttons by Stampin Up. There is something about corduroy that speaks to me of back to school clothes (see picture below for close up of the button).
The paper is from the Urban Prairie Line, which I loved so much a bought two pads! I am also sharing the cut file for the Back to School title and you will need Locker Talk and Alphalicious to cut the file. Find the file HERE. See picture below for the close up of the cut file.
And no cut file for my second page, but I know many of us feel the need for a two page spread, so here is my layout for the second page.
I used the Mini Monograms scalloped square and fit it to page.
Here is my supply list:
Basic Grey Urban Prairie Weather Vane (swirly stripe)
Basic Grey Urban Prairie Hayfield (green floral)
Basic Grey Urban Prairie Bonnet (Pink & White floral background)
Basic Grey Urban Prairie Bountiful (Multi Pink floral background)
Queen and Co black flower
Stampin Up Buttons in Corduroy Pretty in Pink
Cloud Nine Design Rain Dot (at the points in the scalloped square and back of the bus)
Cricut Cartridges (Base Camp, Locker Talk, Alphalicious)
Jolee Button (turquoise and antique brass embellishment on yellow cardstock)
Want2Scrap pearl
Buttons
CTMH Stamp Serendipity (Circle of dots on yellow cardstock)
CTMH Stamp Treasures (Flower on yellow cardstock with pearl in center)
Recollections Rhinestone Stickers (pearls around the Jolee button on the yellow cardstock with stamped black dots)
Friday, August 27, 2010
A Fabric Drawing Friday!
You may know I am addicted to drawings...well today I thought I might share a contest with my fabric friends! Find this contest at Vintage Sheets! Visit their site and find out how to win the fabric pictured above, or a jelly roll of the fabric pictured above. What yummy fabric goodness!
Thursday, August 26, 2010
A New Favorite: Heartfelt Creations Stamps with Spellbinders
Last week I went to the Scrapbook Expo in St. Charles and spent way too much money! One of the items I splurged on was the Heartfelt Creations Stamps with Spellbinders. They had the most beautiful samples at their booth and you can find the on line at their website too! Look for their Gallery tab.
Now you know I don't buy many dies as an avid Cricut fan, but something about these dies that work with stamps appealed to me. Maybe it was the flowers, the bling in the center or the stamps. So here is how they work, you stamp with the Heartfelt Creations stamps, and color your image if desired. Then you carefully line up your stamped image with the die and run it through your die cutter. No hand trimming and the perfect cut!
I watched their video and would add the following tips for the new Heartfelt Creations user:
1) Stamp some practice images, and don't color them until you get the hang of lining this up in your machine.
2) Use the Scotch tape on your clothing first, before taping your die so it doesn't move (I got this tip from their video and it is important!).
3) Make the template as they suggest, and give your self an extra quarter of an inch one side. This will be the hinge side, where your tape will remain, as you remove your cut image. See the photo below with the wider white portion to the right, this is what I call my hinge side.
4) Run the scotch tape over both ends of your template for more precise cuts. Be sure to allow this extra room when stamping.
5) Have a piercing tool or tweezers handy to gently poke your cut image out of the die after cutting.
6) Move your die around the plate to get the best ware on your plate in your die cutter.
7) Use the Gala Glitz to Bling it up and finish it off!
The top card used the following supplies:
Hearfelt Creations Posy Patch Flowers Pre Cut Set
CTMH Best Wishes Stamp, Hollyhock ink to color flowers
Creative Memories Cricut Reminisce Accents Cartridge
Basic Grey Eva Papers
Spellbinders Custom Die Template for Heartfelt Creations
Bottom Card
All of the same supplies and
Hearfelt Creations Posy Boquet PreCut Set
Wednesday, August 18, 2010
Inside Scalloped Tutorial for DS and Gypsy
I get email notices daily from Oh My Crafts and loved the page layout in todays add. It inspired me to make a cut file for the inside scalloped circle. Today I am sharing a tutorial on how to get inside scallops on a circle in your Cricut DS software and with a little adaption you can also make one for your Gypsy. You will need the Graphically Speaking cartridge and the George Basic Shapes Cartridge to be able to cut this file.
1) Start by selecting Graphically Speaking as your active cartridge, and insert the square with the circle of dots.
2) Now copy the shape and Paste (go immediately to step 3 while shape pasted in is selected).
3) Click in the Shape Properties dialog box and type in the Rotation 33.8. I knew it should be close to 30 degrees and played around with is a bit until I got the circles to just over lap. Your mat should now look like the picture below.
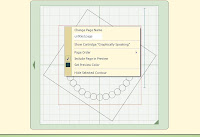
4) Select the outside edge of the original shapes square and right click
5) In the drop down box pictured below, select the Hide Select Contour
6) Save the file and quit the file, so that you can Hide Select Contour on your copied shape.
7) Reopen the file and repeat steps 4 and 5 on the outside edge of the rotated square
8) Select Weld for both of the shapes above
9) Change the active cartridge to George Basic Shapes and select the Shift Lock and Outline font icon
10) Insert the circle outline shape, and select Weld
11) Size and position the outline circle so that the inside edge falls in the center of your ring of scallop circles, and the outside edge falls outside the scallop circles as pictured below.
12) Check to see the file will cut as desired with the Preview
Now, have I got you thinking about making scallops inside your other shapes?! I know some of you will want to try this technique, and others will want the cut file. I wish I had more time for all my ideas and appreciate when others share their files, so, here is the Gypsy cut file. Your comments are appreciated! Thanks!
Tuesday, August 17, 2010
Cricut Spatual Tips and a New & Improved Scrapbag!
There is something about that Cricut Spatula that I find so appealing! I think it is sooo cute! I actually have 2, one for my scraping space at home and one in the crop tool tote. It is one of those tools I believe every scrapper should have two of. But I am forever losing it in my scrap room.
At bedtime last night, I was wondering how I might improve my scrapbag. It is my best seller at crops, but gets little notice at the Etsy shop. So, how to make it appealing to my online customers? Well, how about adding a place to hang your spatula? This way you will never lose it again! And if you don't use the Cricut, you can hang your scissors!
Here's my tip for cleaning your spatula: the Magic Eraser. I love my Magic eraser and realized that it would be the perfect thing for cleaning off my spatula with NO chemicals! Here is my dirty spatula before.
Just get it wet (as usuall) and scrub off the spatula. And here it is, all clean and new looking.
Sunday, August 15, 2010
Trendy Blog Award, Thanks Debbie's Scrapin Corner!
I am excited to say I won my second blog award, this one is from Debbie B. at Debbie's Scrapin Corner and is the Trendy Blog award! She posted that she gave me this award in the comments on my Do It, Did it post, and I am just getting to posting the blogs I would like to give this award to. Thanks Debbie! I love your blog too, and Frugal Fridays!
As part of this award I am to give the Trendy Blogger award to 10 other bloggers whom I think display their talent and time/effort on their trendy blog site. I am also to list 2 reasons why I started blogging and why I continue to blog. So,here are my answers:
1. The main reason I started blogging was to promote my Cricut dust covers, and to share cut files with fellow Cricut addicts!
2. The reasons I keep blogging are to promote my Etsy items, and I love the new online friends I have made! Your comments keep me posting and discovering new artists and ideas! Thanks for giving me an outlet and a community of of friends!
And can I just say that it is difficult to only choose 10 blogs to send this to! There are so many talented bloggers out there and I wanted to choose some new blogs since I sent out my last award! So, here are the blogs I would like to send the Trendy blog award to, in no particular order:
1) Mo's Addiction I love Maureen's scrap booking pages especially! Thanks for being a faithful commenter on my blog!
2) Greenbean's Crafterole I love Carrie's blog for all sorts of crafts, not just scrap booking and she has such an eye for beauty and simplicity!
3) Lolly Chops Lolly has a blog that you need to check out! She has all sorts of crafting ideas, with crocheting, purses, and scrap booking of course. You may not see her addy in my list of blogs I follow, but I subscribe to her posts so that I don't miss a thing!
4) Tammy Tadd, I love to watch Tammy's blog and visit her store for all of the latest fabric trends! She inspires me to keep sewing beautiful things and her sense of color is unmatched!
5) Hobbies & More I love Gabi's blog for trendy ideas in re purposing vintage items, paper crafting ideas and to practice reading in German!
6) We Will Always Have Paris I love this blog, for a little bit of everything, trendy mini albums and kits, recipes, good books, shopping and more. Another blog worthy of subscribe to posts!
7) Olive Juice Studios has wonderful unknown artists and their tutorials. The link works now. She has made it her mission to share new talent and tutorials, so trendy!
8) Images by Heather M Want to visit a SVG trendy blog? Well here it is! I love Heather's svg's!
9) Paper Pastimes of a Scrap booking Mimi I love the trendy colors and sketches at this blog!
10) Primitive Season Lots of shabby chic paper crafting goodness here!
Friday, August 13, 2010
Cuttlebug Challenge #96 I can Clearly See Glam!
I haven't had much time for challenges lately, but when I saw the Cuttlebug Challenge blog would have an acetate challenge, I knew I wanted to try. So, if I haven't convinced you to save all of your strawberry and salad packaging; look out, this post just might convince you to hoard them all!
I made the card above using the Basic Grey Urban Prairie, Bountiful paper and cut a window with the Storybook Cartridge. I doodled a little stitching with a glitter pen around my cut. I then used my strawberry packaging and ran it trough my Cuttlebug with my Harlequin plate (this one is by Stampin Up, but PC has a Harlequin folder too). After I ran it through the cuttlebug, I got out my Tim Holtz Alcohol Inks in Denim an Bottle (green) and applied them with the Tim Holtz applicator. Once that dried, I used my Stickles Turquoise at every intersection. You can see I took a break and took a photo (hand cramp).
I let this dry (see photo below) and tied a bow around the card.
So, excited about this find, I have to share. You may have noticed a suspicious absence of bows here. I am bow challenged, in fact, I have been stalking the Holidays with the Cricut Blog and leaving comments begging for a bow tutorial. I mean have you ever seen such perfect bows?! So, I found the fork bow tutorial and it is the perfect method for the perfect bow. You can find the Fork Bow tutorial at Stampin' With Di. But the size of this bow is too small, so I searched for my formal tableware for the salad fork to no avail, and realized I can make my own bow jig! I cut a simple piece of chipboard (a recycled cereal box). Oh, I know, I have recycle issues, but in this economy we have to save where we can, so we can spurge, where we can! Now, I will make a note of the size ribbon I used and the size bow I get and make a few more as needed.
Now one more tip about my card, how did I get my window cut right where I wanted it? I opened my Design Studio and used George to draw a rectangle for my A2 card front, then placed the window where I wanted it, and removed the temporary card front rectangle. Easy and perfectly placed with no card stock waste!
You're Gonna Love this Sale!
Your gonna love this sale! The Etsy Bloggers Anniversary sale!
Check out the mini Etsy's on the right hand side of my blog to see the Etsy Stores who are participating in the Etsy Bloggers Anniversary Sale! And, yes my stores are both running 10 percent off every item. Find my stores at www.scrapguild.etsy and www.scrapincovers.etsy. Look for the 12 x 12 heart paper at the scrapguild store!
Thursday, August 12, 2010
My Items to be Featured at Summer In Paris Retreat
I am so excited that I was asked to have some of my scrap bags for the flea market at the Summer in Paris Retreat! So, I have been sewing like a madwoman here. Korie, asked me for some Paris themed items and something in black and pink. Well, I checked my local shops and found the coordinating fabric to Korie's scrap bag.
It is also a Michael Miller Fabric, with dress forms! I also made a few with some Red and Black fabric I had with dress forms, dresses and great hats!
I found some pink and black in my stash, and wouldn't you know, it has the Cricut green! I made one up in green, just case the retreat has a Cricut fan!
All of the bags have the weight which hold them on your scraping table and can also be used as a pin cushion. The bag portion is removable (attached with velcro) for easy dumping and if desired washing. I have had these bags for sale at two crops and they are my best sellers. I have actually sold out of scrap bags before I finished setting up my booth. I hope they are well liked at the Summer in Paris Retreat! I wish I could be there, but it is a long way from Illinois! The price is fantastic and the classes look great! Thanks Korie!
Tuesday, August 10, 2010
Etsy August Featured Blogger
The Etsy Featured for August is Patch Diary. Patch has 3 Etsy stores and sells Jewerly, vintage items, and supplies. You can find her stores here: Patch First Shop Patch Vintage Shop Patch Supply Shop
I love the photo of the item above. I love the reflected light and the star in the saphire. Even the small bits of light reflected on the table are beautiful. I so need to work on my photography skills. You can find the pearl and saphire braclet pictured above here. If I did not have a paper crafting habit, I would have a jewerly habit!
Saturday, August 7, 2010
50th Birthday Card Idea
Crazy busy weekend, filled with kids parties, grown up parties and a boat trip on Lake Michigan! So, today I am sharing a birthday card I made for a friends 50th Birthday. First, I cut the flower using Straight from the Nest using the Sticker Paper from Sparkle N Sprinkle. Then I placed a lace fabric on top. I sprinkled it with white glitter, removed the lace and sprinkled it with aqua glitter. I saw this idea at CHA at the Sparkle N Sprinkle booth. Mine did not turn out as well as the example at the booth. But I did not have very dark glitter. I will try this again with darker glitter!
The fabulous is from Forever Young, the 50th is from Heritage. Love the 50th on Heritage! I added a stamped stem from Inkadinkado Wellspring, a Sparkle Burst Brad from Karen Foster, bling, glitter on the 50 with a glue pen, a little doodling, and happy from my CTHM letter H set.
Monday, August 2, 2010
I Did My Do It, Did It Kit at CHA!
A while back I did a swap with Korie from the We Will Always Have Paris' blog. I really wanted one of her Do It Did It Kits. Sometimes, to finance my craft habits, I swap with other artists. So, when I found Korie's blog and kit, I asked if she would mind a swap. She jumped on board and wrote a wonderful review of my products as soon as she got them. Of course, I wanted to write a review of my item from her, but needed pictures!
So, this weekend while at the CHA crop, I worked on my Do It Dit It Roledex. And I love it! Korie sent me the Roledex in the original box with the original cards. She also added assorted tabbed cards in the colors I requested to match my craft room, blue and green (3 shades of blue and 2 of the green). She suggested some titles for some of the tabs from which I could make my selection and printed them out as part of the kit. She also sent instructions on how to get started.
This kit was the perfect thing to take to a crop to get started. I just packed the kit, and added my matching, paper, embellishments, inks and stamp sets. I chose stamp sets, and embellishments based on my tab titles (created by Korie). For example, Korie you'll love this one...Vacation is made with my Stampin Up, Chic Boutique set. Don't you love the Eiffel Tower!? I also used this stamp set on my Sewing to Create card. I love dress forms!
Some of the other Tab cards I added are: Cut Files to Make and Party Ideas
I am looking forward to using this in my creative space and organizing myself in this fun way! Also, I have a secret obsession with planners and checking things off my to do list. I love that this has a Did It tab, and that I will have this visual record that I have completed something! You just might want to check out Kories blog, and her kits! And if you live in or around Harpers Ferry, WV you will want to check out her upcoming crop! Great price! Wish I were closer Korie!
Sunday, August 1, 2010
The Cricut Purse! Thanks Tammy at Creative Critters!
While visiting the CHA yesterday, I made sure I visited the Cricut booth first. And of course, I saw Tammy from Creative Critters Cricut Club, as I approached the booth. So, I had to introduce myself. While you may notice I follow a lot of blogs, I have a select few on my "Subscribe to Post list". Subscribe to post, allows me to get an automatic email notice every time a particular blog has a new post. Tammy's blog is on my subscribe to post list! And if you have not checked it out yet, you will want too!
She really liked my handbag, which I mentioned I made with my Cricut and I offered her the cut file. Turns out I made the Cricut DS version back in November and did not post it. I posted another version then and some instructions on assembly. She wanted to know what I made it with, just cereal boxes, since it was not a scrapbook, and contact paper, since I do not have a laminater. So, thanks Tammy for asking about my work and HERE is your cut file. You will need only George for this purse, and can find the supply list and assembly information here: http://cricutcraftyclare.blogspot.com/2009/12/purse-supply-list-crop-for-cure-link.html and http://cricutcraftyclare.blogspot.com/2009/12/preparing-pieces-for-assembly.html
Subscribe to:
Posts (Atom)