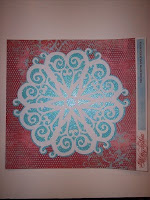
If you visit my blog regularly, you know I have been making a lot of snowflakes on DS. Perhaps it is my childhood memories of folding paper and cutting that make me desire to continue to see what I can make with my cartridges and the DS software. So, I thought some of you might like to know how to create your own. Here is my tutorial:
1) Start with a shape that is triangular or diamond.
2) I recommend that you make the shape as big as possible for intricate cuts, so set your object size to somewhere between 5 and 5 ½". Then select the shape. For this snowflake, I used the heart in the Storybook cartridge at 3 inches.

3) Place the first object at the center of the matt, so that the smallest point falls on or near the center of the matt.
4) Select the weld
5) Select copy
6) Select paste
7) Go to the Shape Properties Box and type 60 degrees into the Rotate box. This is assuming a 6 sided snowflake.

8) Pick the heart up at the move handle and move it so that the sides overlap just at the edge; and if your using the heart, the centers will need to be about 1" apart. If you use the Christmas tree shapes you will have to stretch the tree so that the side overlap from the point to bottom.

9) Select copy and paste again
10) Go to the Shape Properties Box and type in the degrees 120 (this is your original 60+60)

11) Pick the heart up at the move handle and move it so that the sides overlap just at the edge; and if your using the heart, the centers will need to be about 1" apart.

12) Select copy and paste again
13) Go to the Shape Properties Box and type in the degrees 180

14) Pick the heart up at the move handle and move it so that the sides overlap just at the edge; and if your using the heart, the centers will need to be about 1" apart. Your heart in this case, should mirror the heart you placed on top. You may have to do some fine adjusting with the hearts in between.

15) Select copy and paste again
16) Go to the Shape Properties Box and type in the degrees 240

17) Pick the heart up at the move handle and move it so that the sides overlap just at the edge; and if your using the heart, the centers will need to be about 1" apart and mirrors the hearts on the other side of center line of your matt.

18) Select copy and paste again
19) Go to the Shape Properties Box and type in the degrees 300

20) Save your file and do a preview to see your results.

So, take a look through your cartridges and give this a try. You will get a much better result than if you use our fold and cut technique from childhood. If you do give this a try I would love to see your results. Visit this Cricut message board post and leave me a picture or a screen capture! For those of you who are pressed for time, I am sharing my cut file. You will see that I added some circles in the center, so you will need Storybook and George for this cut file. Also, I made a shadow for this cut file. The first picture in this post is my cut file finished snowflake. For the shadow of the flake, I used some glittered paper, cut with my deep cut housing blade. I have found the deep cut blade best for my glitter and metallic cardstocks!

beautiful! so the center circle is using George?
ReplyDeleteduh - never mind, i see it in the last paragraph!
ReplyDeleteThank you so much for this Freebie. I want to let you know that I posted a link to your blog in Creative Busy Hands Cricut Freebies Search List, under the Elements post on Oct. 11, 2009. Thanks again.
ReplyDeleteAwesome instructions. I love the deep cut blade too.
ReplyDeleteWonderful instructions, I will have to give this a try.
ReplyDeleteTFS. I love your blog.
That is beautiful!
ReplyDeleteThank you! Your blog post will be advertised on the DigiFree Blog Cutting Freebie search engine today (look for timestamp: 31 Oct [LA 05:00pm, NY 07:00pm] - 01 Nov [UK 12:00am, OZ 11:00am] ).
ReplyDeleteThank you for several of your cut files.
ReplyDeleteI am getting ready to make my Gandbabies first year album and thought a couple of your files would be great. Her birthday is 1 week from today. Thanks again for sharing!!