background
Thursday, December 31, 2009
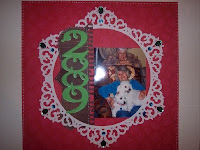
Fancy Daisy Edged Circle SVG to share
Here is an SVG to share of a fancy edge circle I made. This one again was made in SCAL 2 with PC Ornaments font. Please consider reading yesterday's post and making a donation to the Juvenile Diabetes Research Foundation. You will find information about a challenge I am sponsoring in the crop and how you could win a $40.00 gift certificate for my shop in the same post! If you do decide to participate, my challenge is number 19. As always, I love your comments! Thanks!
Find the file here.
Wednesday, December 30, 2009
Doiley Edge Circle Cut File to share inspired by Capadia
Just this last week Capadia Designs had a cut file and tutorial on making a doily edged circle with a crown. I just got my Hannah Montana Cartridge and wanted to try it. Here is my version, and a page I made with it!
Before I share my cut file, I want to take a few minutes to ask you to consider a donation to the Crop Out Diabetes online fundraiser, January 29 through February 5, 2010. My niece; who is 10 years old, was just diagnosed this past year. The holiday season was a very different one for our family. Who knew how important counting carbs could be!? How every snack brought into her class room may require checking sugar levels and or insulin doses? I still know so little about this disease, but I do know that it is serious, and life changing. I know of a college age boy who died this year, who had Juvenile Diabetes. It is the fear of every Mother whose child has diabetes.
I am holding a challenge for this crop, with a $40.00 gift certificate for my Etsy store as a prize. You only need to make a small donation of $5.00 or more to participate in any of the challenges. If you have been considering my covers and been put off by price or your budget, please consider making a donation and entering the challenge. Or maybe, you have downloaded a cut file, and looked for my tip button...I don't have one. Files are for sharing, but I would love a donation to a worthy cause as a thank you for my files! To find out more about the Crop Out Diabetes online fundraiser, please click on the links at the top and bottom of my blog or right here. You can find the cut file here. You will need Hannah Montana and George for this cut file. I will be going through my Gypsy and looking at all the crowns for this type of cut file again! Thanks Diane!
Wednesday, December 16, 2009
Cut File to Share: Teachers gift #3
Here is another teachers gift I made, you can find the cut file here. I don't know if you can read my hand writing but it says, "3 reasons I love to teach..." Then the pages of the book say, June, July and August. Funny, and true! I would love to have my summers off with my boys when I find a job!
You will need George, Base Camp, Plantin Schoolbook and Locker Talk. If you don't have the time to make this for Christmas, you could use it at the end of the year as a teacher appreciation gift.
Tuesday, December 15, 2009
My 1st Gypsy project: A Teachers Gift!
I just finished my first Gypsy Project, a mini album for my son's Kindergarden Teacher. Everything in the class room is frog themed. So, I knew I wanted to make a frog mini album. I can't believe I found this frog in the Lyrical Letters cartridge! Did you know he was there?! I did add the toes. I love the toes on tree frogs and so, I added circles from George. We speak of George at crops reverently, what would we do without George!
And here is another gift for the classroom aide...a Christmas recipe book. All the teachers get gift cards, but they seem so impersonal to me, that I like to make a little something. I don't bake, but I do scrap!
Monday, December 14, 2009
Fancy Circle file: Here's what I did!
A while back I shared a SCAL2 fancy laced edge circle cut file. It was my most popular file of 2009. I finally got around to scraping with it, and thought I would show you what I did with it.
My six sisters and I do a $5.00 gift exchange every year. It has become a challenge to see who can come up with the best bargain. This year, I think they will like my gift. A picture of our parents on their wedding day. Just one brother has the wedding album and the only copy of this picture. While most of us have digital copies. I thought they might like a framed copy.
So, I went a little over budget, but not more than $0.30! Hope my sisters are not reading the blog this week!
I used an acrylic frame from Want2Scrap, CTMH paper, and ink, Ink A Dink a Do stamps (on the Mom and Dad label), bling from Want2Scrap and CTMH.
If you would like to get this cut file, please see my older post here!
Friday, December 11, 2009
Preparing Pieces for Assembly
After cutting out your chipboard and paper you will want to follow the steps below before you assemble your purse:
Stamp your purse before moving to the next step. For this purse I pulled out my stitching stamps from Sassafrass Lass and made a scalloped boarder at the top. I used pink embossing powder to add dimension. Add pictures if desired.
Preparing Purse Pieces for assembly
1) Cover chipboard with paper using glue and aligning edges and holes. Allow to dry. Be sure you have stamped and added photos before proceeding to step 2!
2) Cut clear contact paper to the exact size of the outside front purse piece and adhere to both purse front pieces on the inside of purse. Use your Cricut spatula to smooth out bubbles, or a Pampered Chef brown scraper. Repeat on all pieces.
3) Cut two pieces of clear contact paper ½ ‘ bigger than the purse front on all sides. Miter the corners before folding and adhering.
Center over pattered paper and wrap around to the back. Smoothing out air bubbles as you work with a pampered chef brown scraper or your Cricut spatula. Repeat on all pieces.
4) Pierce contact paper with awl, anywhere hole punch or cut with craft knife in the holes cut with Cricut along sides. Repeat the same procedure for side pieces,placing the larger clear contact paper on the front and wrapping around to the back.
5) Attach purse feet to the bottom piece, placing them in from each corner 1 inch. If you cannot find the purse fee pictured at the right, you may substitute over sized brads.
6) Using your purse handle ends as guides, place your large eyelets in the front piece of the purse and the back piece of the purse at the top, centered in the handle end.
Thursday, December 10, 2009
Purse supply list & Crop for Cure Link
Ok, so here is the promised supply list:
Chipboard
Cricut Expression
Deep Cut Housing Blade
Solid Cardstock (for lining)
Patterned Cardstock (for outside of bag)
Purse Handle (Available at most JoAnn Fabrics or Michaels)
4 Eyelets
4 Rings
4 Purse feet (Available at most JoAnn Fabrics or Michaels)
Clear Contact Paper
Ribbon or Yarn
Zig 2 way Glue or Large Xyron Machine
Needle point needle or crochet hook
Scissors
Stamps (optional)
Ink and Embossing powder (optional)
Photos (optional)
Rhinestones (optional)
When you cut your chipboard, use the deep cut housing blade and a fresh mat. This will keep your cuts acurate and make them all the way through your chipboard.
Also, I want to provide a link here for the Crop Out For a Cure, a fundraiser for Juvenile Diabetes. I am planning on offering a challenge with a prize, so if you like my covers check it out! They have some wonderful sponsors and at least one Gypsy to give away. I will have more information on this event later, but if you want to check this out, make a donation or help find more information here. They will even have a crop in Wisconsin in January, but it is too far for me to attend:(
Wednesday, December 9, 2009
Purse Cut File to Share for SCAL2: An Inexpensive Gift
Here is one of my gift ideas to make on the cheap! I collected my cereal boxes for the chipboard. Used Basic Grey Paper, stamps, embossing powder, large eyelets, album rings, purse handles and feet (from JoAnn Fabrics with a coupon)and yarn. It's also a great way to use the paper you think is too pretty to cover with photos or to cut up for small cards. I fussy cut this paper to show off the peacock, and put my photos on the back of the handbag.
I learned how to make this purse from Melissa Johnson, a CTMH consultant. She always has the most wonderful tips in her classes. She used a Zutter to make the holes. I don't have a Zutter, but it occurred to me that I could make a cut file. Also, she used a ribbon with a whip stitch to sew the purse together. I used my crochet hook and some fringe yarn.
In order to not overwhelm you with a long post, I will be making several posts on this project. If you like this, download the file here today, and come back tomorrow for your supply list, then again, for the instructions. As usual, I request you leave your note of encouragement in the comments! Thanks!
Sunday, December 6, 2009
Christmas Tree Cut file to use with Legos to share
A while back Capadia Designs had a post on a Japanese company that is offering punches to work with Legos. I was so excited, and tried to see if we can purchase here in US. No luck yet, but I have children who love legos. So today we tried it make a Christmas tree with our Cricut. Of course, I made the mistake of creating the cut file while the boys played and by the time I got the holes correct on the big block pieces, they had moved on to another toy. So, here are my tips. If you want to make your own hole cut file, the holes on the 2 x 2 block work well on that block only. As I copied mine using the same placement for the 4 x 4 block and the 6 x 6 blocks, the spacing became too big and I spent lots of time, trying to get this to a workable cut file. It is still not perfect, however, it is good enough for my 5 and 10 years olds. Check out our results and if you like this imperfect cut file, find it here.
You will need George Basic Shapes for this one. Please leave me a post of encouragement if you download. Let me see your tree with a picture on the Cricut message boards. I think this would look great with white puff paint, bling, buttons, eyelets and more. I think I know what me and the boys will be doing for snow day crafts this year! Lego Cricut creations!
Friday, December 4, 2009
My Gypsy "Eye Glass Case"
The case that came with my Gypsy just seemed a little to much like a wet suit. So, I had an excuse to sew. Well, here is the eye glass case I made for my Gypsy and a little pull with ribbon and a vintage button for my stylus. I love vintage buttons! Been looking for a place to use this one, reminds be of an acorn. I looked through my stash and found something with black and pink. Not sure why PC chose orange to go with the pink and black and not green.
I cut this without a pattern and got a little over confident. Those of you who sew and have sewn two left legs know what I'm saying. Meant to cut the flap to extend over, but as I usually do, I decided to go with it and use it as an opportunity to embellish. Another item from the stash, a frog. Can you tell I used to work in fashion design?!
Thursday, December 3, 2009
What would you like to carry your Gypsy in?
Well, it's here! My DH has purchases a Gypsy for me for Christmas. So, of course I had to make sure it worked and apply for my $100 worth of cartridges. And as you may know about me, I had to make it clothes or should I say a handbag?
So, I wondered what would I like in my Gypsy cover. Well I want an "eye glass case" style. Like the one Cricut provides only cuter! And since I am a closet messy person, I am also a purse messy person. So, I want a velcro close flap on this case, so it does not fall out into my messy purse. Next one of the women on the Cricut boards mentioned she wants a pocket for extra stylus. Yes, I want that. This style is for running errands that require waiting. Doctors offices, school pickup, etc. Don't really need cords for this. Don't you think the stylus is calling for a beaded pull, or maybe a vintage button pull?
Now onto the purse style. This I want to use when I will be out of the house for a crop. So, it will need to hold the charging cord, and the connection to the cricut cord, and the Gypsy.
Do you have ideas of what you would like to see your Gypsy in? Let me know and I will use your suggestions to make my Etsy version. Anyone who leaves a comment, with your ideas will be entitled to free shipping on one item from my Etsy store. This item may be in stock, or ask me to issue you a coupon for a future purchase. Leave your contact info, if you are interested in my free shipping for your opinion offer. Thanks!
Subscribe to:
Posts (Atom)